SailPoint IdentityIQ Prod Architectures

IT infrastructure and operations are critical assets for businesses to function smoothly. Disaster recovery management involves planning and implementing strategies to ensure that an organization can quickly recover from disruptive events, such as natural disasters, cyberattacks or equipment failures. IT disaster recovery management is a way to save the business from negative consequences of these risks. 

Such scenarios can present a direct threat to business continuity and survival. The impact can be in the form of financial losses, operation disruptions, reputation loss, or even legal consequences.

This blog post discusses disaster recovery management and the best practices to adopt. 

Disaster recovery is the process by which an organization attempts to prevent or minimize the loss of business and data in the event of a disaster. It is about how an organization bounces back and regains normalcy after the catastrophic impact of such events. 

Disasters can have significant impacts on software systems, affecting both the functionality and security of applications.

  1. Data Loss: Disasters can lead to the loss of critical data, especially if proper backup systems are not in place.
  2. Downtime: Software systems may experience prolonged downtime, disrupting business operations and leading to financial losses.
  3. Security Breaches: Disasters can expose vulnerabilities, making systems more susceptible to cyberattacks and data breaches.
  4. Corrupted Data: Data corruption can occur during disasters, leading to inaccurate or unusable information.
  5. Service Disruptions: Essential services and applications may become unavailable, affecting users and customers.

For example, in 2024, OpenAI experienced a major outage due to a misconfiguration in their Kubernetes system, which disrupted key services like ChatGPT and Sora for several hours. This incident highlighted the importance of proper configuration management and disaster recovery planning.

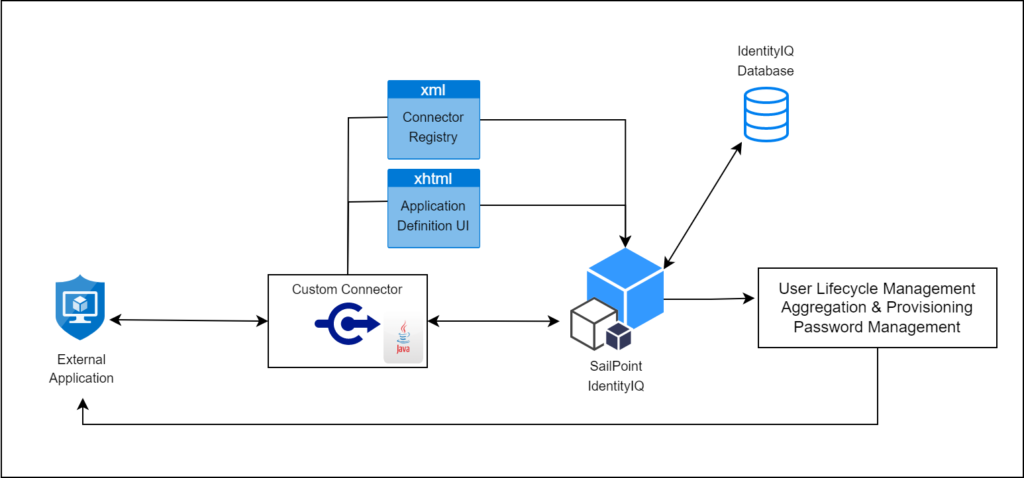
SailPoint Disaster recovery plan for business continuity. It refers to the processes and procedures to ensure the uninterrupted functioning of the business’s during and after a disruptive event.

The simple flow illustrates the DC-DR strategy.

Data Center-Disaster Recovery (DC-DR) architecture has several advantages.

  1. Business Continuity: Ensures that critical business operations can continue during and after a disaster, minimizing downtime.
  2. Data Protection: Provides robust data backup and recovery solutions, safeguarding against data loss.
  3. Compliance: Helps meet regulatory requirements for data protection and disaster recovery.
  4. Scalability: Can be scaled to accommodate growing business needs and data volumes.

This video explains the SailPoint IdentityIQ Production Architecture and business continuity plan strategies.

Prerequisites: (DC-DR works for all latest versions).

The below software’s are used by our ENH environment.

  1. SailPoint IIQ
  2. JDK
  3. Tomcat (any application servers).
  4. NGINX (Load Balancer)
  5. Database (Mysql)
  6. Linux (OS)

The Key points of Disaster recovery is Data Replication and Load balancing.

Steps – How database replication works:

  • Step 1: Identify the Primary Database (Source): A primary (or master) database is chosen as the main source of truth where data changes originate.
  • Step 2: Set Up Replica Databases (Targets): One or more replicas (or secondary databases) are configured to receive data from the primary database.
  • Step 3: Data Changes Captured: Any updates, inserts, or deletes in the primary database are recorded, typically through a transaction log or change data capture mechanism.
  • Step 4: Transmit Changes to Replicas: The captured changes are sent to replica databases over the network in real-time or at scheduled intervals.
  • Step 5: Apply Changes on Replicas: The replicas apply these updates to keep their data in sync with the primary database.

In an active-standby (or active-passive) load balancer setup, the primary load balancer (active) handles all the traffic under normal conditions, while the secondary load balancer (standby) remains on standby, ready to take over if the primary load balancer fails.

Steps – How Load balancers works.

  • Primary Load Balancer (Active):
    1. Actively manages and distributes incoming traffic to the servers in the primary data center (DC).
    2. Continuously monitors the health and performance of the servers and the network.
  • Secondary Load Balancer (Standby):
    1. Remains on standby, not handling any traffic under normal conditions.
    2. Regularly synchronizes with the primary load balancer to stay updated with the current state and configurations.
  • Failover Process:
    1. If the primary load balancer detects a failure or significant issue, it triggers the failover process.
    2. The secondary load balancer becomes active and starts handling the traffic, ensuring minimal disruption to services.
  • Failback Process:
    1. Once the primary load balancer is restored and verified to be fully operational, traffic can be redirected back.
    2. The secondary load balancer returns to standby mode, ready for any future failover events.

This setup ensures high availability and reliability by providing a backup load balancer that can quickly take over in case of a failure.

The following demo video is a deep dive demonstration of SailPoint Disaster recovery plan and failover configurations using our ENH environment.

NGINX (Load Balancer):

  1. Configure only UI servers in Load Balancer.
  2. Sticky Sessions: Configure the load balancer for sticky sessions (also known as session persistence) to ensure that user sessions are consistently routed to the same application server.
  3. We recommend active-standby (or active-passive) load balancer setup.

Database:

  1. Configure your database for replication to ensure high availability and disaster recovery. Use native database replication features like MySQL replication or Oracle Data Guard.
  2. Data base must be one phase commit.
  3. While replicating make sure only identityiq, identityiqah, identityiqPlugin are replicated.


Pass Through Authentication via Active Directory in SailPoint IdentityIQ

In today’s digital age, secure authentication is crucial for all kinds of organizations. Pass Through Authentication enables users to access resources seamlessly without the need for maintaining credentials in on-prem infrastructure. The user credentials are validated against the organization’s directory service such as Active Directory without the need to store credentials. PTA is used commonly in hybrid environments where organizations want control over authentication while integrating with cloud services. The diagram below depicts the process of Pass Through Authentication via Active Directory in SailPoint IdentityIQ.

Image: Pass Through Authentication via Active Directory

  1. A user requests to log in to an application, in our case, SailPoint.
  2. The application (SailPoint) secures the credentials by encrypting them.
  3. The login configuration is checked and found out to be Pass Through Authentication.
  4. The credentials are validated against Active Directory.
  5. After successful validation, the user is logged in.

⦁ Pass Through Authentication ensures the credentials are not stored, reducing the risk of exposure.
⦁ Simplifies user management by validating with a directory system like Active Directory.
⦁ Provides real-time authentication, ensuring accurate and up-to-date access control.
⦁ Offers seamless experience as users can log in to on-prem and cloud-based applications using the same credentials.

Let’s have a close look into Pass Through Authentication in below video.

In this video, a detailed demonstration on Pass Through Authentication via Active Directory and usecases like AD Birthright Provisioning are discussed.

SailPoint Identity Security Cloud Launcher and Launchpad

SailPoint Identity Security Cloud is a comprehensive Identity and Access Management (IAM) solution designed to help organizations manage user access to critical systems and applications efficiently and securely. Within IdentityNow, Launcher and Launchpad are key components that enhance user experience and streamline access management processes.

Launcher

Launcher is a feature within IdentityNow that allows users to manually initiate interactive processes related to access management. It is tied to entitlements and can be assigned to users through regular governance practices. Here’s how it works:

  • Manual Initiation: Users can manually start processes such as access requests, certifications, and reviews.
  • Entitlements: The launcher is linked to specific entitlements, ensuring that users have the appropriate permissions to initiate these processes.
  • Governance Integration: It integrates with IdentityNow’s governance framework, allowing for seamless management and oversight of access-related activities.

Launchpad

Launchpad is a centralized interface within IdentityNow that provides users with a single point of access to various identity management tasks and applications. It offers a user-friendly and intuitive way to navigate and manage identity-related activities. Key features include:

  • Centralized Access: Users can access different identity management functions from one place, improving efficiency and ease of use.
  • Customization: The launchpad can be customized to meet the specific needs of an organization, allowing for personalized dashboards and workflows.
  • Self-Service Capabilities: Users can perform self-service tasks such as password resets, access requests, and profile updates directly from the launchpad.

Creation Flow for Launcher and Launchpad

Together, Launcher and Launchpad enhance the user experience by providing intuitive and efficient ways to manage access and identity-related tasks within IdentityNow.

In the video below, I have thoroughly explained Launcher and Launchpad, along with Forms and Workflow, using a simple presentation:

In this video, I have vividly explained the entire process of Launcher and Launchpad using real-life analogies:

Machine Identity Management in SailPoint Identity Security Cloud

The age of AI and automation is here. With organizations all around the globe leveraging Artificial Intelligence and Machine Learning, more and more tasks and processes previously done manually, are now being automated. This leads to the creation of several machine accounts dealing with Robotic Process Automation (RPA), privileged service accounts for authenticating requests from an external system, and the like. Consequently, organizations are spending more time and resources managing the access held by these non-human accounts in every application, which can often lead to complicated situations as there is no centralized view of the same.

As described above, organizations are automating mundane processes, and thus more machine accounts are being created. These accounts can be difficult to manage and govern in a standalone environment, considering the lack of ownership and effective ways to control and manage their access. The following are some statistical insights on machine accounts shared by SailPoint: –

This gives a clear picture as to how AI, Automated Scripts and Robotic Processes are taking over the workplace, which signifies the difficulty as well as importance of managing these machine accounts.

This is where SailPoint’s Machine Identity Security jumps in. It offers a robust set of features to:-

  • Discover any accurately configured machine account on any source
  • Classify the accounts as machine accounts, by using an account attribute/set of attributes (eg, in Active Directory, if there are machine accounts containing the word “bot” in their sAMAccountName, we can use this account attribute to classify these accounts as machine accounts in SailPoint)
  • Assign a human owner to a machine account. This identity will be responsible for reviewing the access held by the machine account in a certification campaign
  • Correlate the machine accounts to machine identities
  • Certify the machine account’s access using Certification Campaigns

The diagram above depicts SailPoint Machine Identity Security, which aggregates machine accounts from various applications such as Active Directory, SAP and Web Service and manages them under a single platform i.e., Identity Security Cloud.

There are several advantages to using SailPoint Machine Identity Security: –

  • It provides clear visibility and insights on all machine accounts across various applications.
  • It provides tools to automate the management of machine accounts. This eliminates the need to maintain and manage these accounts and their access manually, such as on excel sheets.
  • Human owners can be assigned to machine accounts, ensuring accountability, risk detection and mitigation.
  • Access reviews via Certification Campaigns help ensure that machine accounts follow the principle of Least Privileged Access Control.

Let’s have a close look at how SailPoint Machine Identity Security works in the following video: –

The following video is a deep dive demonstration of SailPoint Machine Identity Security: –

Hope this blog gave you some insights into how you can use SailPoint Machine Identity Security to effectively classify, manage and govern machine accounts from any source. Please share your thoughts and feedback in the comment box below.

Please follow our socials to stay up to date with the latest technology content.

Thank you!

Duo Two-Factor Authentication for SailPoint Identity Security Cloud

What is Duo

Duo is a two-factor authentication solution that helps organizations boost security by verifying user identity, establishing device trust, and providing a secure connection to company networks and applications.

Why Duo

Duo is fast, easy and flexible. Passwords and even basic Multi-Factor Authentication (MFA) aren’t enough to keep you safe from today’s attackers. Duo gives you the extra layers of protection you need for secure access management. With this setup, Duo two-factor authentication (2FA) is added as a verification option for account unlocking and password resets.

Prerequisites to integrate Duo

  1. Configure SailPoint Web application and copy ClientID, secret and hostname these details are required for SailPoint integration.
  2. Add users and enroll them in the application. User should have an account in SailPoint.

Technical Overview:

Here’s the technical demonstration on the integration of Duo

Use case Demonstration – Integration flow:

Please refer to the below video to have an understanding about Duo integration

SailPoint configuration

  1. The steps to be done in SailPoint tenant for duo integration
  2. First in SailPoint, integrate the Duo and then check the test connection after successful test connection
  3. Enable multifactor Authentication in Identity profile
  4. And select duo web in Password Reset and Unlock Settings
  5. Now you are all set to use duo authentication

Duo 2FA for Identity security cloud password reset

  1. With duo integration user can reset his password
  2. First user has to proceed to reset password
  3. Enter the username
  4. Then you should enter the passcode received from duo after successful duo authentication you can able to set new password

Duo 2FA for Identity security cloud Unlock account

  1. If the user account got locked, then he can unlock his account with duo integration
  2. First user has to proceed to unlock account
  3. Enter the username
  4. After successful duo authentication your account will be unlocked


SailPoint IdentityIQ Custom Connector

Introduction

Connectivity is critical to successful IAM deployments. SailPoint is committed to providing design, configuration, troubleshooting and best practice information to deploy and maintain connectivity to target systems. SailPoint IdentityIQ enables you to manage and govern access for digital identities across various applications in your environment. Connectors are the bridges that IdentityIQ uses to communicate with and aggregate data from applications. SailPoint IdentityIQ provides a wide range of OOTB connectors that facilitate integration with variety of systems, applications and data sources. These connectors are designed to simplify the process of managing Identity information and access across different platforms.  

In SailPoint IdentityIQ, a Custom Connector is a specialized integration component that allows the IdentityIQ platform to connect and interact with external systems, applications, or data sources that are not supported by the standard OOTB connectors. Custom connectors extend the capabilities of IdentityIQ by enabling it to manage identity-related information in a wider range of systems. 

High level architecture of Custom connector 

Custom Connector Development

Developing Custom connector in SailPoint IdentityIQ involves creating a Java-based implementation that adheres to the connector framework and API provided by SailPoint.  

This allows you to define the interaction between IdentityIQ and the specific external system you want to integrate with. A typical development of custom connector includes 4 steps – 

  1. Creating a new implementation of functionality and packaging it into JAR file. 
  • The custom connector uses the openconnector framework provided by SailPoint in the openconnector package where there are lot of methods provided for different type of operations.  
  • The custom logic which you want to implement using this custom connector shall be developed in the specified methods.  
  • Once code development is completed, Custom connector code with all the classes must be compiled and packaged to a JAR file.  
  • And the JAR file must be placed in WEB-INF/lib folder of IIQ Installation directory 
  1. Defining Connector type in Connector Registry 
  • Connector Registry is an XML file present in IdentityIQ as Configuration object. This file contains the information about all the different connectors and their related details.  
  • Now that we have created a new connector in our IdentityIQ, we have to declare its information and details in Connector Registry.  
  • Here we will create an xml file consisting of the details pertaining to our custom connector. Once we Import this xml file into IdentityIQ, it will be merged with the existing Connector Registry file in IdentityIQ database allowing IdentityIQ to create a new entry in the list of connectors.  
  • Alternatively, the Connector Registry could be manually edited through the Debug page
  1. Defining .xhtml page which specifies required and optional connection parameters. 
  • Usually, some parameters are required to define the connection to the target resource (e.g. host, port, username, password, etc.).  
  • To allow these parameters to be specified through the UI for each application that uses this connector, an .xhtml page must be written to define how the Application Configuration user interface will request and record those parameters.  
  • This file must be placed in the [IdentityIQ Installation Directory]/define/applications/ directory and must be referenced in the application definition’s XML as the “formPath” entry.  
  1. Testing the connector by Creating an application which uses this connector. 
  • Finally, after completing all the development related activities, one must start the application server which is hosting IdentityIQ.   
  • An Application object must be created for using the IdentityIQ’s UI. Select the configured custom connector as application type to tie it to the connector registry configuration and specifying any connection parameters through the configuration. 
  •  Once the application is onboarded, we can perform all the configured functionalities in it and verify back the results within the targeted external application.  
  • Alternatively, Application connector can be tested from the integration console (run iiq integration from the [IdentityIQ Installation Directory]/WEB-INF/bin directory).  
  • This console can be used to test the various features of your connector including Aggregation and Provisioning

The following presentation gives you clear understanding of custom connector development in detail.

Now let’s have a demo on building custom connector, deploying it into SailPoint IdentityIQ and using it. 

Please subscribe to our social media and stay updated with latest technology content. Thanks!

SailPoint IdentityNow Workflows

About SailPoint IdentityNow Workflows:

IdentityNow workflows are a way to automate processes related to Identity Security Cloud. These processes when carried individually are manual, error prone and laborious in nature.

Here are a few examples of the power of workflows.

  1. Design workflows that can handle a growing number of users onboarding requests, ensuring scalability as the organization hires new employees.
  2. Design workflow to raise tickets in ticketing system to automate the resolution of access-related issues reported by users, ensuring a streamlined process.
  3. Modify an existing workflow to include new steps for managing temporary access during a special project, adapting to changing business needs.
  4. Implement a workflow for access reviews that automatically identifies and revokes unnecessary access rights, ensuring that users only retain permissions relevant to their current roles.
  5. Streamline access request procedures including approval steps for access approval or modification.
  6. Send email alert when an identity changes group in end application.
  7. No human involvement while configuring and activating certification campaign when identity changes department and also send email alert to reviewer.

In this video blog, we will be discussing about the IdentityNow workflows in detail. The following are the key topics that are discussed as part of the blog.

  1. Why SailPoint introduced Workflow in IdentityNow
  2. Available platforms in IdentityNow to build a workflow.
  3. General terminology and use of Inline variables
  4. Simulating and testing a workflow
  5. Migrate workflows between sandbox and production.

The detailed discussion of Workflows, it’s terminology and configuration process are present in the following video.

Detailed demo on developing & testing workflows in all 3 possible ways is present in the following video.

Please subscribe to our socials and stay updated with latest technology content.

SailPoint IdentityNow Automation Testing

Introduction
Automation testing refers to the testing of the software in which tester write the test script once with the help of testing tools and framework and run it on the software.
The test script automatically tests the software without human intervention and shows the result.

Prerequisites for Automation:
To begin automation testing using Selenium, there are few prerequisites should have in place:

  1. Programming Language: Choose a programming language in which you will write your test scripts. Java, Python, C#, and Ruby are common choices for Selenium automation. You should have a good grasp of the chosen language.so we have chosen java.
  2. Integrated Development Environment (IDE): Install an integrated development environment (IDE) such as Eclipse, IntelliJ IDEA, or Visual Studio Code to write and manage your Selenium scripts. We have chosen Eclipse as IDE platform.
  3. Java Development Kit (JDK): If u opt for Java, you’ll need to install the Java Development Kit (JDK) on your system.
  4. Selenium WebDriver: Download the Selenium WebDriver for your preferred programming language. You can add the WebDriver libraries to your project using build tools like Maven.
  5. Web Browsers: Make sure you have the web browsers you intend to automate (e.g., Chrome, Firefox) installed on your system.
  6. Web Drivers: Selenium interacts with browsers through web drivers. You should have the appropriate web drivers for the browsers you plan to test with (e.g., Chrome Driver, Gecko Driver). These should be downloaded and configured. Ensure that your chosen IDE is integrated with the Selenium WebDriver, making it easier to write, run, and debug test scripts.
  7. Test Framework: Select a test framework such as TestNG or Hybrid. Test frameworks help structure your tests and provide reporting capabilities.

By meeting these prerequisites, you’ll be well. prepared to start automation testing using Selenium and create efficient, maintainable, and effective test scripts.

The following below video showcases a small presentation on automation testing:

Tools used for Automation testing.

  1. Eclipse:
    Eclipse is a digital workspace for automation testing. It’s a special software that makes creating and running automated tests easier. It is used by testers because it’s super flexible and works with different programming languages. It helps in writing, organizing, and running tests for finding problems or bugs in software, making sure everything works smoothly.
  2. Selenium:
    Selenium is an Open source, It Supports multiple languages like java, python, Ruby. Scripts can be run on Multiple browsers like Chrome, Firefox, IE, Microsoft Edge. It supports Multiple operating systems like Linux, Windows, MacOS. It can be integrated with third party applications like TestNG, Cucumber.
  3. TestNG:
    TestNG is a testing framework used with Selenium for automating tests. It allows for organizing test cases, running tests in a specific sequence. It offers annotations to manage test execution flow, such as @Test for defining test cases, @BeforeMethod and @AfterMethod as you can see the highlighted point in the picture for pre and post-test setups, and @DataProvider for parameterization. This combination of Selenium and TestNG helps in efficient and structured automation testing, enabling testers to create, manage, and execute test cases reliably. Generates HTML reports showing test execution details.
  4. Maven:
    Maven is an open-source tool. Maven allows to download all the JARs and Dependencies and manage lifecycle for a Selenium Java project. This makes it easier for the QA to configure dependencies for Selenium Java by automatically downloading the JARs from the Maven repository.

Advantages of Automation testing

Efficiency: Automation testing can execute repetitive and complex tasks faster than manual testing.
Accuracy: Automated tests perform the same steps precisely every time, reducing the chance of human errors.
Reusability: Test scripts can be reused across different phases of development and in various testing scenarios.
Faster Feedback: Automated tests provide rapid feedback on the software’s stability and functionality.

Let us see how we can execute the test cases in the below video:

SailPoint IdentityNow REST API’s

Introduction

API stands for Application Programming Interface. APIs are mechanisms that enable two software components to communicate with each other using a set of definitions and protocols.

API architecture is usually explained in terms of client and server. The application sending the request is called the client and the application sending the response is called the server.

API Workflow

Fig. – API dataflow

What is REST API:

  REST stands for Representational State Transfer. This is the most popular and flexible APIs found on the web today. The client sends requests to the server as data. The server uses this client input to start internal functions and returns output data back to the client.  REST defines a set of functions like GET, POST, PUT, DELETE, etc. that clients can use to access server data. Clients and servers exchange data using HTTP.

The main feature of REST API is statelessness. Statelessness means that servers do not save client data between requests. Client requests to the server are similar to URLs you type in your browser to visit a website. The response from the server is plain data, without the typical graphical rendering of a web page.

Rest API operation in SailPoint IdentityNow

Post Operation: POST APIs request allows appending data to the endpoint. This is a method used to add information within the request body in the server. It is commonly used for passing delicate information.

GET operations: GET APIs request is used to obtain details from the endpoint and does not have any impact on the endpoint. The GET request does not update any endpoint data while it is triggered.

UPDATE operations: PUT APIs request is used to pass data to the server for creation or modification of an endpoint. The difference between POST and PUT is that POST request is not idempotent.

DELETE operations: DELETE APIs request deletes a resource already present in the server. The DELETE method sends a request to the server for deleting the request mentioned in the endpoint.

Let us understand usage of REST API’s in SailPoint IdentityNow in the following below presentation:

Pre-requisite

  • Base URL of SailPoint tenant.
  • secret key and client ID for the token generation.
  • Generating access token with Authorization code.

Rest API Authentication in IdentityNow

              Authentication is the process of determining whether someone or something is, in fact, who or what it says it is. Authentication provides access control for systems by checking to see if a user’s credentials match the credentials in a database of authorized users or in a data authentication server. In doing this, authentication assures secure systems, secure processes and enterprise information security.

OAuth 2.0

  • OAuth 2.0 is the industry-standard protocol for AUTHORIZATION.
  • OAuth 2.0 is designed primarily as a means of granting access to a set of resources, in simple way OAuth 2.0 Access Token is a string that the OAuth client uses to make requests to the resource server.

JSON Web Token

          JSON Web Token (JWT) authentication is a stateless method of securely transmitting information between two parties as (JSON) object. It is often used to authenticate and authorize users in web applications and APIs.

Rest API Authorization in IdentityNow

          Authorization in system security is the process of giving the user permission to access a specific resource or Authorization is the act of validating the user’s permission to access a given resource. This term is often used interchangeably with access control or client privilege.

Personal Access Token in IdentityNow

In IdentityNow a personal access token (PAT) is a method of authenticating to an API as a user without providing a username and password.

Now, let us go through a demo on how we can use these REST API’s in SailPoint IdentityNow.

Features of Rest API in IdentityNow

  • APIs extend IdentityNow functionality and Usability
  • Advanced configuration such as
    • Transform creation
    • Customization of account profiles
    • Ranking authoritative source priority
    • System level changes
    • Object management
  • Interface with other systems – pull data/initiate processes

Identity Deletion in SailPoint IdentityNow

Identity management (IDM), also known as identity and access management (IAM), ensures that authorized people and only authorized people have access to the technology resources they need to perform their job functions.

And access is managed by the user lifecycle state in IdentityNow. Identity Lifecycle State aims to automate and manage the entire digital identity lifecycle process and access throughout the organization.

Identity lifecycle is a set of stages of the identity from the creation to its deactivation or deletion. It contains a creation of an account, assignment of correct groups and permissions, setting and resetting passwords and in the end deactivation or deletion of the account.

Figure 1: Identity Lifecycle Management

Handling the unwanted identities in SailPoint increases the processing time and reduces the usability of the SailPoint tenant. To reduce the process and speed up the work, in tenant only limited and require identities we can handle, handling is easy and processing the limited identities is a less time-consuming process, so we can delete unwanted and terminated users’ identities from SailPoint.

Now, let us have a look at the SailPoint REST API’s used in the Identity deletion process. Below is the list of APIs used for Identity deletion in SailPoint IdentityNow:

Figure 2:  REST APIs in PowerShell Script connecting with SailPoint IdentityNow

And here, we will be using A personal access token (PAT) is a method of authenticating to an API as a user without providing a username and password.

Prerequisites for Identity deletion:

  1. SailPoint REST API’s.
  2. Client ID and Client Secret.
  3. IQservice Server.

Now, let us discuss the use case of Identity deletion.

Use Case:

All the identities in the “30daysPostTermination” lifecycle state will be deleted from IdentityNow. 

The deleted identities would be re-aggregated in the next aggregation cycle as “Uncorrelated accounts” in target application, and hence would not affect the new hire creation logic and the SAMAccount name would remain unique as per the requirement and the logic defined.

A PowerShell script will be developed to call the APIs to identify all the Identities in the required lifecycle state i.e. “30daysPostTermination” and will delete the accounts from the HRMS Source for all the Identities.

Figure 3: Use Case diagram.

Steps Overview as per the script:

Step1: As part of the PowerShell script first it will read the require details from property file. In property file we can maintain the ClientID, client Secret, base URL, search query, deletion limit, log file path and debug values.

Step2: Authentication API will execute to generate the access token.

Step3: Next Search API will execute and the fetch “30daysPostTermination” lifecycle state identities from SailPoint Tenant.

Step4: One by one Identities will pass to Delete API to delete from SailPoint Tenant.

Let us understand Identity Deletion by using SailPoint REST APIs, use cases and automation of the script via windows task scheduler in the following below presentation:

Advantages of Identities Deletion in SailPoint IdentityNow.

  1. It will increase the usability of the tenant.
  2. It decreases the aggregation and identity refresh process time.
  3. It will fasten the backend processes and reduce the unwanted identity handling.
  4. Reduce the burden on the tenant.

When a user got terminated or left the organization, all access will be removed, and accounts will be disabled.
Now, let us go through a demo on how we can achieve identity deletion in SailPoint IdentityNow.