Introduction
Connectivity is critical to successful IAM deployments. SailPoint is committed to providing design, configuration, troubleshooting and best practice information to deploy and maintain connectivity to target systems. SailPoint IdentityIQ enables you to manage and govern access for digital identities across various applications in your environment. Connectors are the bridges that IdentityIQ uses to communicate with and aggregate data from applications. SailPoint IdentityIQ provides a wide range of OOTB connectors that facilitate integration with variety of systems, applications and data sources. These connectors are designed to simplify the process of managing Identity information and access across different platforms.
In SailPoint IdentityIQ, a Custom Connector is a specialized integration component that allows the IdentityIQ platform to connect and interact with external systems, applications, or data sources that are not supported by the standard OOTB connectors. Custom connectors extend the capabilities of IdentityIQ by enabling it to manage identity-related information in a wider range of systems.
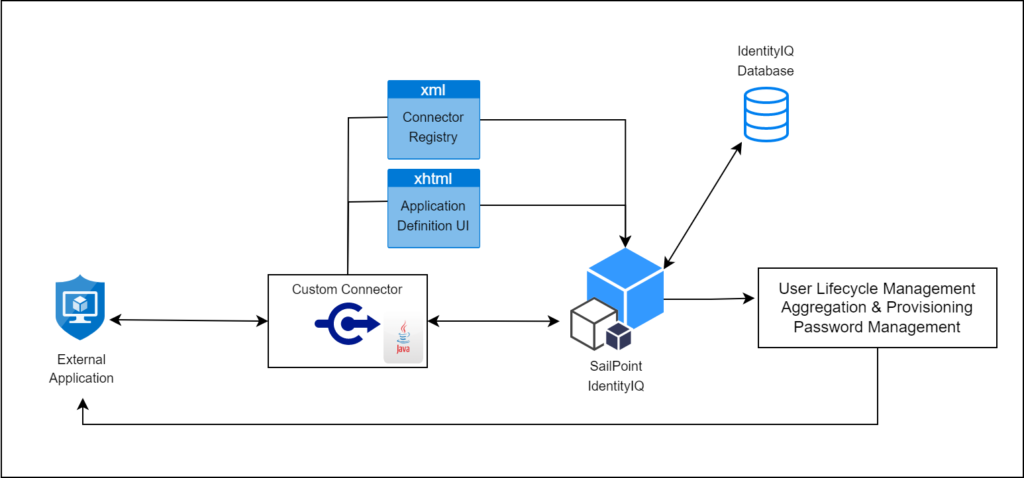
High level architecture of Custom connector
Custom Connector Development
Developing Custom connector in SailPoint IdentityIQ involves creating a Java-based implementation that adheres to the connector framework and API provided by SailPoint.
This allows you to define the interaction between IdentityIQ and the specific external system you want to integrate with. A typical development of custom connector includes 4 steps –
- Creating a new implementation of functionality and packaging it into JAR file.
- The custom connector uses the openconnector framework provided by SailPoint in the openconnector package where there are lot of methods provided for different type of operations.
- The custom logic which you want to implement using this custom connector shall be developed in the specified methods.
- Once code development is completed, Custom connector code with all the classes must be compiled and packaged to a JAR file.
- And the JAR file must be placed in WEB-INF/lib folder of IIQ Installation directory
- Defining Connector type in Connector Registry
- Connector Registry is an XML file present in IdentityIQ as Configuration object. This file contains the information about all the different connectors and their related details.
- Now that we have created a new connector in our IdentityIQ, we have to declare its information and details in Connector Registry.
- Here we will create an xml file consisting of the details pertaining to our custom connector. Once we Import this xml file into IdentityIQ, it will be merged with the existing Connector Registry file in IdentityIQ database allowing IdentityIQ to create a new entry in the list of connectors.
- Alternatively, the Connector Registry could be manually edited through the Debug page.
- Defining .xhtml page which specifies required and optional connection parameters.
- Usually, some parameters are required to define the connection to the target resource (e.g. host, port, username, password, etc.).
- To allow these parameters to be specified through the UI for each application that uses this connector, an .xhtml page must be written to define how the Application Configuration user interface will request and record those parameters.
- This file must be placed in the [IdentityIQ Installation Directory]/define/applications/ directory and must be referenced in the application definition’s XML as the “formPath” entry.
- Testing the connector by Creating an application which uses this connector.
- Finally, after completing all the development related activities, one must start the application server which is hosting IdentityIQ.
- An Application object must be created for using the IdentityIQ’s UI. Select the configured custom connector as application type to tie it to the connector registry configuration and specifying any connection parameters through the configuration.
- Once the application is onboarded, we can perform all the configured functionalities in it and verify back the results within the targeted external application.
- Alternatively, Application connector can be tested from the integration console (run iiq integration from the [IdentityIQ Installation Directory]/WEB-INF/bin directory).
- This console can be used to test the various features of your connector including Aggregation and Provisioning.
The following presentation gives you clear understanding of custom connector development in detail.
Now let’s have a demo on building custom connector, deploying it into SailPoint IdentityIQ and using it.
Please subscribe to our social media and stay updated with latest technology content. Thanks!