SailPoint Identity Security Cloud Transforms

Introduction

SailPoint Identity Security Cloud Transforms are configurable objects that allow us to manipulate attribute data while aggregating from or provisioning to a source. Sometimes transforms are referred to as Seaspray, the codename for transforms. Identity Security Cloud Transforms and Seaspray are essentially the same.

As we can see from the below diagram, we will be providing input to transform, transformation occurs and output will be returned. So, the way transformation occurs depends on the type of operation used. Some of the transform operations are Concatenation, Conditional, Date Format etc.

Transform REST APIs

In order to create the transform, get transform details, update transform or delete any tranform, we can make use of REST APIs available for transforms.

There are 5 REST APIs are available for transforms in V3 and Beta APIs.

Rest APIsDescription
List TransformsList Transform API is used to get list of all available transforms from the tenant
Create TransformCreate Transform API is used to create a new transform and upload it into the tenant.
Transform by IDTransform by ID is used to get the details of a particular transform.
Update TransformUpdate a transform API is used to update any existing transform.
Delete TransformDelete transform API is used to delete any transform using transform ID.

Transform Operations:

In order to make use of transform according to the use case, we should understand various transform operations that are available.

Below are the various types of operations that are available in transform. Each of these operations performs specific task, we can use them according to our needs.

Transform OperationDescription
Account Attribute TransformAccount attribute transform used to look up an account for a particular source on an identity and return a specific attribute value from that account. 
Base64 Decode TransformThe base64 decode transform allows you to take incoming data that has been encoded using a Base64-based text encoding scheme and render the data in its original binary format.
Base64 Encode TransformBase64 transform will take an input, this input is given to base64 encode transform and the encodes string is returned as output.
Decompose Diacritical Marks TransformDecompose diacritical marks transform to clean or standardize symbols used within language to inform the reader how to say or pronounce a letter.
E.164 Phone TransformUse the E.164 phone transform to convert an incoming phone number string into an E.164-compatible number.
Identity Attribute TransformTransform is used to get the users identity attribute value.
Lower TransformThis transform is used to convert input string into lowercase character.
Upper TransformThis transform is used to convert input string into uppercase characters.

In below series of 4 videos, we comprehensively cover all the details around the transforms including basic syntax of transforms, APIs around transforms and all the types of transforms.

Transforms Series – Video 1 of 4:
Below video is the first video in a series of 4 videos about transforms. This part contains an introduction to transforms, syntax of transform, types of Inputs, REST APIs and API Responses.

Video:

Transforms Series – Video 2 of 4: Below video is the second video in a series of 4 videos about transforms. This part contains use cases, transform operations like account attribute transform, base64 decode transform, base64 encode transform, concatenation, conditional, date format, date math, date compare, decompose diacritical marks, first valid, generate random string

Video:


Transforms Series Video 3 of 4:
Below video is the third video in a series of 4 videos about transforms. This part contains about transform operations like  get end of string, get reference identity attribute, identity attribute, index of , ISO3166, last index of, left pad, look up lower, name normalizer, random alphanumeric, random numeric

Video:

Transforms SeriesVideo 4 of 4:
Below video is the fourth video in a series of 4 videos about transforms. This part contains about transform operations like reference, replace all, replace, right pad, rule, split, static, substring, trim, upper, username generator, UUID generator

Video:
SailPoint IdentityIQ Custom Connector

Introduction

Connectivity is critical to successful IAM deployments. SailPoint is committed to providing design, configuration, troubleshooting and best practice information to deploy and maintain connectivity to target systems. SailPoint IdentityIQ enables you to manage and govern access for digital identities across various applications in your environment. Connectors are the bridges that IdentityIQ uses to communicate with and aggregate data from applications. SailPoint IdentityIQ provides a wide range of OOTB connectors that facilitate integration with variety of systems, applications and data sources. These connectors are designed to simplify the process of managing Identity information and access across different platforms.  

In SailPoint IdentityIQ, a Custom Connector is a specialized integration component that allows the IdentityIQ platform to connect and interact with external systems, applications, or data sources that are not supported by the standard OOTB connectors. Custom connectors extend the capabilities of IdentityIQ by enabling it to manage identity-related information in a wider range of systems. 

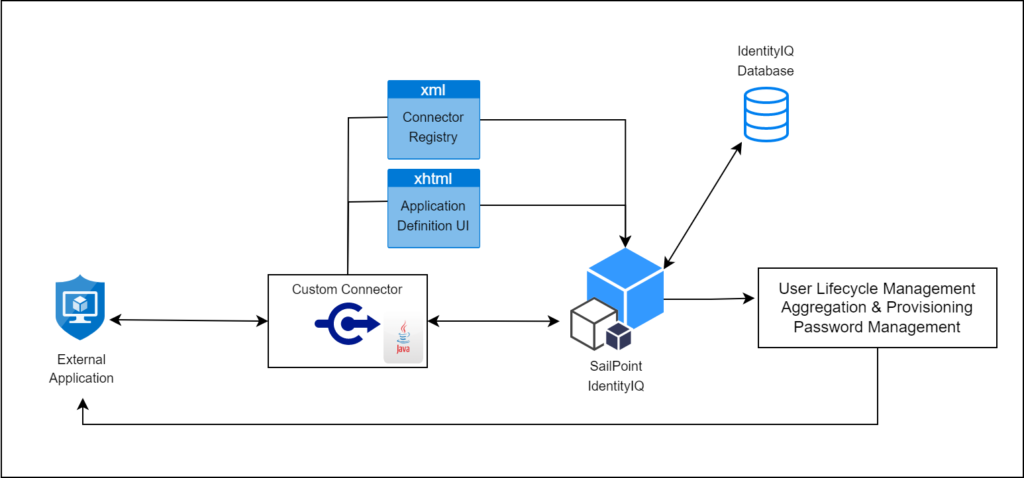
High level architecture of Custom connector 

Custom Connector Development

Developing Custom connector in SailPoint IdentityIQ involves creating a Java-based implementation that adheres to the connector framework and API provided by SailPoint.  

This allows you to define the interaction between IdentityIQ and the specific external system you want to integrate with. A typical development of custom connector includes 4 steps – 

  1. Creating a new implementation of functionality and packaging it into JAR file. 
  • The custom connector uses the openconnector framework provided by SailPoint in the openconnector package where there are lot of methods provided for different type of operations.  
  • The custom logic which you want to implement using this custom connector shall be developed in the specified methods.  
  • Once code development is completed, Custom connector code with all the classes must be compiled and packaged to a JAR file.  
  • And the JAR file must be placed in WEB-INF/lib folder of IIQ Installation directory 
  1. Defining Connector type in Connector Registry 
  • Connector Registry is an XML file present in IdentityIQ as Configuration object. This file contains the information about all the different connectors and their related details.  
  • Now that we have created a new connector in our IdentityIQ, we have to declare its information and details in Connector Registry.  
  • Here we will create an xml file consisting of the details pertaining to our custom connector. Once we Import this xml file into IdentityIQ, it will be merged with the existing Connector Registry file in IdentityIQ database allowing IdentityIQ to create a new entry in the list of connectors.  
  • Alternatively, the Connector Registry could be manually edited through the Debug page
  1. Defining .xhtml page which specifies required and optional connection parameters. 
  • Usually, some parameters are required to define the connection to the target resource (e.g. host, port, username, password, etc.).  
  • To allow these parameters to be specified through the UI for each application that uses this connector, an .xhtml page must be written to define how the Application Configuration user interface will request and record those parameters.  
  • This file must be placed in the [IdentityIQ Installation Directory]/define/applications/ directory and must be referenced in the application definition’s XML as the “formPath” entry.  
  1. Testing the connector by Creating an application which uses this connector. 
  • Finally, after completing all the development related activities, one must start the application server which is hosting IdentityIQ.   
  • An Application object must be created for using the IdentityIQ’s UI. Select the configured custom connector as application type to tie it to the connector registry configuration and specifying any connection parameters through the configuration. 
  •  Once the application is onboarded, we can perform all the configured functionalities in it and verify back the results within the targeted external application.  
  • Alternatively, Application connector can be tested from the integration console (run iiq integration from the [IdentityIQ Installation Directory]/WEB-INF/bin directory).  
  • This console can be used to test the various features of your connector including Aggregation and Provisioning

The following presentation gives you clear understanding of custom connector development in detail.

Now let’s have a demo on building custom connector, deploying it into SailPoint IdentityIQ and using it. 

Please subscribe to our social media and stay updated with latest technology content. Thanks!

SailPoint IdentityNow Workflows

About SailPoint IdentityNow Workflows:

IdentityNow workflows are a way to automate processes related to Identity Security Cloud. These processes when carried individually are manual, error prone and laborious in nature.

Here are a few examples of the power of workflows.

  1. Design workflows that can handle a growing number of users onboarding requests, ensuring scalability as the organization hires new employees.
  2. Design workflow to raise tickets in ticketing system to automate the resolution of access-related issues reported by users, ensuring a streamlined process.
  3. Modify an existing workflow to include new steps for managing temporary access during a special project, adapting to changing business needs.
  4. Implement a workflow for access reviews that automatically identifies and revokes unnecessary access rights, ensuring that users only retain permissions relevant to their current roles.
  5. Streamline access request procedures including approval steps for access approval or modification.
  6. Send email alert when an identity changes group in end application.
  7. No human involvement while configuring and activating certification campaign when identity changes department and also send email alert to reviewer.

In this video blog, we will be discussing about the IdentityNow workflows in detail. The following are the key topics that are discussed as part of the blog.

  1. Why SailPoint introduced Workflow in IdentityNow
  2. Available platforms in IdentityNow to build a workflow.
  3. General terminology and use of Inline variables
  4. Simulating and testing a workflow
  5. Migrate workflows between sandbox and production.

The detailed discussion of Workflows, it’s terminology and configuration process are present in the following video.

Detailed demo on developing & testing workflows in all 3 possible ways is present in the following video.

Please subscribe to our socials and stay updated with latest technology content.

Event Triggers

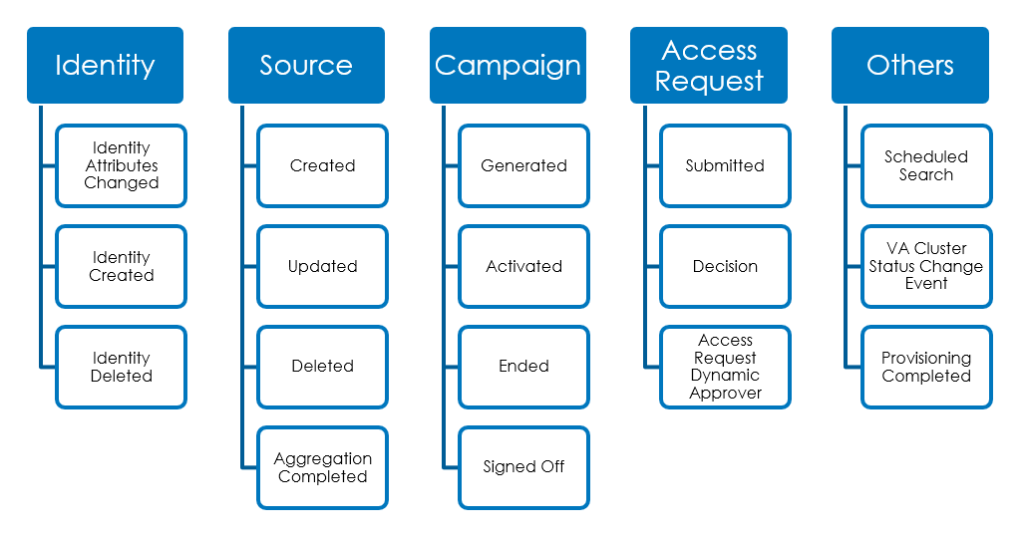
Event triggers is an extensibility feature recently released by sailpoint which enables us to integrate identitynow with third party applications. Event triggers follows an event based architecture towards integration.

IdentityNow has many even triggers which capture the events internal to IdentityNow. This can be related to various IdentityNow internal processes like aggregation, provisioning, access request etc.

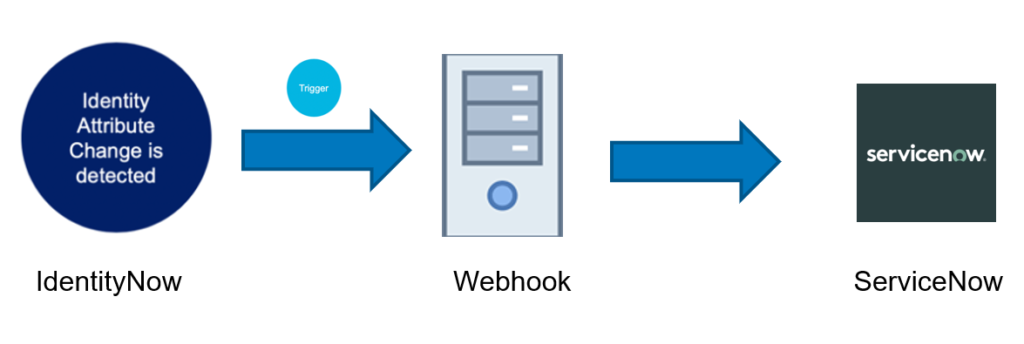
In response or action to an event, Event triggers have a capability to communicate with external applications. This response can happen via webhooks or AWS event bridge.

If webhook is configured as an action for the event trigger, respective HTTP APIs will be called.

If an AWS event bridge is configured for the event trigger, an event can be setup to be captured on an AWS event bridge.

Types of Event Triggers

REQUEST_RESPONSE

This type of trigger is used to give the custom application an ability to answer back to a trigger event sent by the trigger service. This integration is bi-directional. A response from the custom application is required for a trigger invocation to be considered complete and successful.

FIRE_AND_FORGET

This type of trigger is used to notify the custom application of a particular occurrence of an event. This integration is uni-directional. Trigger invocation is successful the moment the trigger service notifies the external application, and it does not require a response from the custom application.

IdentityNow has a set of event triggers that you can configure to connect to web hooks in third-party systems.

Available Event Triggers

In below presentation we will be viewing the concept of event triggers in brief.

Use Case:

Let us see a real time use case for this.

Below is the workflow representation.

In below video we will be demonstrating the real time implementation of event triggers.

References:

https://developer.sailpoint.com/triggers/getting_started.html

Segments Image

SailPoint IdentityNow : Segments Feature

Introduction

Access requests is a feature in SailPoint IdentityNow using which the users gain ability to make a manual request for access that they need.

Segments feature released by SailPoint IdentityNow is  promoting zero trust in the enterprises. Using this feature, request center items will be made available to the users only on a “Need to know” basis.

For example, a user from IT department is able to see Jira, Bitbucket, Administrative / Privileged access across applications like Active Directory, ServiceNow and various other applications in the request center. For a user from Marketing department, the above access is not relevant and with segments, we are abstracting those items. The relevant access for marketing users would be Salesforce CRM and the same will be visible for the users.

In the presentation below, we will be discussing about segments feature in detail :

In the below video, we will provide a practical demonstration on how to configure segments, how it affects the end user perspective using a practical use-case :

Advantages

  1. Limit end user visibility for applicable access
    • Only the access that is applicable for a subset of identities and relevant for them is displayed using segments. This helps in avoiding the confusion in finding the right role/access profile while making an access request.
  2. Reduce incorrect access requests
    • End users shall not make any incorrect access requests because the only access items that they’ll see in the request center are already fine tuned and configured according to the organizational requirement.  
  3. Limit accidental provisioning
    • If presented with a lot of access items, users might request for something that they don’t need. This can be avoided by creating and assigning users to their respective segments based on certain criteria.
  4. Reduce cost of software licensing
    • Due to accidental access provisioning, users might be consuming additional licenses for access that they do not need which is a major costing risk. This can be avoided by configuring segments.

References

TopicURL
Segments Documentationhttps://documentation.sailpoint.com/saas/help/requests/segments.html?h=segmen
Segments REST API referencehttps://developer.sailpoint.com/apis/beta/#tag/Segments

ERP Overview from an IAM Perspective

ERP plays a critical role by helping an organization in managing its core business processes such as, project management, procurement, sales, etc. It manages day-to-day business activities by providing a central information system for data sharing. A greater visibility, increased productivity and operational efficiency can be observed by synchronizing all these areas. To authenticate and authorize the users within ERP software, there is a major role played by Identity and Access Management. It authenticates the digital identity of the users and manage their roles and access privileges in the central information system.

In this blog we are discussing about the benefit of implementing ERP by comparing it with the traditional method and also about securing it with the help of IAM modules. The blog also mentioned about the SAP (System applications and Product) which is a top ERP solution, it has positioned as a leader in Gartner’s Magic quadrant for single instance ERP, for multiple consecutive areas as per different evaluation criteria.

COBIT in IAM Projects – An overview

Information technology is expanding within the business world immensely. For the success of your business, one of the key requirements is the effective IT governance. There are numerous frameworks available to manage the Information Technology within an organization, and COBIT is one such framework that aligns your IT strategies with business strategies. It narrowly focuses on security, risk, management and governance.

While an organization is dealing with important projects like Identity and Access Management, COBIT implementation ensures that we are aligning with the business & IT objectives for IAM.

In this blog we are going to put some light on the COBIT framework and its implementation within the business processes of an organization.