Duo is a two-factor authentication solution that helps organizations boost security by verifying user identity, establishing device trust, and providing a secure connection to company networks and applications.
Why Duo
Duo is fast, easy and flexible. Passwords and even basic Multi-Factor Authentication (MFA) aren’t enough to keep you safe from today’s attackers. Duo gives you the extra layers of protection you need for secure access management. With this setup, Duo two-factor authentication (2FA) is added as a verification option for account unlocking and password resets.
Prerequisites to integrate Duo
Configure SailPoint Web application and copy ClientID, secret and hostname these details are required for SailPoint integration.
Add users and enroll them in the application. User should have an account in SailPoint.
Technical Overview:
Here’s the technical demonstration on the integration of Duo
Use case Demonstration – Integration flow:
Please refer to the below video to have an understanding about Duo integration
SailPoint configuration
The steps to be done in SailPoint tenant for duo integration
First in SailPoint, integrate the Duo and then check the test connection after successful test connection
Enable multifactor Authentication in Identity profile
And select duo web in Password Reset and Unlock Settings
Now you are all set to use duo authentication
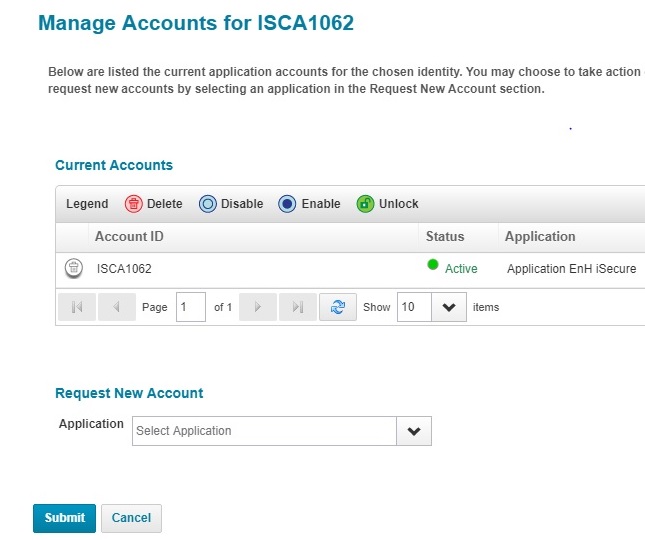
Duo 2FA for Identity security cloud password reset
With duo integration user can reset his password
First user has to proceed to reset password
Enter the username
Then you should enter the passcode received from duo after successful duo authentication you can able to set new password
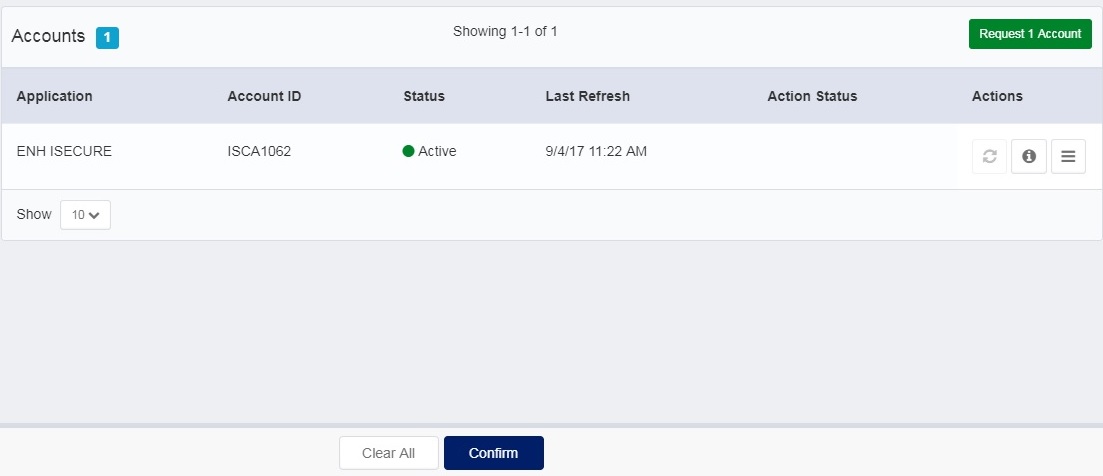
Duo 2FA for Identity security cloud Unlock account
If the user account got locked, then he can unlock his account with duo integration
First user has to proceed to unlock account
Enter the username
After successful duo authentication your account will be unlocked
Connectivity is critical to successful IAM deployments. SailPoint is committed to providing design, configuration, troubleshooting and best practice information to deploy and maintain connectivity to target systems. SailPoint IdentityIQ enables you to manage and govern access for digital identities across various applications in your environment. Connectors are the bridges that IdentityIQ uses to communicate with and aggregate data from applications. SailPoint IdentityIQ provides a wide range of OOTB connectors that facilitate integration with variety of systems, applications and data sources. These connectors are designed to simplify the process of managing Identity information and access across different platforms.
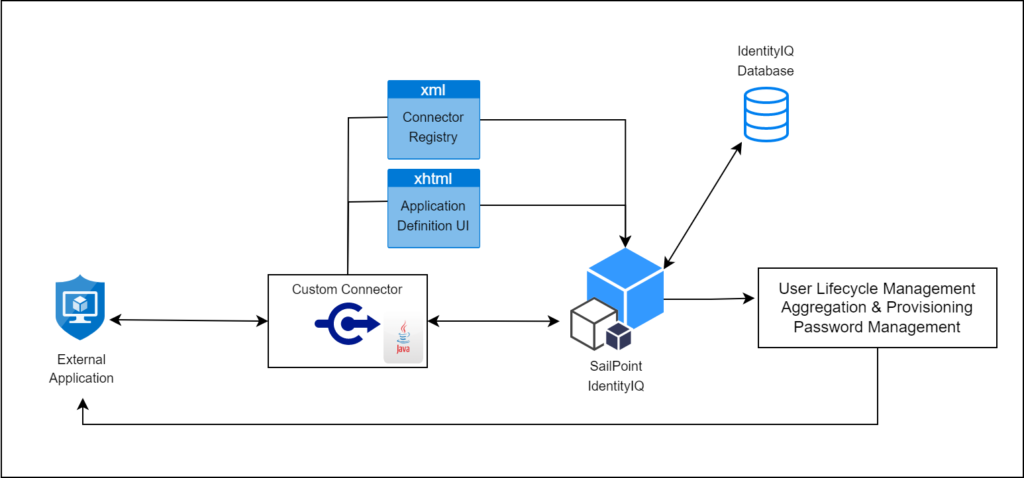
In SailPoint IdentityIQ, a Custom Connector is a specialized integration component that allows the IdentityIQ platform to connect and interact with external systems, applications, or data sources that are not supported by the standard OOTB connectors. Custom connectors extend the capabilities of IdentityIQ by enabling it to manage identity-related information in a wider range of systems.
High level architecture of Custom connector
Custom Connector Development
Developing Custom connector in SailPoint IdentityIQ involves creating a Java-based implementation that adheres to the connector framework and API provided by SailPoint.
This allows you to define the interaction between IdentityIQ and the specific external system you want to integrate with. A typical development of custom connector includes 4 steps –
Creating a new implementation of functionality and packaging it into JAR file.
The custom connector uses the openconnector framework provided by SailPoint in the openconnector package where there are lot of methods provided for different type of operations.
The custom logic which you want to implement using this custom connector shall be developed in the specified methods.
Once code development is completed, Custom connector code with all the classes must be compiled and packaged to a JAR file.
And the JAR file must be placed in WEB-INF/lib folder of IIQ Installation directory
Defining Connector type in Connector Registry
Connector Registry is an XML file present in IdentityIQ as Configuration object. This file contains the information about all the different connectors and their related details.
Now that we have created a new connector in our IdentityIQ, we have to declare its information and details in Connector Registry.
Here we will create an xml file consisting of the details pertaining to our custom connector. Once we Import this xml file into IdentityIQ, it will be merged with the existing Connector Registry file in IdentityIQ database allowing IdentityIQ to create a new entry in the list of connectors.
Alternatively, the Connector Registry could be manually edited through the Debug page.
Defining .xhtml page which specifies required and optional connection parameters.
Usually, some parameters are required to define the connection to the target resource (e.g. host, port, username, password, etc.).
To allow these parameters to be specified through the UI for each application that uses this connector, an .xhtml page must be written to define how the Application Configuration user interface will request and record those parameters.
This file must be placed in the [IdentityIQ Installation Directory]/define/applications/ directory and must be referenced in the application definition’s XML as the “formPath” entry.
Testing the connector by Creating an application which uses this connector.
Finally, after completing all the development related activities, one must start the application server which is hosting IdentityIQ.
An Application object must be created for using the IdentityIQ’s UI. Select the configured custom connector as application type to tie it to the connector registry configuration and specifying any connection parameters through the configuration.
Once the application is onboarded, we can perform all the configured functionalities in it and verify back the results within the targeted external application.
Alternatively, Applicationconnector can be tested from the integration console (run iiq integration from the [IdentityIQ Installation Directory]/WEB-INF/bin directory).
This console can be used to test the various features of your connector including Aggregation and Provisioning.
The following presentation gives you clear understanding of custom connector development in detail.
About Oracle Fusion: Oracle Fusion Cloud HCM is a complete cloud solution that connects every human resource process and every person across the enterprise.
Benefits of Oracle Fusion:
Oracle HCM cloud enables HR leaders by delivering an end-to-end solution to manage every stage of the employee lifecycle.
Human capital management transforms the traditional administrative functions of human resource departments – recruiting, training, payroll, compensation, and performance management into opportunities to drive engagement, productivity, and business value.
It also offers Data Efficiency by preserving history of changes made to the attributes of some objects. As a Professional user, you can retrieve and edit past and future versions of an object.
Many HCM objects, including person names, assignments, benefits-plans, grades, jobs, locations, payrolls, and positions are date-effective. Date-effective objects include one or more physical records. Each record has effective start and end dates. One record is current and available to transactions. Others are past or take effect in the future. Together, these records constitute the logical record or object instance.
Integration with SailPoint IdentityIQ
Here, Oracle Fusion application is integrated with SailPoint using Webservices connector. Let us have a quick overview of basic configuration parameters of SailPoint IdentityIQ Webservices Connector
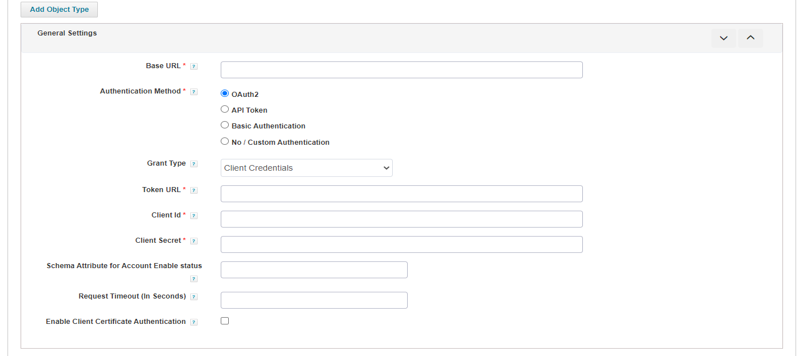
Webservices connector application configuration
Base URL: The base URL is used to connect to the web service managed system.
Authentication Method: Authentication methods that is supported are: OAuth2, API Token, Basic Authentication and No/Custom Authentication
Schema Attribute for Account Enable status: Attribute name and value required to be provided to check the Enable status. For example: status=Active
Username: Username of the resource owner
Password: Password of the resource owner
Grant Type: We can select the type of Grant from below: Refresh Token, JWT, Client Credentials, Password and SAML Bearer Assertion
Client Id: (Optional for JWT and SAML Bearer Assertion) Client Id for OAuth2 authentication.
Client Secret: (Optional for JWT and SAML Bearer Assertion) Client Secret for OAuth2 authentication.
Token URL: URL for generating access token.
Basically, connecting SailPoint to your Web Services allows you to configure any web service supported managed system which can read and write on the managed system using the respective managed system’s Web Services. Web Services supports JSON and XML for read and write.
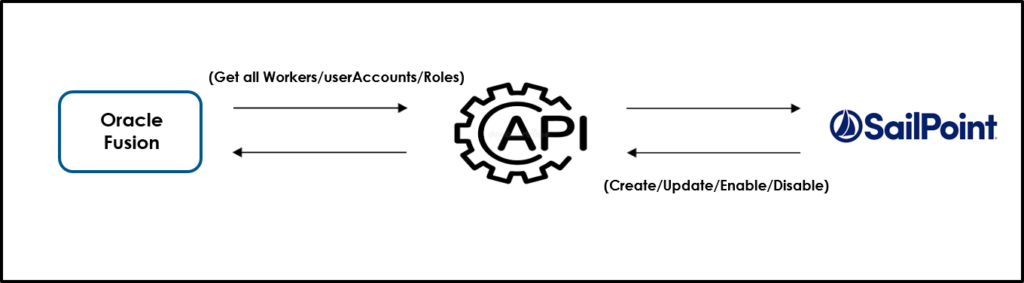
Oracle Fusion Integration with SailPoint IdentityIQ
Now, let us have a look at the Oracle Fusion REST APIs used in the Integration process. Below is the list of APIs used for integrating Oracle Fusion to SailPoint:
Get all Workers API: This fetches all the worker records as of the specified date. Worker types include employee, contingent worker, and pending worker. By default, the current date is retained.
Get all User Accounts API: This fetches all the userAccounts. We may need to manage user accounts for the workers to assign or revoke Fusion Roles
Get all Roles API: This is used the get the roles assigned to the user accounts.
Create Employee API: This is used to create an Employee record in Oracle Fusion.
Update Employee API: This is used to update an Employee record in Oracle Fusion.
Terminate Worker API: This is used to Disable a Worker record in Oracle Fusion.
Role Revoke API: This is used to revoke an assigned role.
Rehire Employee API: This is used to Enable an Employee record in Oracle Fusion.
And here, we will be using Basic Authentication in the Integration Process where we have used Username and Password of the resource owner to from connection between Oracle Fusion and SailPoint IdentityIQ
Prerequisites for integrating Oracle Fusion with SailPoint
Oracle Fusion REST APIs
Oracle Fusion instance
Base URL of the Oracle Fusion instance
As we are using Basic Authentication, we need username and password for the APIs
Now, let us discuss the use cases involved in the integration process.
Use Cases
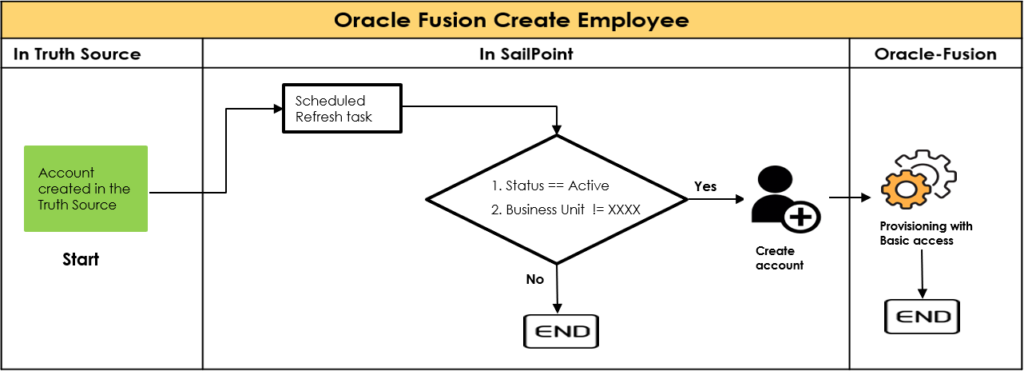
1. Joiner/Create account Process
Joiner Process starts with the creation of account in Truth Source application. Then that account will be brought to SailPoint through a scheduled aggregation task.
Joiner/Create Account Process
Then through a Scheduled Refresh Identity Cube task and using a configured Business Role and Assignment Rule, two conditions are checked.
Identity or Account in Truth Source is Active
Business Unit is XXXX
If these two conditions are satisfied. Then the account creation process for Oracle Fusion application gets triggered. As part of the Joiner or Account creation process, Basic access will be provisioned to the newly created account from the Fusion end automatically.
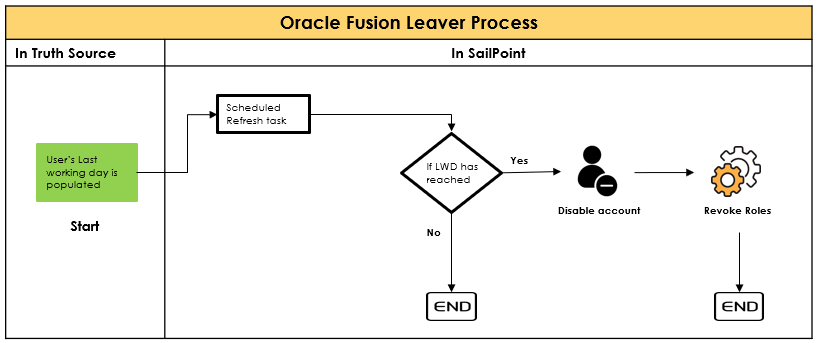
2. Leaver/Disable Account Process:
Leaver process starts when the Last working day attribute of account is populated in Truth Source application.
Leaver/Disable Account Process
Then that Last working day for that account will be updated in SailPoint through a scheduled aggregation task. Then through a Scheduled Refresh Identity Cube task, it is checked that if that Last working day is equal to Today’s date. In other words, it is checked that if the Last working day has reached.
If the Last working day has reached, then the account disable process for Oracle Fusion application gets triggered.
As part of the Termination process, all the Roles which that account has, will be de-provisioned.
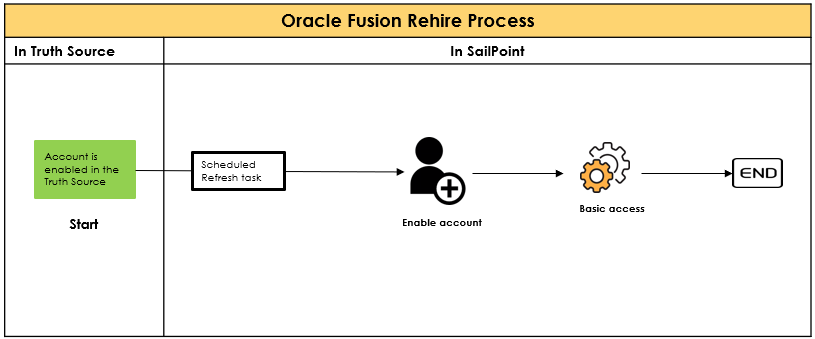
3. Rehire/Enable Account Process:
Rehire Process starts by enabling the account in Truth Source application. Then that is updated in SailPoint through a scheduled aggregation task.
Rehire/Enable Account Process
Then through a Scheduled Refresh Identity Cube task, the account enable process for Oracle Fusion application gets triggered.
As part of the Rehire/Enable account process, another new Assignment is created for that account with AssignmentName and AssignmentNumber appended with “R”. And Basic access will be assigned to that enabled account as we saw in the create account use case.
Advantages of Integrating Oracle Fusion with Sailpoint IdentityIQ:
In this integration, we have automated the creation of account in Oracle Fusion. Whereas before the integration, Oracle Fusion team had to create an account in Oracle Fusion manually for the new Joiners
In this integration, we have also automated the Disabling and Role Revoke operations. Actually, when the Last Working Date of the user has reached, then the Oracle Fusion account of this leaver will be disabled and Oracle Fusion Roles assigned to this leaver will Revoked, by Sailpoint. Whereas, before the integration, Oracle Fusion team had to disable the account and Revoked Roles in Oracle Fusion manually for the leavers.
In this Integration, we have also automated the update operation as well. From Sailpoint, we are updating the attributes such as LegalEmployerName, Department, Job, Grade, FirstName, LastName, DisplayName, etc. Whereas, before the integration, Oracle Fusion team had to handle these updates manually which will be a tedious task to do.
We have also automated the Rehire Process. When a user got rehired, then for that user, Oracle Fusion account will be enabled and a new work relationship will be created from Sailpoint.
When a user got Rehired, only the Basic access will be given, not the access that user had before Leaver process for that user initiated. The detailed discussion of Oracle Fusion introduction, Oracle Fusion TEST APIs, use cases and integration approach is discussed in the following video:
Now, let us a have a demo on integration of Oracle Fusion with SailPoint IdentityIQ in the following video:
While an organization is dealing with important projects like Identity and Access Management, COBIT implementation ensures that we are aligning with the business & IT objectives for IAM.
In this blog we are going to put some light on the COBIT framework and its implementation within the business processes of an organization.
Secured Socket Layer (SSL) is a protocol which provides the secured way of communication between the client and server with the help of the certificates. When using Apache Tomcat as a server for the deployment of SailPoint, the data that we are dealing with is sensitive in nature. With the help of Self Sign certificates, we can secure Sailpoint IdentityIQ which is hosted on tomcat server without the need of certificate authority (CA).
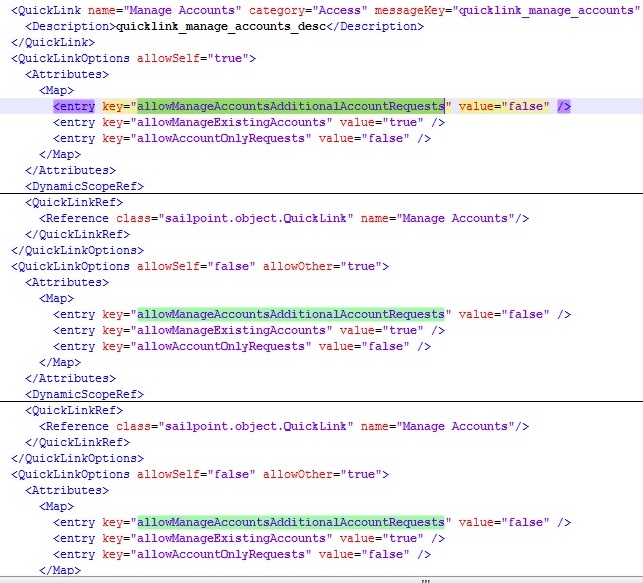
–> If you are using higher version of SailPoint 6.4 then you will face problem in finding these 3 options to enable them.
Solution 1 :
For that you need to edit init-lcm.xml and import it again in iiq console. (This will effect pre-existing workflows and LCM Configuration. So, to avoid that follow Solution 2).
Follow these steps and pictures shown below for editing init-lcm.xml (Solution 1)
Step 1: init-lcm.xml is present in ~identityIQ/WEB-INF/config/init-lcm.xml location. Make a copy of it and place it in a safe folder.
Now open init.xml and search for Manage Accounts under QuickLink tag.
In init.xml search Manage Account
Carefully observe 3 entries under Manage Accounts tag.
Original_init-lcm.xml of SailPoint 7.1 version
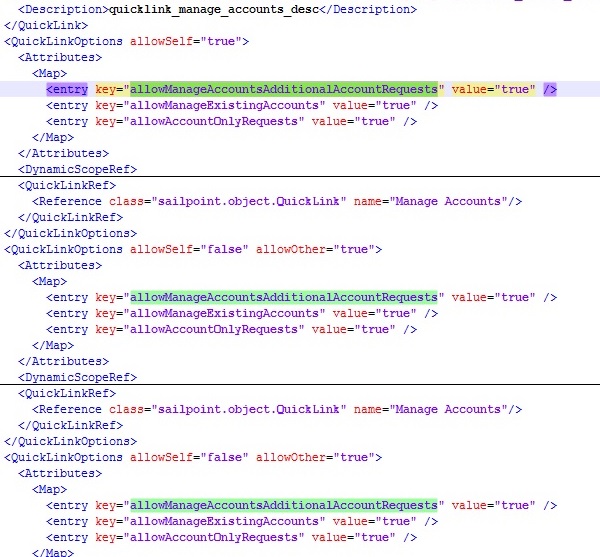
Step 2: Make few changes by enabling this options manually from false to true 3 times in Quicklink Manage Accounts tag as shown in the picture below.
Traditionally, all developers deciphered a product, by understanding the Entity Relationship model of the product’s database schema. This approach was the quick and easiest way to understand any product.
A similar approach is tried in deciphering SailPoint IdentityIQ, an Identity Governance solution from Sailpoint. The presentation envisages to give the audience a thorough understanding of the product, not from the API perspective, but from a database model perspective.
Sailpoint’s Identity IQ has some key objects like Identity, Application, Bundle etc. There are many dependent objects. Most of the key objects are covered comprehensively in the presentation.
Mis-utilization of access controls in any system has been an age old problem. Such mis-utilizations lead to serious scandals similar to Enron and MF Global in USA and Satyam scandal in India. Also they would lead to serious internal losses in the organization which could have been prevented with an identity management solution in place.
The exploitation in access controls have grown to great extents that heavily stringent laws to be followed by every organization like SoX and HIPAA have been enforced. The prime objectives of these laws is to strictly assess access control in an organization to ensure that best practices are followed to make sure access control is not misutilized.
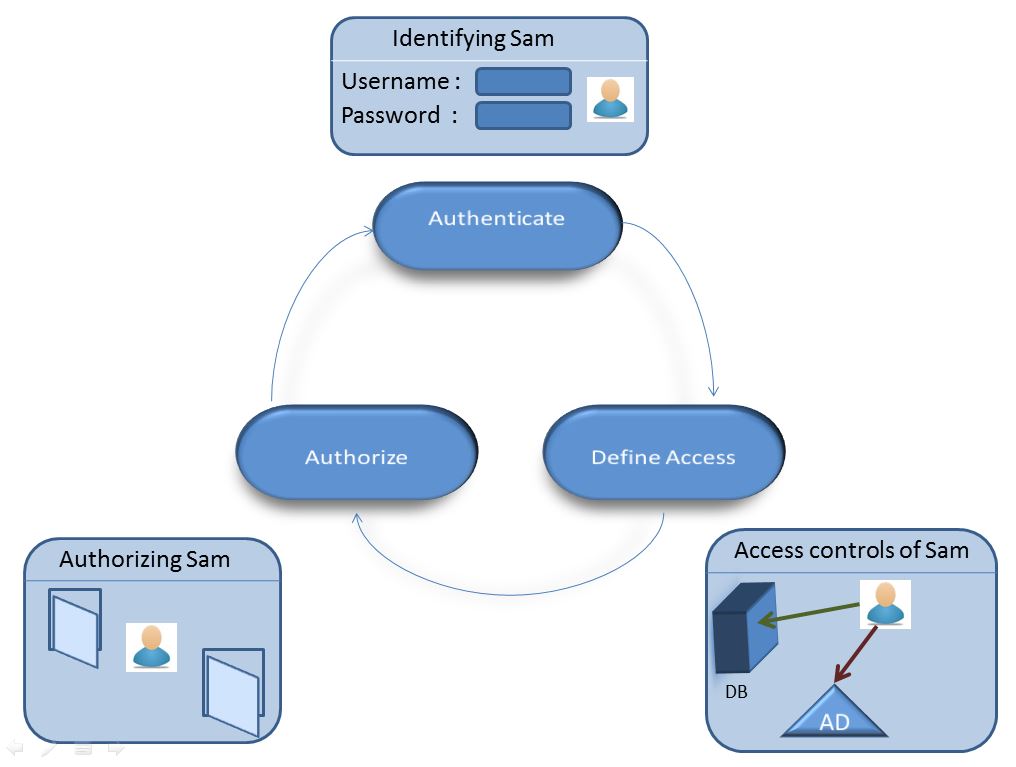
Identity management is the domain which would help the organizations solve most of the problems related to access control that could be solved by proper authentication, authorization and accountability.
Identity management solves these problems by strictly monitoring the life-cycle of an enterprise identity. Identity management solutions automate the processes of joiner, mover, leaver (which are the various phases of life-cycle of digital identity).
To monitor the JML process , identity management solutions follow various mechanisms through which CIA is actually achieved. The following are the mechanisms that are followed :
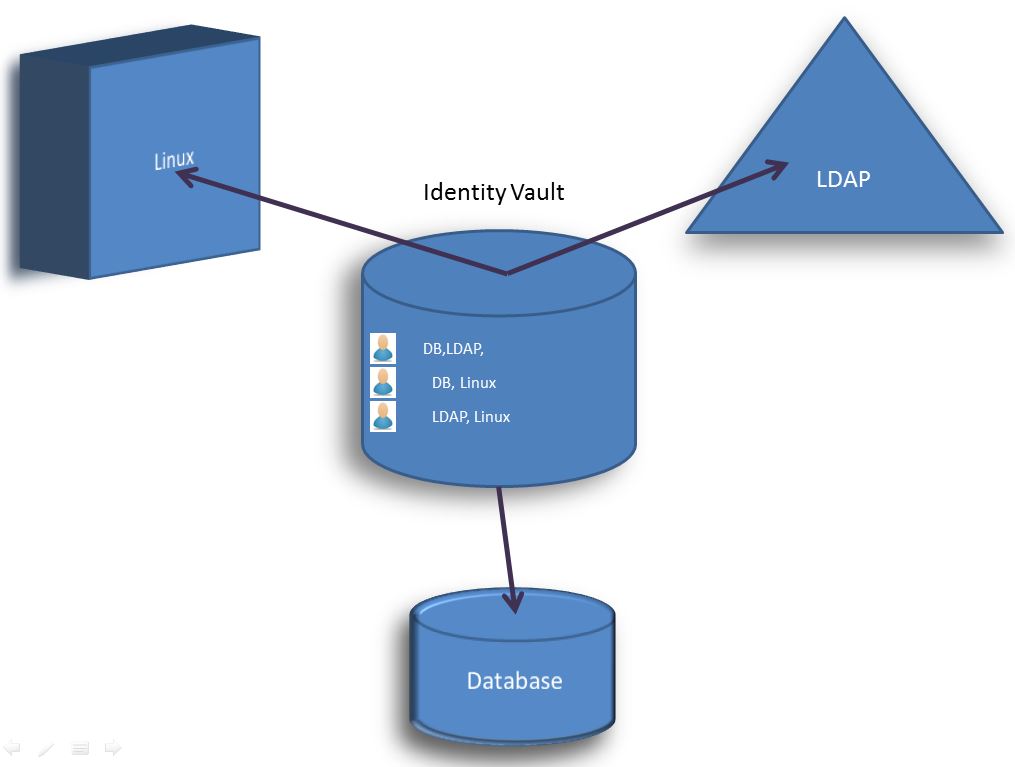
Maintaining and updating the identity repository :
An identity repository or identity vault is a huge collection of all the digital identities and a mapping of various access controls to each digital identity. It serves as base to any identity management operations.
Identity repository is created as a very first step of any identity management solution. This simply means that we have track of all the employees in the organization, their access controls to various organizational resources. Identity vault is very regularly updated to keep track any changes in the digital identities as well their access controls.
Provisioning / De-provisioning Automation :
Provisioning is the process of providing additional access controls in the organization. De-provisioning is the process of removing or disabling an access control for the resource. Both the processes are automated using the attributes or properties of an identity. For example, you may decide on a few access controls based on an employee’s designation attribute as an ‘IT-Manager’.
However, automation of provisioning and de-provisioning solely based on the identity’s attributes becomes highly complex. For easier management, identity management solutions use RBAC ( Role based access control ). As part of RBAC, virtual entities called roles are created, membership in which can lead to access to various resources. Now, the identity attributes are used to assign the memberships in these roles, thus reducing the complexity.
Process implementations :
Every organization has its own way of doing things. Hence it has its own processes that are internally followed to achieve. Similarly, there are processes that are related to the access controls. We digitally define such processes so that they could be automated . As a subpart of the processes, multiple series and parallel approvals can take place.
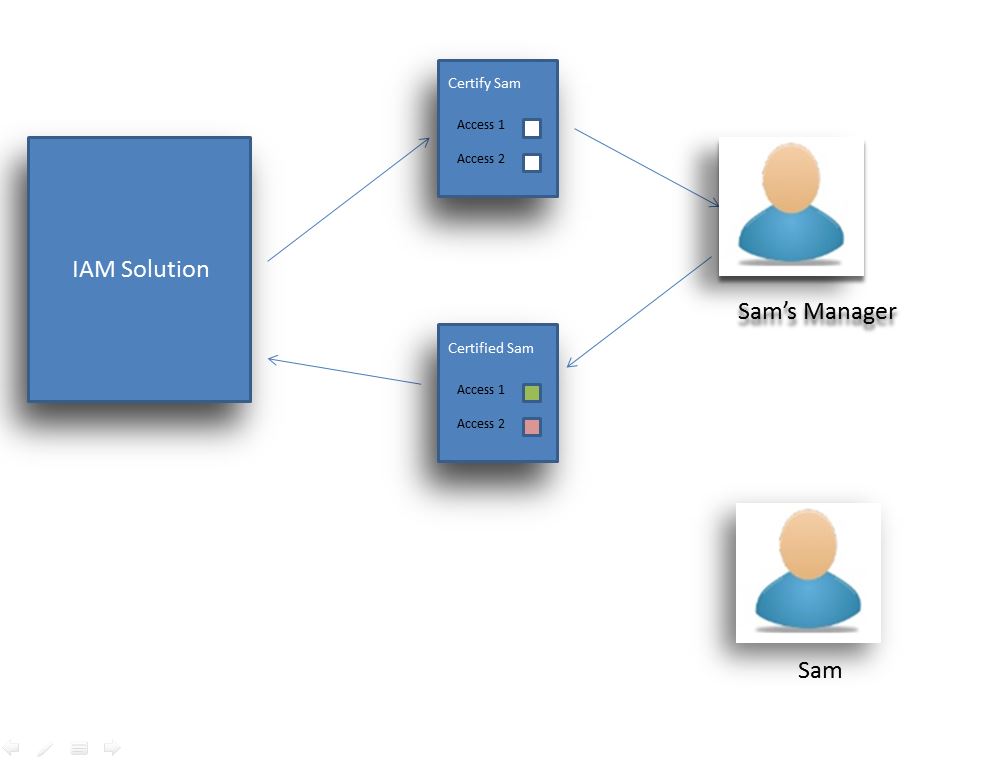
Certification :
Certification is a mechanism through which periodic monitoring of access controls take place. Access controls of various identities are forwarded to reporting identities where reporting identities can review the access.
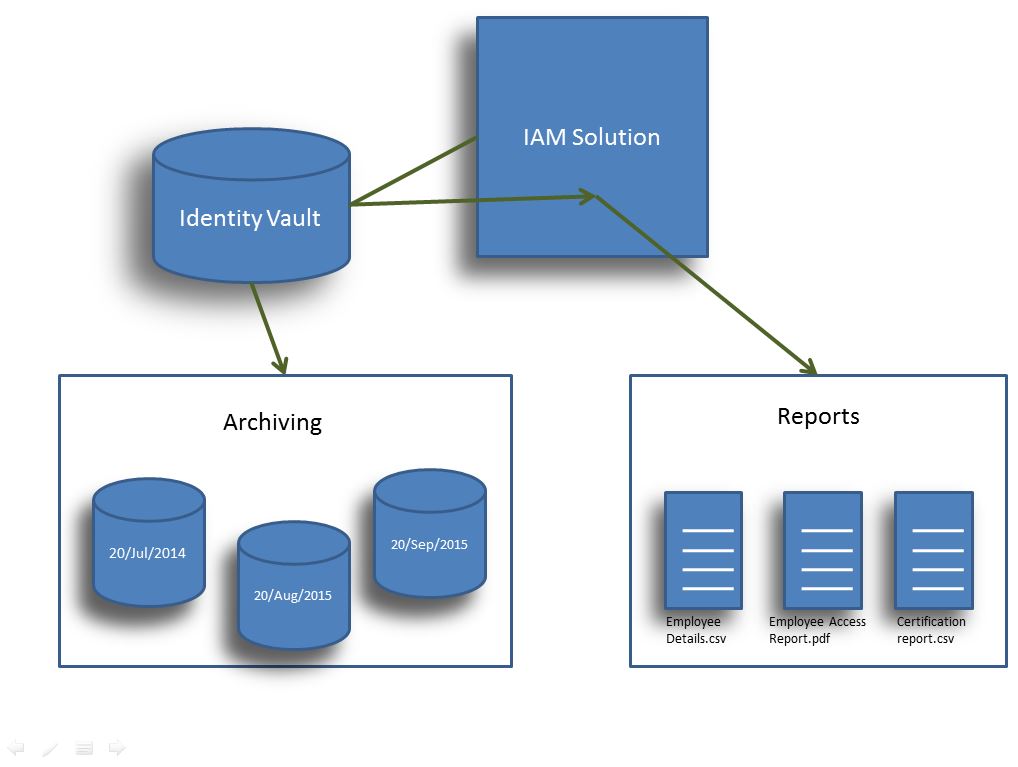
Data Archival strategies :
Even with the best of the practices, there will be a need for archiving the data. Identity management solutions also aim to archiving the past data that will not be useful in running the current state of solution.
Reporting :
While all the above mechanisms give a robust and secure system, it would be a lot convenient to have various reports based on the data present with the identity management solutions. For example, SOX reports could be pulled out of the identity management solution very easily based on the access control data available with the solution. Also the reports would be helpful in making various business decisions internally.
One day the above envelope was delivered by a postman at our office. In fact two of them turned up. The management wondered about the authenticity of the sender and try to search on the internet quickly.
The world as we know has changed dramatically. With the infiltration of personal devices and plethora of applications which collect an individual’s data with/without his/her cognizance have made enterprises, especially government services vulnerable to data loss and its consequences. However, none of the new age ways of working might not be curbed anymore.
The prudent way to step ahead into future shall be to adopt ideas like BYOD, BYOI, Work from Home, Social media enablement into the work culture and let the workforce take the advantage of delivering better. While we adopt, so do we implement the Modern way of Information security.
Data and individual are mutually dependent. Thus protecting the way and means of how data is being accessed by individuals helps solve the jigsaw.
If BYOI may be implemented very well, it helps enterprises track the way an identity acts either in the enterprise or the rest of the world wide web. Social media access has become a huge threat where information might be cross its boundaries in stealth mode. The following steps are prescribed for a safe implementation of BYOI/D methodologies.
Ensure every door opened technically has an authorized owner and there is strict accountability associated. This is technically possible.
Ensure zero identity loss by eliminating passwords as much as possible. Passwords are a menace.
Adopt techniques like biometrics, thermal scanning, retinal scans etc for high privileged accesses.
Ensure all social identities are published. Audit for the unpublished identities.
Have robust frameworks built for Mobile device management. These frameworks should be at application layer level on every device ensuring highest level tracking and auditing
Build application development frameworks to ensure zero vulnerability in code.
Last but not the least, educate everyone on social engineering, phishing and other fraudulent techniques.
Conduct periodic checks/audits to validate all identity related information.


 Identity management is the domain which would help the organizations solve most of the problems related to access control that could be solved by proper authentication, authorization and accountability.
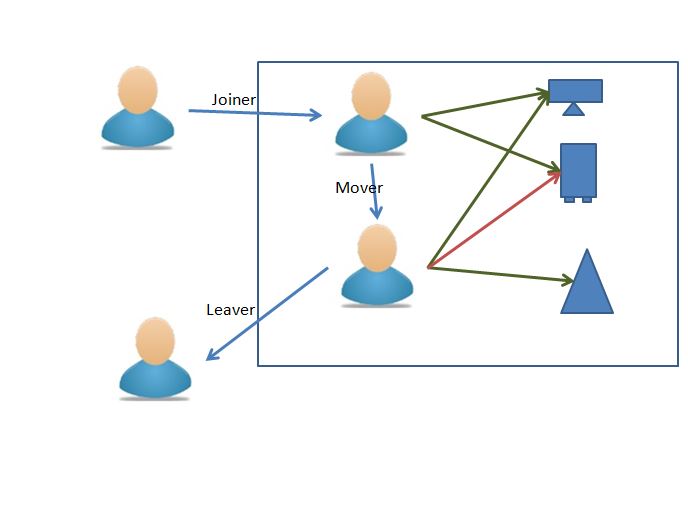 To monitor the JML process , identity management solutions follow various mechanisms through which CIA is actually achieved. The following are the mechanisms that are followed :