Introduction:
In SailPoint Identity Security Cloud, managing and governing access approvals using fixed, static workflows often leads to bottlenecks, compliance gaps, and delays. Dynamic Approval Workflow solves this by replacing hardcoded reviewer assignments with intelligent, context-aware approval routing — ensuring the right reviewer gets the right request at the right time.
Problem:
In a traditional workflow, every access request is routed to a single fixed reviewer. If that reviewers are unavailable, the request gets stuck. Low-risk and high-risk requests are treated identically, creating context blindness.
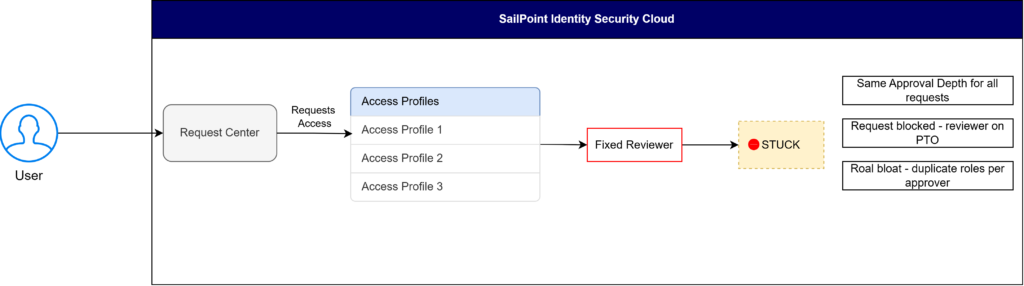
Users request elevated permissions via Request Center. The system routes to a single hardcoded reviewer. If that reviewer is on leave, the request gets and business access is delayed. Low-risk email requests get the same review burden as high-risk admin access.
Solution – Adaptive Approvals:
The purpose of Adaptive Approvals is to dynamically route requests to the best available approver based on context — who is asking, what they need, and how risky it is. Users request access through the Request Center. Once approved, the user receives the required access based on the requested entitlement.

Users can request elevated user level permissions through the Request Center. The Dynamic Router evaluates the requestor’s identity, risk score, and entitlement type to select the correct approver in real time. Once approved, the user receives the required higher permission. If rejected, no entitlement is granted and the account remains unchanged. SLA timers ensure no request is ever forgotten.
Key Features:
Below are the key capabilities of Dynamic Approval Workflow in SailPoint Identity Security Cloud:
- Real-time, context-aware reviewer selection
- Three approval types: Single, Multi-Step, and Quorum
- Serial and Parallel execution schemes
- Automated SLA reminders, escalations, and timeouts
- Two policy types: Approval Policy and Generic Approval Policy
- Full audit trail and compliance reporting
In this blog, we will be discussing about the Identity Security Cloud Adaptive Approvals feature in detail. The following are the key topics that are discussed as part of the blog.
- The Problem.
- What are adaptive approvals
- 3 Pillars of logic
- Execution Schemes
- SLAs and Enforcement
- Policy Types
In the video blog of SailPoint Identity Security Cloud Adaptive Approval Workflow, we will be discussing above mentioned topics.
Presentation:
Detailed presentation on adaptive approvals in present in the below video:
Demo:
Detailed demo on adaptive approvals is present in the following demo.