About Workday: Workday is a powerful cloud-based ERP platform that helps businesses streamline their financial and human resource process.
Benefits of Workday:
Workday is a human resource management system that helps companies with everything from hiring and onboarding to monitoring performance and keeping track of time and attendance to processing payroll.
Resource Management
Talent Management
Recruiting
Payroll
Big Data Analytics
Integration of Workday with SailPoint IdentityIQ:
Here, Workday application is integrated with SailPoint using Workday connector. You can have an overview of the connector documentation in the following link- SailPoint IdentityIQ Workday Connector.
The Workday Connector supports the following operations:
Account Aggregation (Full and Delta)
Update: Email, Phone, User ID (Internally mapped to username), Custom attributes
Let us have a quick overview on the presentation covering the Integration.
SailPoint’s Workday solution extends a deep level of management on your Workers, Contingent workers and Worker Accounts present in Workday HCM. It offers the seamless automation of your Joiner, Mover and Leaver use cases where you can manage the complete role base access control from single place with unlimited custom schema support.
Integration server: Workday is designed as a web service platform that is heavily into SOAP (Simple Object Access Protocol). The integration server is responsible for translating the SOAP into anything that might need integration and performs, generates reliable delivery.
By integrating SailPoint IIQ with Workday, organizations can automate and simplify employee onboarding and onboarding in minutes.
Let us go through the demo which covers the entire Integration of Workday with SailPoint
Automation testing refers to the testing of the software in which tester write the test script once with the help of testing tools and framework and run it on the software. The test script automatically tests the software without human intervention and shows the result.
Prerequisites for Automation:
Programming Language: As selenium support 14 different programing language Ex: java, python, Ruby, JavaScript, R. we can chose anyone but, I have chosen java.
Integrated Development Environment (IDE): Install an IDE such as Eclipse, IntelliJ IDEA, or Visual Studio Code to write and manage your Selenium scripts. i have used Eclipse
Java Development Kit (JDK): If you are using Java, you need to install the Java Development Kit (JDK) on your system.in my case I am using jdk 21 but we can use any version which is above 1.8, Since selenium 4th version has stopped supporting JDK 1.8 or below version.
Automation Testing Framework: we can choose any of the testing framework like TestNG, or Junit for java language.
Automation Testing Tool: We can use selenium, Appium, or similar tools based on the application type (Web, Mobile, etc)
I am using selenium because I am automating web page.
Let us walkthrough the Presentation for the same in the below link
Version control system: Git is commonly used for source code version control, which we have used for the demo
Build Tool: we can choose maven or Gradle for java project. I have used maven for demo
Continuous Integration server: I have used Jenkins
Eclipse is a digital workspace for automation testing. It’s a special software that makes creating and running automated tests easier. It is used by testers because it’s super flexible and works with different programming languages. It helps in writing, organizing, and running tests for finding problems or bugs in software.
Selenium is an Open source, It Supports multiple languages like java, python, Ruby. Scripts can be run on Multiple browsers like Chrome, Firefox, IE, Microsoft Edge. It supports Multiple operating systems like Linux, Windows, MacOS. It can be integrated with third party applications like TestNG, Cucumber.
TestNG is a testing framework used with Selenium for automating tests. It allows for organizing test cases, running tests in a specific sequence. It offers annotations to manage test execution flow, such as @Test for defining test cases, @BeforeMethod and @AfterMethod for pre and post-test setups, and @DataProvider for parameterization. The combination of Selenium and TestNG helps in efficient and structured automation testing, enabling testers to create, manage, and execute test cases reliably. Generates HTML reports showing test execution details.
Please find the below video which covers the entire demo on how automation works in SailPoint IIQ.
Advantages of Automation testing:
Efficiency: Automation testing can execute repetitive and complex tasks faster than manual testing.
Accuracy: Automated tests perform the same steps precisely every time, reducing the chance of human errors.
Reusability: Test scripts can be reused across different phases of development and in various testing scenarios.
Faster Feedback: Automated tests provide rapid feedback on the software’s stability and functionality.
Connectivity is critical to successful IAM deployments. SailPoint is committed to providing design, configuration, troubleshooting and best practice information to deploy and maintain connectivity to target systems. SailPoint IdentityIQ enables you to manage and govern access for digital identities across various applications in your environment. Connectors are the bridges that IdentityIQ uses to communicate with and aggregate data from applications. SailPoint IdentityIQ provides a wide range of OOTB connectors that facilitate integration with variety of systems, applications and data sources. These connectors are designed to simplify the process of managing Identity information and access across different platforms.
In SailPoint IdentityIQ, a Custom Connector is a specialized integration component that allows the IdentityIQ platform to connect and interact with external systems, applications, or data sources that are not supported by the standard OOTB connectors. Custom connectors extend the capabilities of IdentityIQ by enabling it to manage identity-related information in a wider range of systems.
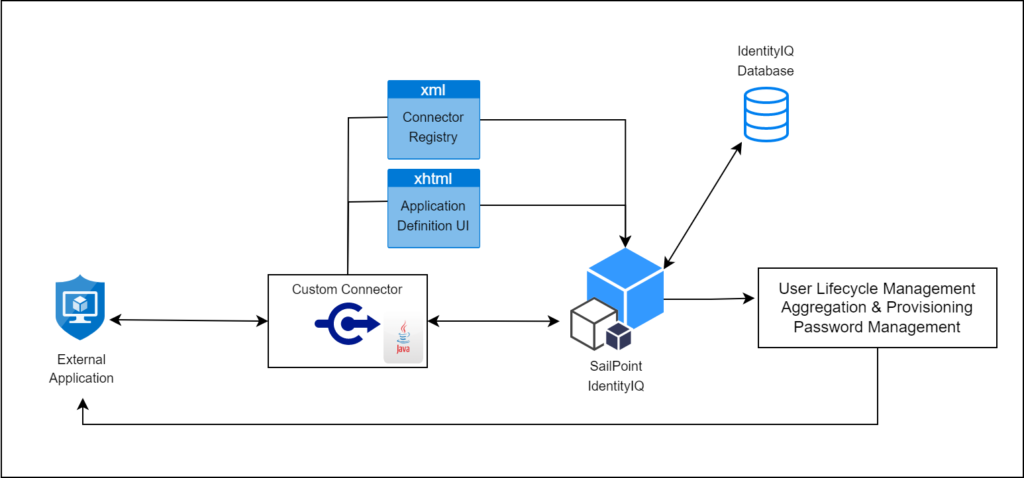
High level architecture of Custom connector
Custom Connector Development
Developing Custom connector in SailPoint IdentityIQ involves creating a Java-based implementation that adheres to the connector framework and API provided by SailPoint.
This allows you to define the interaction between IdentityIQ and the specific external system you want to integrate with. A typical development of custom connector includes 4 steps –
Creating a new implementation of functionality and packaging it into JAR file.
The custom connector uses the openconnector framework provided by SailPoint in the openconnector package where there are lot of methods provided for different type of operations.
The custom logic which you want to implement using this custom connector shall be developed in the specified methods.
Once code development is completed, Custom connector code with all the classes must be compiled and packaged to a JAR file.
And the JAR file must be placed in WEB-INF/lib folder of IIQ Installation directory
Defining Connector type in Connector Registry
Connector Registry is an XML file present in IdentityIQ as Configuration object. This file contains the information about all the different connectors and their related details.
Now that we have created a new connector in our IdentityIQ, we have to declare its information and details in Connector Registry.
Here we will create an xml file consisting of the details pertaining to our custom connector. Once we Import this xml file into IdentityIQ, it will be merged with the existing Connector Registry file in IdentityIQ database allowing IdentityIQ to create a new entry in the list of connectors.
Alternatively, the Connector Registry could be manually edited through the Debug page.
Defining .xhtml page which specifies required and optional connection parameters.
Usually, some parameters are required to define the connection to the target resource (e.g. host, port, username, password, etc.).
To allow these parameters to be specified through the UI for each application that uses this connector, an .xhtml page must be written to define how the Application Configuration user interface will request and record those parameters.
This file must be placed in the [IdentityIQ Installation Directory]/define/applications/ directory and must be referenced in the application definition’s XML as the “formPath” entry.
Testing the connector by Creating an application which uses this connector.
Finally, after completing all the development related activities, one must start the application server which is hosting IdentityIQ.
An Application object must be created for using the IdentityIQ’s UI. Select the configured custom connector as application type to tie it to the connector registry configuration and specifying any connection parameters through the configuration.
Once the application is onboarded, we can perform all the configured functionalities in it and verify back the results within the targeted external application.
Alternatively, Applicationconnector can be tested from the integration console (run iiq integration from the [IdentityIQ Installation Directory]/WEB-INF/bin directory).
This console can be used to test the various features of your connector including Aggregation and Provisioning.
The following presentation gives you clear understanding of custom connector development in detail.
IdentityNowworkflows are a way to automate processes related to Identity Security Cloud. These processes when carried individually are manual, error prone and laborious in nature.
Here are a few examples of the power of workflows.
Design workflows that can handle a growing number of users onboarding requests, ensuring scalability as the organization hires new employees.
Design workflow to raise tickets in ticketing system to automate the resolution of access-related issues reported by users, ensuring a streamlined process.
Modify an existing workflow to include new steps for managing temporary access during a special project, adapting to changing business needs.
Implement a workflow for access reviews that automatically identifies and revokes unnecessary access rights, ensuring that users only retain permissions relevant to their current roles.
Send email alert when an identity changes group in end application.
No human involvement while configuring and activating certification campaign when identity changes department and also send email alert to reviewer.
In this video blog, we will be discussing about the IdentityNow workflows in detail. The following are the key topics that are discussed as part of the blog.
Introduction Automation testing refers to the testing of the software in which tester write the test script once with the help of testing tools and framework and run it on the software. The test script automatically tests the software without human intervention and shows the result.
Prerequisites for Automation: To begin automation testing using Selenium, there are few prerequisites should have in place:
Programming Language: Choose a programming language in which you will write your test scripts. Java, Python, C#, and Ruby are common choices for Selenium automation. You should have a good grasp of the chosen language.so we have chosen java.
Integrated Development Environment (IDE): Install an integrated development environment (IDE) such as Eclipse, IntelliJ IDEA, or Visual Studio Code to write and manage your Selenium scripts. We have chosen Eclipse as IDE platform.
Java Development Kit (JDK): If u opt for Java, you’ll need to install the Java Development Kit (JDK) on your system.
Selenium WebDriver: Download the Selenium WebDriver for your preferred programming language. You can add the WebDriver libraries to your project using build tools like Maven.
Web Browsers: Make sure you have the web browsers you intend to automate (e.g., Chrome, Firefox) installed on your system.
Web Drivers: Selenium interacts with browsers through web drivers. You should have the appropriate web drivers for the browsers you plan to test with (e.g., Chrome Driver, Gecko Driver). These should be downloaded and configured. Ensure that your chosen IDE is integrated with the Selenium WebDriver, making it easier to write, run, and debug test scripts.
Test Framework: Select a test framework such as TestNG or Hybrid. Test frameworks help structure your tests and provide reporting capabilities.
By meeting these prerequisites, you’ll be well. prepared to start automation testing using Selenium and create efficient, maintainable, and effective test scripts.
The following below video showcases a small presentation on automation testing:
Tools used for Automation testing.
Eclipse: Eclipse is a digital workspace for automation testing. It’s a special software that makes creating and running automated tests easier. It is used by testers because it’s super flexible and works with different programming languages. It helps in writing, organizing, and running tests for finding problems or bugs in software, making sure everything works smoothly.
Selenium: Selenium is an Open source, It Supports multiple languages like java, python, Ruby. Scripts can be run on Multiple browsers like Chrome, Firefox, IE, Microsoft Edge. It supports Multiple operating systems like Linux, Windows, MacOS. It can be integrated with third party applications like TestNG, Cucumber.
TestNG: TestNG is a testing framework used with Selenium for automating tests. It allows for organizing test cases, running tests in a specific sequence. It offers annotations to manage test execution flow, such as @Test for defining test cases, @BeforeMethod and @AfterMethod as you can see the highlighted point in the picture for pre and post-test setups, and @DataProvider for parameterization. This combination of Selenium and TestNG helps in efficient and structured automation testing, enabling testers to create, manage, and execute test cases reliably. Generates HTML reports showing test execution details.
Maven: Maven is an open-source tool. Maven allows to download all the JARs and Dependencies and manage lifecycle for a Selenium Java project. This makes it easier for the QA to configure dependencies for Selenium Java by automatically downloading the JARs from the Maven repository.
Advantages of Automation testing
Efficiency: Automation testing can execute repetitive and complex tasks faster than manual testing. Accuracy: Automated tests perform the same steps precisely every time, reducing the chance of human errors. Reusability: Test scripts can be reused across different phases of development and in various testing scenarios. Faster Feedback: Automated tests provide rapid feedback on the software’s stability and functionality.
Let us see how we can execute the test cases in the below video:
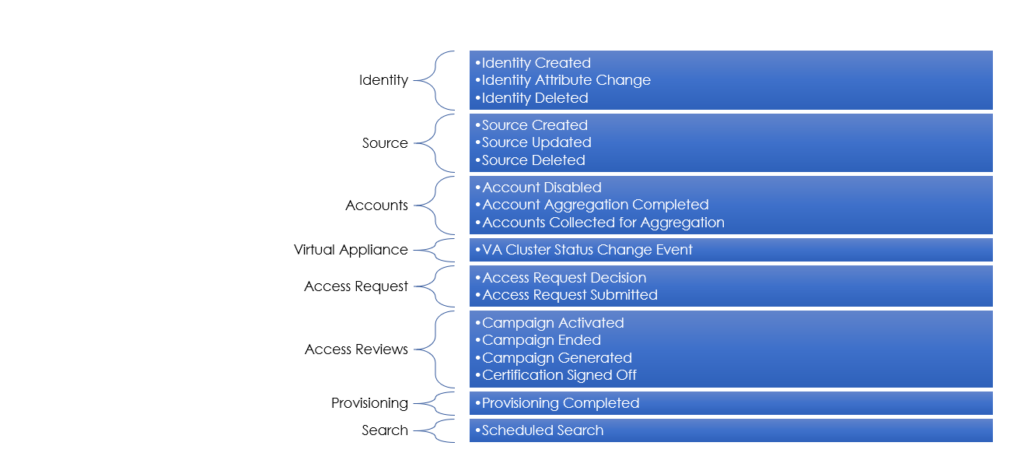
Event triggers is an extensibility feature released by SailPoint which enables us to integrate identity now with third party applications.
Event Triggers: In SailPoint any action is performed like account aggregation, account created, source created, source deleted called events, based on this event we can perform any new action called event trigger. Based on the different events SailPoint provides the different event triggers to perform action in identity now. In SailPoint tenant we can see the available event triggers, based on customer requirement we can subscribe the event trigger.
Types of Event Triggers:
Response required: A response-required trigger enables two-way interaction between the subscriber and the trigger service. This trigger type waits for the subscriber to respond with instructions on how to carry out the event.
Fire and Forget: fire-and-forget event only support one-way communication with subscribers. Its only job is to forward all received events to each subscribing service. This trigger type doesn’t wait for a response from subscribers
Available Event Triggers in SailPoint IdentityNow
Now, let us go through a presentation on Event Triggers in SailPoint IdentityNow.
Use Case
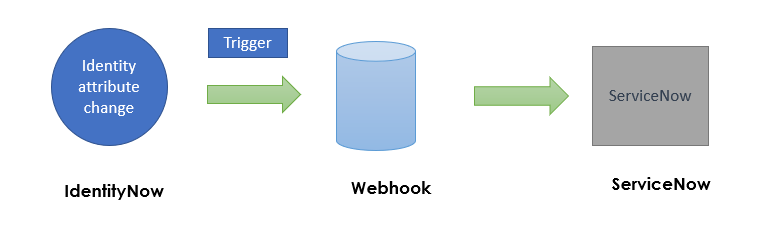
When target system is to create a request in ServiceNow instance when user is terminated from organization.
We can track user status based on Identity attribute cloud Lifecycle state.
We can use Identity attribute change event trigger and create a request in service now instance.
Whenever an Identity Attributes change on Identity.
It triggers to external system (Webhooks), when Identity attributes change.
Now, let us go through a demo on Event Triggers in SailPoint IdentityNow.
Filtering Events
A filter refers to a mechanism that allows to specify criteria for selecting or excluding certain identity or access-related information.
Benefits of using Filtering
By using filters, you can reduce the number of events that trigger actions. This minimizes unnecessary processing and resource consumption, making our implementation more efficient.
Constructing a Filter
Event trigger filters are constructed using a Jayway JSONpath expression.
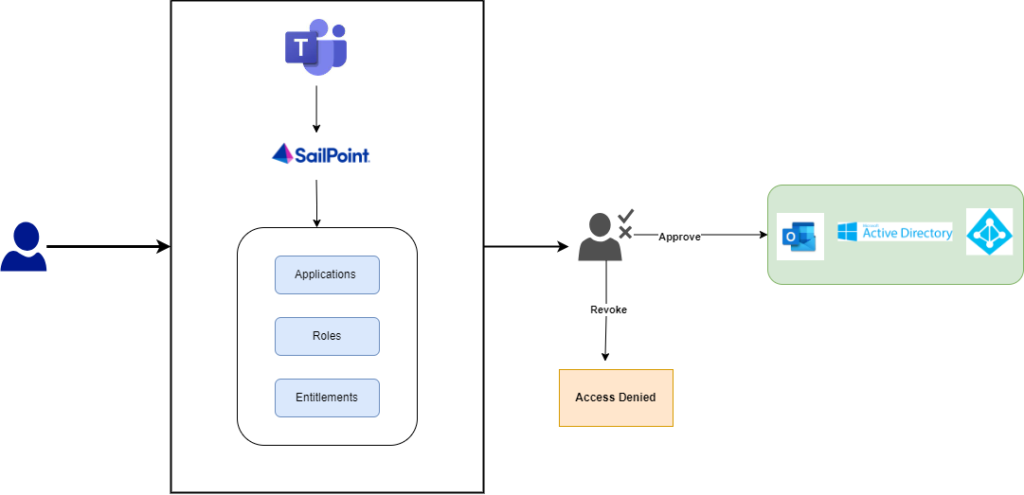
SailPoint for Microsoft Teams provide users access to corporate resources anytime, anywhere right from Microsoft.
Users are distributed worldwide, the number of applications used are constantly increasing and the lines between who can access these applications and who should access these apps are increasingly getting blurred. SailPoint for Microsoft Teams enables users to get the access they need to stay productive right from within the tool they use the most, all while maintaining strict governance and compliance controls.
Transform allows you to manipulate attributes values while provisioning to a source. It will help in manipulating any incoming data from the source as per the requirement.
Transforms are configurable objects that define easy ways to manipulate attribute data without requiring you to write code. Transforms are configurable building blocks with sets of inputs and outputs.
As we can see in diagram there is Input-Transform-Output. In input the value or data is coming from identity attributes or Account attribute and according to requirement we will write the transforms and in output we can see our result.
Transform syntax
The Transform syntax has the following properties:
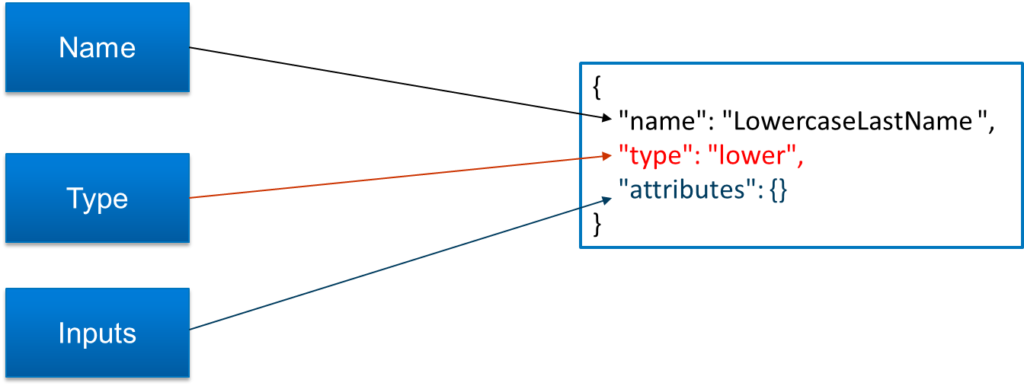
The basic requirement for a transform is name, type, attributes.
For name, we can take any objects and that will reflect to your identity profile.
For Type, we can put the transforms according to your requirement.
For inputs, the developer can decide whether we want to take the value from identity attribute or Account attribute.
Basic String Operations
These are basic string operation there are 18 transform. These transform are commonly used in any operation.
I will discuss each and every transform.
1)Base64 Decode– This transform is used for converting String to Base64. Basically it used for decoding purpose.
2)Base64 Encode-This transform is used for converting Base64 to String. Basically it used for encoding purpose.
3)Concatenation-Concatenation transform is used for Combining two string. This transform basically used to combined first name and last name.
4)Index Of– The index of transform is used to get the location of a specific substring. Suppose that if we give the string to find the index of a string if its found it will return the index number, if doesn’t find it will return -1.
5)Substring– Substring transform is used to take the specific part of the string with provided begin index and end index.
6)Split– Split Transform basically used to split the string based on the provided delimiter. This transform is often useful when you want to split combined names into their constituent parts or when you want to simplify an ordered list of values into a single attribute.
7)Leftpad – Left pad transform to pad the string left side with a user-supplied character out to a specific number of characters. This transform is often useful for data normalization situations. such as user IDs are not uniform in length.
8)Right pad– Right pad transform to pad the string right side with a user-supplied character out to a specific number of characters. This transform is often useful for data normalization situations. such as user IDs are not uniform in length.
9)Replace– Replace transform is used for replace the specific string based on the provided regex.
10)Replace All– Replace All transform used to replace the string based on the provided table attribute of key-value pairs as an argument.
11)Upper– Upper transform use to convert an string into uppercase letters.
12)Lower– Lower transform use to convert an string into lowercase letters.
13)Static– Static transform is use to return a fixed string value, or more commonly, to evaluate Velocity. Static transform can also take other dynamically provided variables as inputs into the value attribute.
14)Last Index of – The last index of transform is used to get the last location of a specific substring.
15)Trim– Trim transform used to trim whitespaces from both the beginning and ending of input strings.
16)Get End of String– Get end of string transform as an out-of-the-box rule transform provided through SailPoint’s Cloud Services Deployment Utility rule. The transform allows you to get the rightmost N characters of a string.
17) Decompose Diacritial Marks– Decompose Diacritial marks transform is used to remove the diacritical marks.
18)E.164 phone transform:- The E.164 phone transform is used to convert an incoming phone number string into an E.164-compatible number.
Date Operation
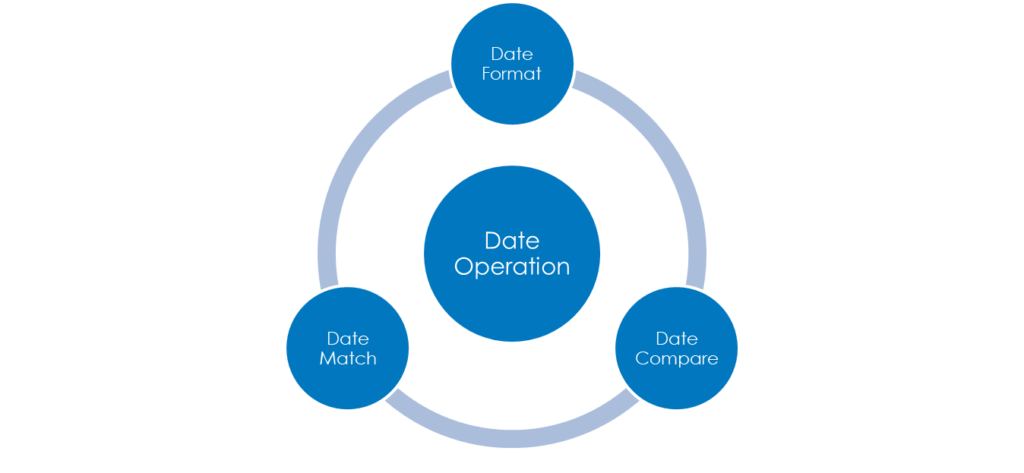
Under the date operation there are three transform.
2)Date Format:- The date format transform is used to convert datetime strings from one format to another. It is useful when you are syncing data from one system to another, because each application uses a different format for date and time data.
3)Date Math:- Date Math transform can be used for performing mathematical operation like addition, subtractions and rounding of a timestamp.
It also allows you to work with a referential value of “now” to run operations against the current date and time instead of a fixed value.
Generators
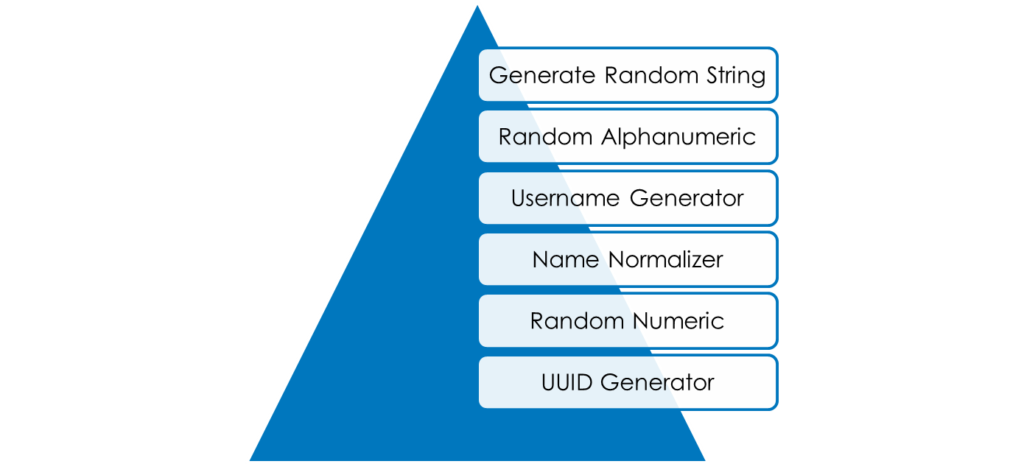
Under generators Transform there are six different transforms are present.
Under generators Transform there are six different transforms are present.
1)Generate Random String- Generate Random String Transform provided through SailPoint’s Cloud Services Utility rule. This transform allow us to generate a random string of any length.
2) Random Alphanumeric:- The random alphanumeric transform is used to generate a random string of any provided length, if we do not provide the length it will give the default output that is 32 char. comprising both numbers and letters (both lowercase and uppercase). The maximum allowable value is 450 characters.
3)Username Generator:- To set the logic to use when it determines a unique value for an attribute in an account create profile, utilize the username generator transform. The logic of the generator can be as basic as combining elements of an HR record or the user’s name.
4)Name normalizer:- The name normalizer transform is used to clean or standardize the spelling of strings coming in from source systems. The most common use for this transform is for names.
5)Random Numeric:- The random numeric transform is used to generate a random number of any length. The transform defaults value is 10 char. and maximum allowable value is 450 characters.
6)UUID Generator:-The UUID generator transform is use to create a universal unique ID (UUID) in the form of a 36-character string.
Extending Transforms
Under extending transforms there are two transforms.
1)Reference transform:- The reference transform is used to reuse a transform that has already been written within another transform. We can use this transform when you want to repeat the same logic multiple times within other transforms.
2)Rule Transform:- Rule transform allows you to reuse logic that has already been written for a previous use case. you can use the rule transform to reuse code contained within a Generic rule.
Rules Vs Transforms
Transforms
Transforms are JSON-based configurations, editable with IdentityNow’s transform REST APIs.
It supports complex logic to modify aggregation and provisioning process.
We can view, create, edit, and delete transforms directly via REST API without any involvement of SailPoint.
Rules
Rules are implemented with code (typically BeanShell, a Java-like syntax).
It support more complex logic.
By creating Rules there is involvement of Sailpoint for cloud rules.
API stands for Application Programming Interface. APIs are mechanisms that enable two software components to communicate with each other using a set of definitions and protocols.
API architecture is usually explained in terms of client and server. The application sending the request is called the client and the application sending the response is called the server.
API Workflow
Fig. – API dataflow
What is REST API:
REST stands for Representational State Transfer. This is the most popular and flexible APIs found on the web today. The client sends requests to the server as data. The server uses this client input to start internal functions and returns output data back to the client. REST defines a set of functions like GET, POST, PUT, DELETE, etc. that clients can use to access server data. Clients and servers exchange data using HTTP.
The main feature of REST API is statelessness. Statelessness means that servers do not save client data between requests. Client requests to the server are similar to URLs you type in your browser to visit a website. The response from the server is plain data, without the typical graphical rendering of a web page.
Post Operation: POST APIs request allows appending data to the endpoint. This is a method used to add information within the request body in the server. It is commonly used for passing delicate information.
GET operations: GET APIs request is used to obtain details from the endpoint and does not have any impact on the endpoint. The GET request does not update any endpoint data while it is triggered.
UPDATE operations: PUT APIs request is used to pass data to the server for creation or modification of an endpoint. The difference between POST and PUT is that POST request is not idempotent.
DELETE operations: DELETE APIs request deletes a resource already present in the server. The DELETE method sends a request to the server for deleting the request mentioned in the endpoint.
Let us understand usage of REST API’s in SailPoint IdentityNow in the following below presentation:
Pre-requisite
Base URL of SailPoint tenant.
secret key and client ID for the token generation.
Authentication is the process of determining whether someone or something is, in fact, who or what it says it is. Authentication provides access control for systems by checking to see if a user’s credentials match the credentials in a database of authorized users or in a data authentication server. In doing this, authentication assures secure systems, secure processes and enterprise information security.
OAuth 2.0 is the industry-standard protocol for AUTHORIZATION.
OAuth 2.0 is designed primarily as a means of granting access to a set of resources, in simple way OAuth 2.0 Access Token is a string that the OAuth client uses to make requests to the resource server.
JSON Web Token
JSON Web Token (JWT) authentication is a stateless method of securely transmitting information between two parties as (JSON) object. It is often used to authenticate and authorize users in web applications and APIs.
Rest API Authorization in IdentityNow
Authorization in system security is the process of giving the user permission to access a specific resource or Authorization is the act of validating the user’s permission to access a given resource. This term is often used interchangeably with access control or client privilege.
Personal Access Token in IdentityNow
In IdentityNow a personal access token (PAT) is a method of authenticating to an API as a user without providing a username and password.
Now, let us go through a demo on how we can use these REST API’s in SailPoint IdentityNow.
Features of Rest API in IdentityNow
APIs extend IdentityNow functionality and Usability
Advanced configuration such as
Transform creation
Customization of account profiles
Ranking authoritative source priority
System level changes
Object management
Interface with other systems – pull data/initiate processes
Identity management (IDM), also known as identity and access management (IAM), ensures that authorized people and only authorized people have access to the technology resources they need to perform their job functions.
And access is managed by the user lifecycle state in IdentityNow. Identity Lifecycle State aims to automate and manage the entire digital identity lifecycle process and access throughout the organization.
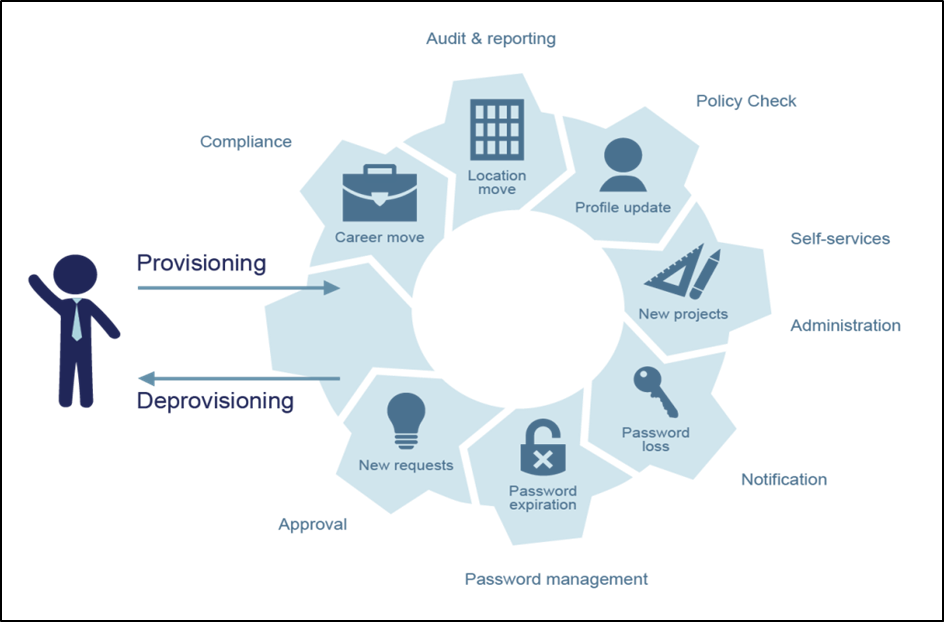
Identity lifecycle is a set of stages of the identity from the creation to its deactivation or deletion. It contains a creation of an account, assignment of correct groups and permissions, setting and resetting passwords and in the end deactivation or deletion of the account.
Figure 1: Identity Lifecycle Management
Handling the unwanted identities in SailPoint increases the processing time and reduces the usability of the SailPoint tenant. To reduce the process and speed up the work, in tenant only limited and require identities we can handle, handling is easy and processing the limited identities is a less time-consuming process, so we can delete unwanted and terminated users’ identities from SailPoint.
Now, let us have a look at the SailPoint REST API’s used in the Identity deletion process. Below is the list of APIs used for Identity deletion in SailPoint IdentityNow:
Figure 2: REST APIs in PowerShell Script connecting with SailPoint IdentityNow
Authentication: This is used to create an access Token (Bearer token).
Search – Perform Search(v3 API): This is used to fetch the all “30daysPostTermination” or “terminated” lifecycle state identities.
And here, we will be using A personal access token (PAT) is a method of authenticating to an API as a user without providing a username and password.
Prerequisites for Identity deletion:
SailPoint REST API’s.
Client ID and Client Secret.
IQservice Server.
Now, let us discuss the use case of Identity deletion.
Use Case:
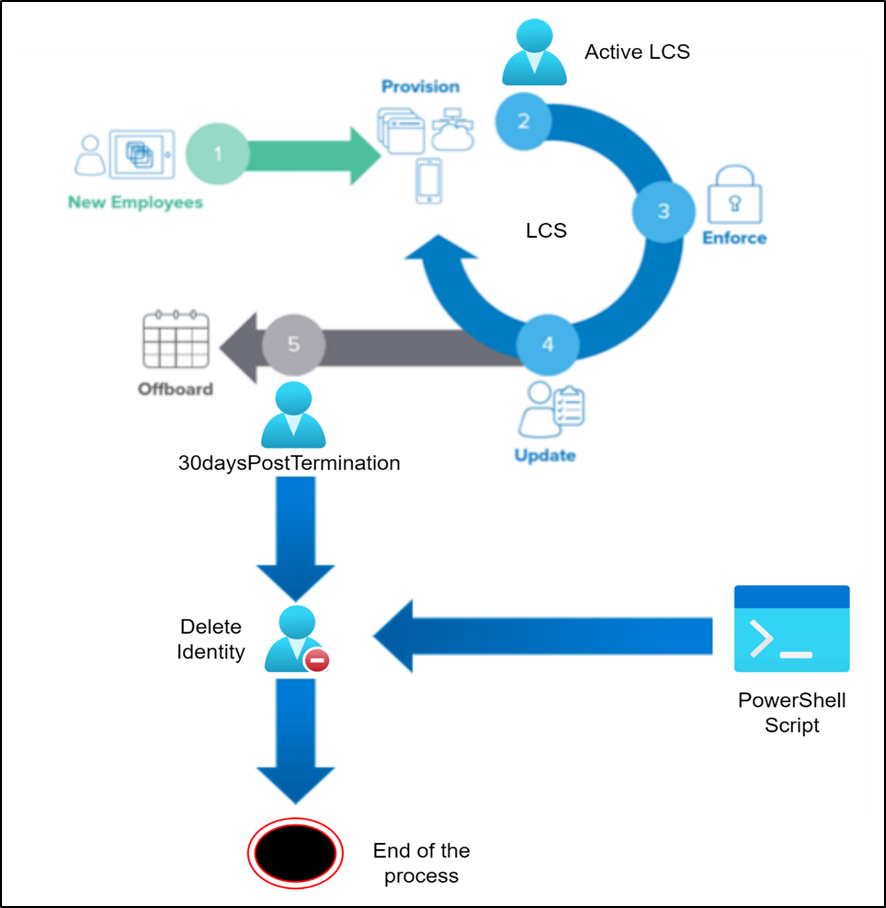
All the identities in the “30daysPostTermination” lifecycle state will be deleted from IdentityNow.
The deleted identities would be re-aggregated in the next aggregation cycle as “Uncorrelated accounts” in target application, and hence would not affect the new hire creation logic and the SAMAccount name would remain unique as per the requirement and the logic defined.
A PowerShell script will be developed to call the APIs to identify all the Identities in the required lifecycle state i.e. “30daysPostTermination” and will delete the accounts from the HRMS Source for all the Identities.
Figure 3: Use Case diagram.
Steps Overview as per the script:
Step1: As part of the PowerShell script first it will read the require details from property file. In property file we can maintain the ClientID, client Secret, base URL, search query, deletion limit, log file path and debug values.
Step3: Next Search API will execute and the fetch “30daysPostTermination” lifecycle state identities from SailPoint Tenant.
Step4: One by one Identities will pass to Delete API to delete from SailPoint Tenant.
Let us understand Identity Deletion by using SailPoint REST APIs, use cases and automation of the script via windows task scheduler in the following below presentation:
Advantages of Identities Deletion in SailPoint IdentityNow.
It will increase the usability of the tenant.
It decreases the aggregation and identity refresh process time.
It will fasten the backend processes and reduce the unwanted identity handling.
Reduce the burden on the tenant.
When a user got terminated or left the organization, all access will be removed, and accounts will be disabled. Now, let us go through a demo on how we can achieve identity deletion in SailPoint IdentityNow.