In today’s enterprise environments, organizations often operate in complex identity ecosystems, especially when they span multiple business units or partner organizations. For businesses using Okta as their Identity Provider (IdP), cross-tenant access can become a hurdle without proper integration strategies. One powerful solution to this challenge is the Okta Org2Org integration using the OpenID Connect (OIDC) protocol, which allows for secure and seamless identity federation between two separate Okta tenants.
Problem Statement
Employees from the WIC Okta tenant regularly need to access customer-facing applications hosted within the CIC Okta tenant. However, this currently requires them to maintain separate credentials for each tenant. This fragmented login experience leads to user confusion, slower access times, and diminished productivity.
From an IT and security administration standpoint, managing duplicate user accounts, enforcing consistent security policies, and maintaining compliance across tenants introduces unnecessary complexity and risk. Without a centralized authentication strategy, organizations struggle to ensure unified access control, increased visibility, and a consistent user experience.
Solution
To address these challenges, we propose implementing Okta Org2Org integration using the OIDC protocol. This allows WIC users to authenticate into CIC-hosted applications using their existing WIC credentials providing a Single Sign-On (SSO) experience.
The Org2Org integration treats the WIC Okta tenant as an Identity Provider (IdP) and the CIC tenant as a Service Provider (SP). Leveraging OIDC, this setup enables token-based authentication and seamless identity federation without the need for duplicate accounts.
Use-Case Overview:
Check out the presentation below to explore how to set up Okta Org2Org Integration using OIDC, enabling secure identity federation between multiple Okta tenants.
Technical Demonstration:
Watch the demo below to see a step-by-step configuration of Okta Org2Org Integration using OIDC, enabling secure and scalable identity federation between tenants.
Conclusion
The Okta Org2Org integration using OIDC creates a robust and user-friendly SSO experience across different Okta tenants. By bridging identity systems and automating authentication through federation, enterprises can streamline user access, improve security posture, and reduce administrative friction. As multi-tenant setups become increasingly common in large organizations, implementing solutions like these ensures smooth, secure, and scalable identity management.
Active Directory (AD), a directory service developed by Microsoft for Windows domain networks, is primarily used for authentication and authorization, helping organizations manage user access to resources. However, as organizations increasingly adopt cloud-based applications, managing user access across disparate directories has become a challenge for traditional Active Directory (AD)/LDAP systems. Each cloud service often introduces its own user store, leading to a proliferation of login credentials and making it difficult to maintain consistent, secure access control.
This complexity can result in administrative headaches, such as trouble deactivating user accounts when employees leave and a lack of visibility into resource access. To address these issues, many companies turn to Okta, an identity management platform that integrates seamlessly with Active Directory, bridging the gap between on-premises and cloud environments. By using Okta, organizations can continue to leverage their existing AD or LDAP services for user authentication while centralizing User Lifecycle Management, providing a unified dashboard for administrators to ensure consistent, secure access control across all systems.
Understanding Okta Universal Directory
Okta Universal Directory is a centralized platform designed for managing user identities from various sources. As a core component of the Okta Identity Cloud, Universal Directory provides a centralized view of all users and their respective attributes, making it easier for IT teams to oversee and manage user data. This product enables organizations to maintain a unified profile for a user, no matter where their data comes from. This capability is especially advantageous for enterprises with multiple user directories, as it simplifies user management and bolsters security.
Key Features of Okta Universal Directory
Centralized User Management: Universal Directory allows you to manage all your user identities in one place. This means that whether your users are employees, partners, or customers, you can easily create, modify, or deactivate their accounts without jumping between different platforms.
Integration with Multiple Sources: It allows integration with various identity sources, including Active Directory (AD), LDAP, and HR systems like Workday. This flexibility ensures that organizations can consolidate user information from different platforms seamlessly.
Customizable User Profiles: Universal Directory supports both Okta user profiles and app-specific user profiles. This capability allows organizations to define and manage user attributes tailored to their applications, ensuring that each app only accesses the data it needs.
Customizable User Attributes: With Universal Directory, you can customize user attributes to fit your organization’s unique needs. This flexibility enables you to collect and store specific information relevant to your users, such as job titles, department details, or location data.
Real-Time Synchronization: Changes made in AD, such as user updates or account deactivations, are synchronized in real-time with Okta. This ensures that terminated employees lose access immediately, enhancing security and compliance.
Delegated Authentication: The integration allows for delegated authentication, meaning that users can authenticate against AD without needing direct access to the AD environment. This feature simplifies the authentication process while maintaining security.
Prerequisites
Okta Tenant:
You must possess an account with Super Admin role privileges.
On-Premises Active Directory:
The host server should have at least two CPUs and a minimum of 8 GB RAM.
Host server running Windows server 2016 & above.
.NET framework 4.6.2 and above.
The host server should be a member server part of the same domain.
Okta agent installation wizard should be executed from the host server.
An account with Domain administrator privileges for domain discovery & AD agent application installation in the host server.
Delegated Authentication – Enables the users to use their AD credentials to access Okta & downstream applications. This feature is enabled by default.
Usecase Overview:
Check out the video below to explore Okta’s Universal Directory and how it works with Active Directory integration. Along with that, benefits of Universal Directory & the integration flow.
Technical Demonstration – Integration flow:
Here’s a technical demonstration, a step-by-step approach explaining the integration between Active Directory and Okta.
Conclusion
Integrating Active Directory with Okta not only streamlines identity management but also enhances security and user experience. With Okta’s Universal Directory, organizations can manage user identities more effectively, ensuring that they are well-equipped to handle the demands of a cloud-first world. This integration empowers IT teams to focus on strategic initiatives rather than being bogged down by the complexities of traditional identity management systems.
Many organizations face difficulties in securely managing access to their servers. This often results in compromised static credentials, delay in accessing the servers and increase in security risks. Okta’s approach to address this problem is unique, comes with Advanced Server Access (ASA) to provide simple & secure way to access the servers through ephemeral certificates. These certificates are short-lived & tightly scoped which ensures strong security for the connection. And also, JIT Passwordless authentication for server access which will create & revoke access for the user through time-bound constraints. It streamlines the login process and enhances security, ensuring that only the right people can access right resources.
To get started, we need to create and configure an ASA team, which is a designated group of users that can authenticate with Okta. Each team acts as an Advanced Server Access tenant, with all configurations and resources scoped to that team.
Prerequisites:
An Okta Org account with the necessary permissions to configure applications and integrations.
Supported OS for ASA Server Agent – Linux & Windows
Supported OS for ASA Client Agent – Linux, Windows & MacOS
Administrative permission to install ASA Server Agent & Client Agent on servers & end devices.
Please refer to the below video to have an understanding about Okta Advanced Server Access & the usecase around integrating servers with Okta ASA.
Technical Demonstration:
Here’s the technical demonstration on the integration of Windows and Linux servers with Okta ASA. We will cover the process of creating an ASA team in ScaleFT, followed by integrating and configuring the ASA application in Okta. Next, we will explain how to enroll servers and clients, and finally, we will test the process by accessing the server from client machines to showcase a seamless user experience.
Conclusion:
On a closure note, with all the steps carried out in this blog it is fair enough to say integrating Servers with Okta Advanced Server Access not only enhances security through ephemeral credentials but also simplifies management processes while ensuring compliance. Its scalable architecture supports modern cloud environments, making it a comprehensive solution for organizations looking to secure their server access effectively.
In today’s fast-paced business environment, manually logging into multiple App’s can be a tedious and time-consuming process, especially when dealing with multiple accounts or complex password policies. Moreover, security risks associated with password-based authentication can put your organization’s sensitive data at risk.
That’s where Okta Single Sign-On (SSO) comes in, a solution that streamlines App access, boosts productivity, and fortifies security. By integrating Okta SSO with multiple App’s like Salesforce, Slack, LinkedIn, etc.., organizations can provide teams with seamless, one-click access to the platform, while maintaining the highest levels of security.
In this blog, we’ll explore the benefits of using Okta SSO with Salesforce and provide a step-by-step guide on how to set up and configure this powerful integration.
Pre-requisites:
Okta Tenant:
An account with Super Admin role privileges
Salesforce Tenant:
Salesforce Org with system administrator privileges
Custom Domain: acme
Usecase Overview – Integration flow:
Please refer to the below video to have an understanding about Okta & the use case around integrating Salesforce with Okta.
Technical Demonstration:
Here’s the technical walkthrough on the integration and provisioning between Salesforce & Okta.
Conclusion:
In conclusion, integrating Okta with Salesforce has significantly streamlined the users access to the platform. With Okta’s Single Sign-On (SSO) capabilities, users can now seamlessly log in to salesforce without remembering multiple passwords, reducing login times and increasing productivity. The integration backed up with Okta’s Sign-On policies, enhances organization security posture by providing an additional layer of authentication, ensuring that only authorized personnel can access sensitive customer data. By streamlining Salesforce access with Okta, we have improved user experience, increased efficiency and strengthened security, ultimately driving business growth and success.
Most of the organizations, rely on Microsoft Active Directory Services or LDAP for a centralized store for identities & access permissions. Majority of the on-prem applications rely on these services to authenticate and authorize the actions. But with the cloud-based application, where the applications would have their own identity profiles to manage the application it is challenging for the administrator to manage the user accounts & it would be challenging for the end user too to use multiple identities for multiple applications.
Okta provides a solution to utilize the existing Microsoft Active Directory Services / LDAP services to access the SaaS applications through Active Directory / LDAP integration. This allows a single dashboard for the users to access the applications using their existing credentials and for administrators a centralized service to handle the lifecycle management.
In this section, we will integrate an existing on-premises Active Directory to Okta and let Okta provision the user accounts for us in Microsoft 365 tenant.
For simulating this in our lab environment, we’ll need to have access to 3 entities & few prerequisites.
Okta Tenant.
Member Server for Okta Active Directory Agent Installation.
Microsoft 365 tenant.
Pre-requisites:
Okta Tenant:
An account with Super Admin role privileges.
Member Server for Okta Active Directory Agent Installation:
The host server should have at least two CPUs and a minimum of 8 GB RAM.
Host server running Windows server 2016 & above is supported.
.NET framework 4.6.2 and above is supported.
Host server should be a member server part of the same domain.
Okta agent installation wizard should be executed from host server.
Microsoft 365 Tenant:
Microsoft 365 tenant name – This is the default tenant name registered as “comanyname.onmicrosoft.com”
Microsoft 365 domain – This is the custom domain which is chosen for federation.
Microsoft 365 global administrator user account.
Usecase Overview – Integration flow:
Please refer to the below video to have an understanding about Okta & the use case around integrating Office365 with Okta.
Technical Walkthrough:
Here’s the technical demonstration on the integration between Office 365 & Okta.
Conclusion:
On a closure note, with all the steps carried out in this blog it is fair enough to say integrating Okta with Active Directory & Office 365 eases the overhead of IT administrators for access management and provisioning happening through Single Sign-on. With this integration in place, IT administrators can manage the user assignments & modifying the attributes from Okta and the replication will happen to AD & Office 365 tenant.
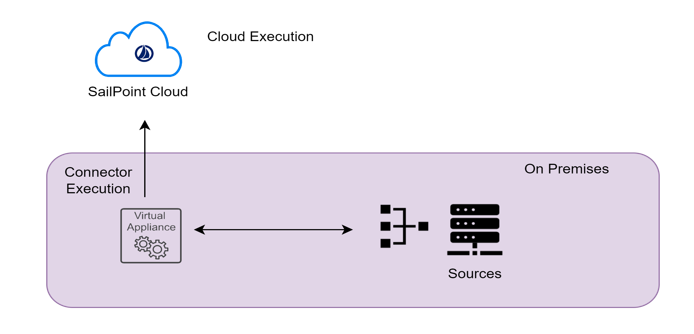
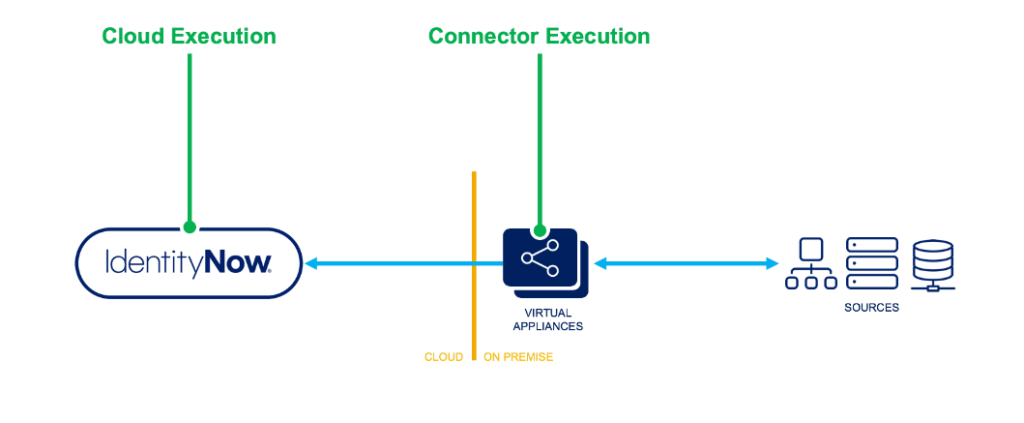
Let us have an overview on the difference between the cloud rules & connector rules
Cloud Executed rules are running in the cloud within the Identity Now tenant. Connector rules run on the virtual appliance which is on-premise inside the customer’s data center
Cloud Execution Rule :
Cloud executed rules, as the name implies, are executed within the Identity Now multi-tenant environment.
They typically have independent functions for a specific purpose. For example, calculating an Identity attribute value.
Cloud executed rules typically need to query the Identity Now data model in order to complete their work.
The rule might need to guarantee uniqueness of a value and it would generate a value and query Identity Now to determine if that value already exists.
Access to any Identity Now data is read-only and you can’t make any calls outside of Identity Now such as a REST API from another vendor service.
Because they run in a multi-tenant environment, the are put in a very restricted context and there is a great deal of scrutiny taken during the required review process for rules.
We will cover the review process that is required when a cloud-executed rules is submitted later in the presentation.
Of course, this all makes sense as you cannot allow rules to effect other tenants if they are poorly written.
You also have to restrict the rules context so they can’t access any data from another tenant and things along those lines.
Connecter Execution Rule :
Connector executed rules do not run in the cloud which is fairly obvious based on the name.
These rules instead run on the VA itself. So they are running in the customers data center and therefore they are not running side by side with services from another tenant.
They are usually extending the connector capabilities. The functions that they perform are quite complex.
They do NOT have access to the Identity Now Data Model because they are executing on a virtual appliance.
The huge difference here is that they are not subject to a review process by SailPoint. These rules can be uploaded via the REST API and are significantly easier to work with. With that said you still want these rules to be well written.
The simple fact is that the possible negative effect of a poorly written connector rule is limited because it is not running within the Identity Now tenant.
SailPoint Provides us with six APIs to perform connector rule operations mentioned below :
GET, LIST, CREATE, UPDATE, DELETE, VALIDATE are the APIs that are currently used for connector rule operations.
A token with ORG_ADMIN authority is required to perform any operation.
Rule Examples
Example usage:
Calculate complex identity attributes.
Calculate complex account attributes.
Provide connector logic
Connector rule Example – If there is a requirement to disable the account based on the number of entitlements or the account should be disabled automatically based on role revocation, this can be achieved by writing a connector rule
Cloud rule Example– This can be used for generating a unique email id which can scan the existing email id’s and generate a unique id for every joiner.
Please subscribe to our social media and stay updated with latest technology content. Thanks you.
Connectivity is critical to successful IAM deployments. SailPoint is committed to providing design, configuration, troubleshooting and best practice information to deploy and maintain connectivity to target systems. SailPoint IdentityIQ enables you to manage and govern access for digital identities across various applications in your environment. Connectors are the bridges that IdentityIQ uses to communicate with and aggregate data from applications. SailPoint IdentityIQ provides a wide range of OOTB connectors that facilitate integration with variety of systems, applications and data sources. These connectors are designed to simplify the process of managing Identity information and access across different platforms.
In SailPoint IdentityIQ, a Custom Connector is a specialized integration component that allows the IdentityIQ platform to connect and interact with external systems, applications, or data sources that are not supported by the standard OOTB connectors. Custom connectors extend the capabilities of IdentityIQ by enabling it to manage identity-related information in a wider range of systems.
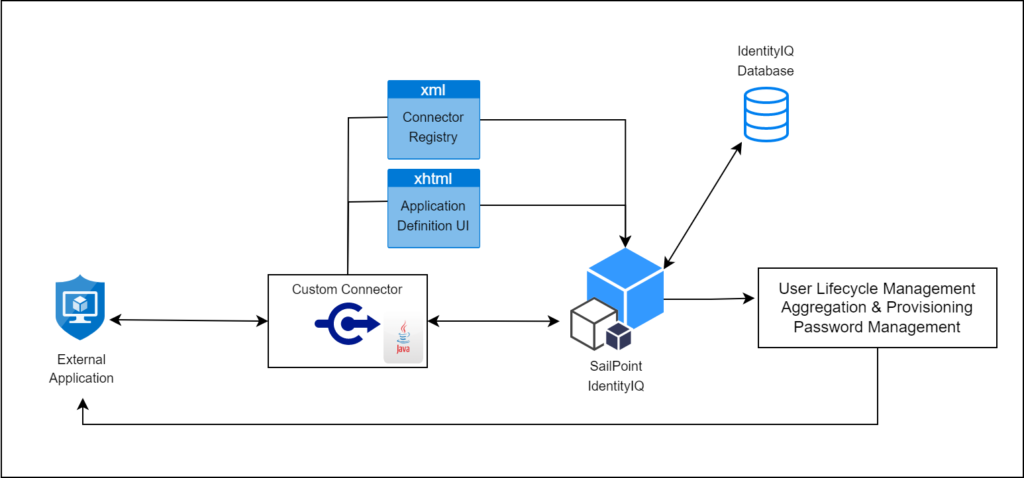
High level architecture of Custom connector
Custom Connector Development
Developing Custom connector in SailPoint IdentityIQ involves creating a Java-based implementation that adheres to the connector framework and API provided by SailPoint.
This allows you to define the interaction between IdentityIQ and the specific external system you want to integrate with. A typical development of custom connector includes 4 steps –
Creating a new implementation of functionality and packaging it into JAR file.
The custom connector uses the openconnector framework provided by SailPoint in the openconnector package where there are lot of methods provided for different type of operations.
The custom logic which you want to implement using this custom connector shall be developed in the specified methods.
Once code development is completed, Custom connector code with all the classes must be compiled and packaged to a JAR file.
And the JAR file must be placed in WEB-INF/lib folder of IIQ Installation directory
Defining Connector type in Connector Registry
Connector Registry is an XML file present in IdentityIQ as Configuration object. This file contains the information about all the different connectors and their related details.
Now that we have created a new connector in our IdentityIQ, we have to declare its information and details in Connector Registry.
Here we will create an xml file consisting of the details pertaining to our custom connector. Once we Import this xml file into IdentityIQ, it will be merged with the existing Connector Registry file in IdentityIQ database allowing IdentityIQ to create a new entry in the list of connectors.
Alternatively, the Connector Registry could be manually edited through the Debug page.
Defining .xhtml page which specifies required and optional connection parameters.
Usually, some parameters are required to define the connection to the target resource (e.g. host, port, username, password, etc.).
To allow these parameters to be specified through the UI for each application that uses this connector, an .xhtml page must be written to define how the Application Configuration user interface will request and record those parameters.
This file must be placed in the [IdentityIQ Installation Directory]/define/applications/ directory and must be referenced in the application definition’s XML as the “formPath” entry.
Testing the connector by Creating an application which uses this connector.
Finally, after completing all the development related activities, one must start the application server which is hosting IdentityIQ.
An Application object must be created for using the IdentityIQ’s UI. Select the configured custom connector as application type to tie it to the connector registry configuration and specifying any connection parameters through the configuration.
Once the application is onboarded, we can perform all the configured functionalities in it and verify back the results within the targeted external application.
Alternatively, Applicationconnector can be tested from the integration console (run iiq integration from the [IdentityIQ Installation Directory]/WEB-INF/bin directory).
This console can be used to test the various features of your connector including Aggregation and Provisioning.
The following presentation gives you clear understanding of custom connector development in detail.
Transform allows you to manipulate attributes values while provisioning to a source. It will help in manipulating any incoming data from the source as per the requirement.
Transforms are configurable objects that define easy ways to manipulate attribute data without requiring you to write code. Transforms are configurable building blocks with sets of inputs and outputs.
As we can see in diagram there is Input-Transform-Output. In input the value or data is coming from identity attributes or Account attribute and according to requirement we will write the transforms and in output we can see our result.
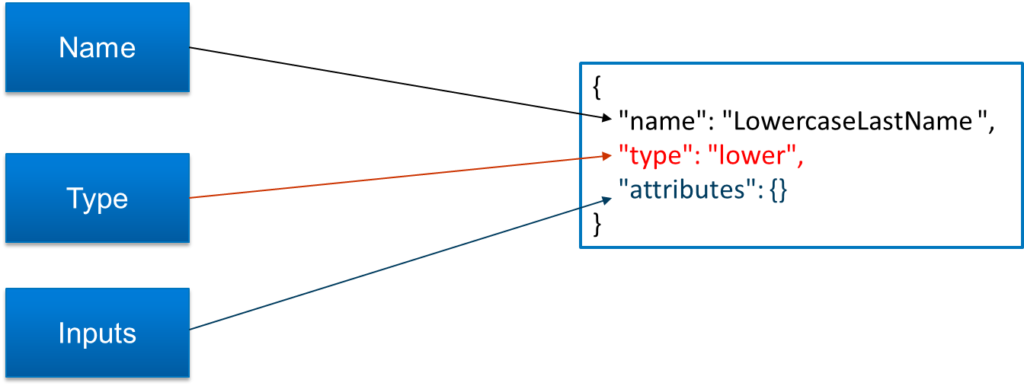
Transform syntax
The Transform syntax has the following properties:
The basic requirement for a transform is name, type, attributes.
For name, we can take any objects and that will reflect to your identity profile.
For Type, we can put the transforms according to your requirement.
For inputs, the developer can decide whether we want to take the value from identity attribute or Account attribute.
Basic String Operations
These are basic string operation there are 18 transform. These transform are commonly used in any operation.
I will discuss each and every transform.
1)Base64 Decode– This transform is used for converting String to Base64. Basically it used for decoding purpose.
2)Base64 Encode-This transform is used for converting Base64 to String. Basically it used for encoding purpose.
3)Concatenation-Concatenation transform is used for Combining two string. This transform basically used to combined first name and last name.
4)Index Of– The index of transform is used to get the location of a specific substring. Suppose that if we give the string to find the index of a string if its found it will return the index number, if doesn’t find it will return -1.
5)Substring– Substring transform is used to take the specific part of the string with provided begin index and end index.
6)Split– Split Transform basically used to split the string based on the provided delimiter. This transform is often useful when you want to split combined names into their constituent parts or when you want to simplify an ordered list of values into a single attribute.
7)Leftpad – Left pad transform to pad the string left side with a user-supplied character out to a specific number of characters. This transform is often useful for data normalization situations. such as user IDs are not uniform in length.
8)Right pad– Right pad transform to pad the string right side with a user-supplied character out to a specific number of characters. This transform is often useful for data normalization situations. such as user IDs are not uniform in length.
9)Replace– Replace transform is used for replace the specific string based on the provided regex.
10)Replace All– Replace All transform used to replace the string based on the provided table attribute of key-value pairs as an argument.
11)Upper– Upper transform use to convert an string into uppercase letters.
12)Lower– Lower transform use to convert an string into lowercase letters.
13)Static– Static transform is use to return a fixed string value, or more commonly, to evaluate Velocity. Static transform can also take other dynamically provided variables as inputs into the value attribute.
14)Last Index of – The last index of transform is used to get the last location of a specific substring.
15)Trim– Trim transform used to trim whitespaces from both the beginning and ending of input strings.
16)Get End of String– Get end of string transform as an out-of-the-box rule transform provided through SailPoint’s Cloud Services Deployment Utility rule. The transform allows you to get the rightmost N characters of a string.
17) Decompose Diacritial Marks– Decompose Diacritial marks transform is used to remove the diacritical marks.
18)E.164 phone transform:- The E.164 phone transform is used to convert an incoming phone number string into an E.164-compatible number.
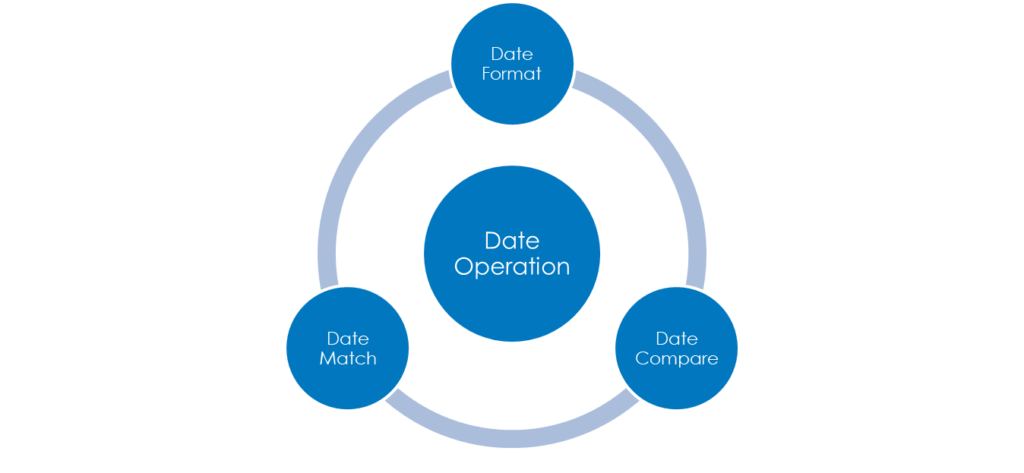
Date Operation
Under the date operation there are three transform.
2)Date Format:- The date format transform is used to convert datetime strings from one format to another. It is useful when you are syncing data from one system to another, because each application uses a different format for date and time data.
3)Date Math:- Date Math transform can be used for performing mathematical operation like addition, subtractions and rounding of a timestamp.
It also allows you to work with a referential value of “now” to run operations against the current date and time instead of a fixed value.
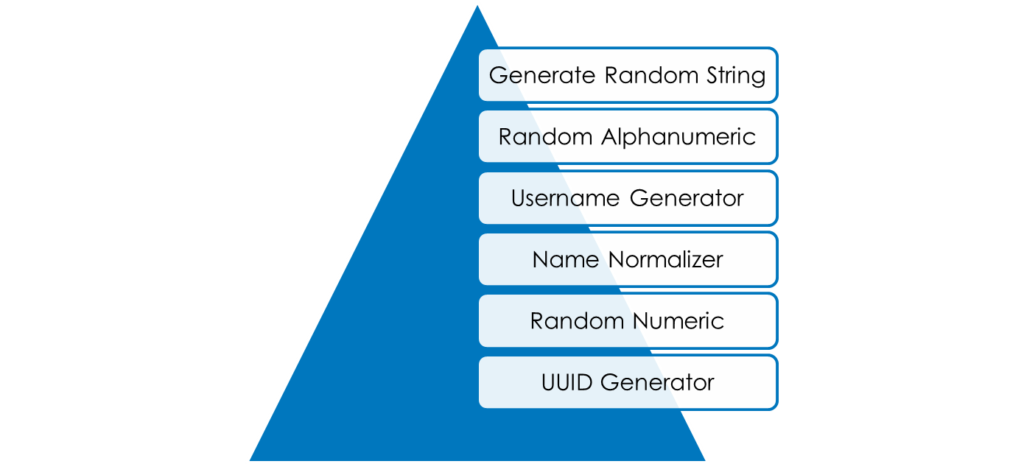
Generators
Under generators Transform there are six different transforms are present.
Under generators Transform there are six different transforms are present.
1)Generate Random String- Generate Random String Transform provided through SailPoint’s Cloud Services Utility rule. This transform allow us to generate a random string of any length.
2) Random Alphanumeric:- The random alphanumeric transform is used to generate a random string of any provided length, if we do not provide the length it will give the default output that is 32 char. comprising both numbers and letters (both lowercase and uppercase). The maximum allowable value is 450 characters.
3)Username Generator:- To set the logic to use when it determines a unique value for an attribute in an account create profile, utilize the username generator transform. The logic of the generator can be as basic as combining elements of an HR record or the user’s name.
4)Name normalizer:- The name normalizer transform is used to clean or standardize the spelling of strings coming in from source systems. The most common use for this transform is for names.
5)Random Numeric:- The random numeric transform is used to generate a random number of any length. The transform defaults value is 10 char. and maximum allowable value is 450 characters.
6)UUID Generator:-The UUID generator transform is use to create a universal unique ID (UUID) in the form of a 36-character string.
Extending Transforms
Under extending transforms there are two transforms.
1)Reference transform:- The reference transform is used to reuse a transform that has already been written within another transform. We can use this transform when you want to repeat the same logic multiple times within other transforms.
2)Rule Transform:- Rule transform allows you to reuse logic that has already been written for a previous use case. you can use the rule transform to reuse code contained within a Generic rule.
Rules Vs Transforms
Transforms
Transforms are JSON-based configurations, editable with IdentityNow’s transform REST APIs.
It supports complex logic to modify aggregation and provisioning process.
We can view, create, edit, and delete transforms directly via REST API without any involvement of SailPoint.
Rules
Rules are implemented with code (typically BeanShell, a Java-like syntax).
It support more complex logic.
By creating Rules there is involvement of Sailpoint for cloud rules.
Identity management (IDM), also known as identity and access management (IAM), ensures that authorized people and only authorized people have access to the technology resources they need to perform their job functions.
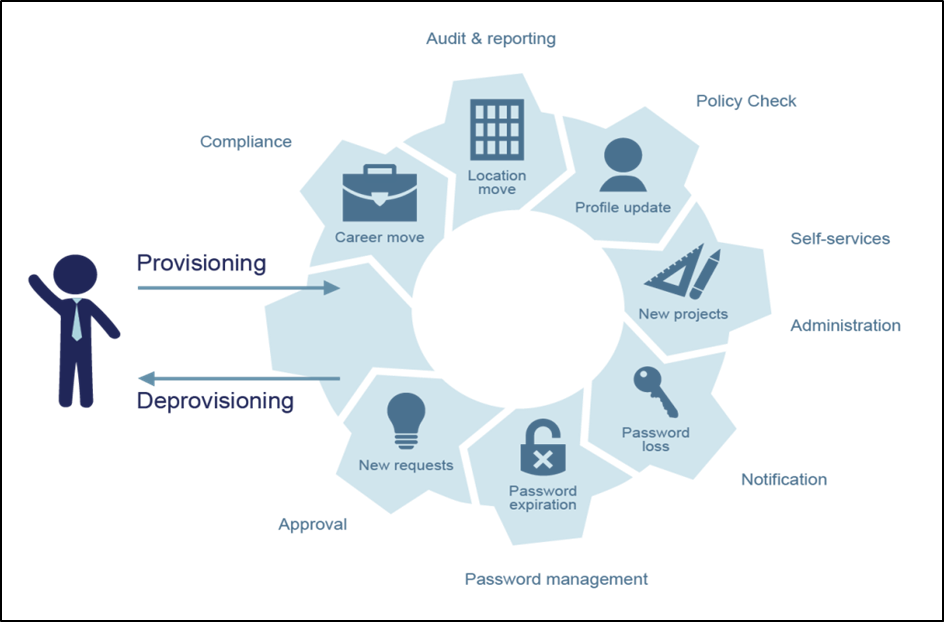
And access is managed by the user lifecycle state in IdentityNow. Identity Lifecycle State aims to automate and manage the entire digital identity lifecycle process and access throughout the organization.
Identity lifecycle is a set of stages of the identity from the creation to its deactivation or deletion. It contains a creation of an account, assignment of correct groups and permissions, setting and resetting passwords and in the end deactivation or deletion of the account.
Figure 1: Identity Lifecycle Management
Handling the unwanted identities in SailPoint increases the processing time and reduces the usability of the SailPoint tenant. To reduce the process and speed up the work, in tenant only limited and require identities we can handle, handling is easy and processing the limited identities is a less time-consuming process, so we can delete unwanted and terminated users’ identities from SailPoint.
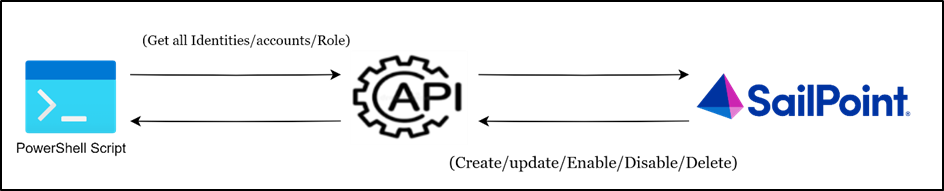
Now, let us have a look at the SailPoint REST API’s used in the Identity deletion process. Below is the list of APIs used for Identity deletion in SailPoint IdentityNow:
Figure 2: REST APIs in PowerShell Script connecting with SailPoint IdentityNow
Authentication: This is used to create an access Token (Bearer token).
Search – Perform Search(v3 API): This is used to fetch the all “30daysPostTermination” or “terminated” lifecycle state identities.
And here, we will be using A personal access token (PAT) is a method of authenticating to an API as a user without providing a username and password.
Prerequisites for Identity deletion:
SailPoint REST API’s.
Client ID and Client Secret.
IQservice Server.
Now, let us discuss the use case of Identity deletion.
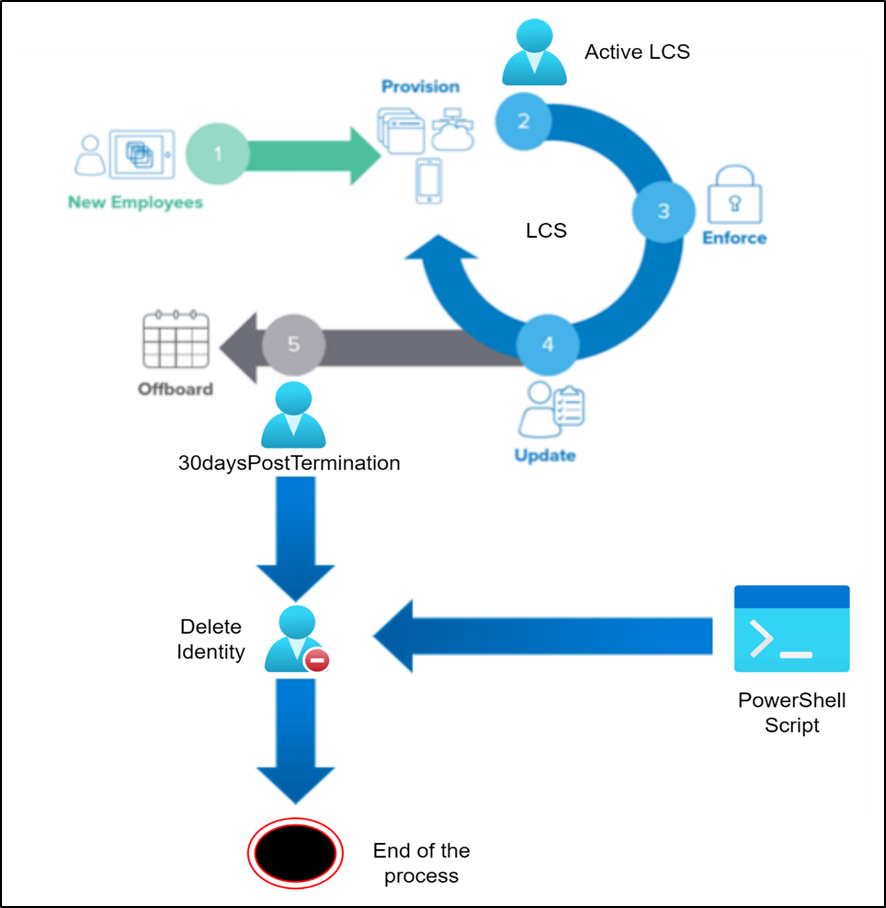
Use Case:
All the identities in the “30daysPostTermination” lifecycle state will be deleted from IdentityNow.
The deleted identities would be re-aggregated in the next aggregation cycle as “Uncorrelated accounts” in target application, and hence would not affect the new hire creation logic and the SAMAccount name would remain unique as per the requirement and the logic defined.
A PowerShell script will be developed to call the APIs to identify all the Identities in the required lifecycle state i.e. “30daysPostTermination” and will delete the accounts from the HRMS Source for all the Identities.
Figure 3: Use Case diagram.
Steps Overview as per the script:
Step1: As part of the PowerShell script first it will read the require details from property file. In property file we can maintain the ClientID, client Secret, base URL, search query, deletion limit, log file path and debug values.
Step3: Next Search API will execute and the fetch “30daysPostTermination” lifecycle state identities from SailPoint Tenant.
Step4: One by one Identities will pass to Delete API to delete from SailPoint Tenant.
Let us understand Identity Deletion by using SailPoint REST APIs, use cases and automation of the script via windows task scheduler in the following below presentation:
Advantages of Identities Deletion in SailPoint IdentityNow.
It will increase the usability of the tenant.
It decreases the aggregation and identity refresh process time.
It will fasten the backend processes and reduce the unwanted identity handling.
Reduce the burden on the tenant.
When a user got terminated or left the organization, all access will be removed, and accounts will be disabled. Now, let us go through a demo on how we can achieve identity deletion in SailPoint IdentityNow.
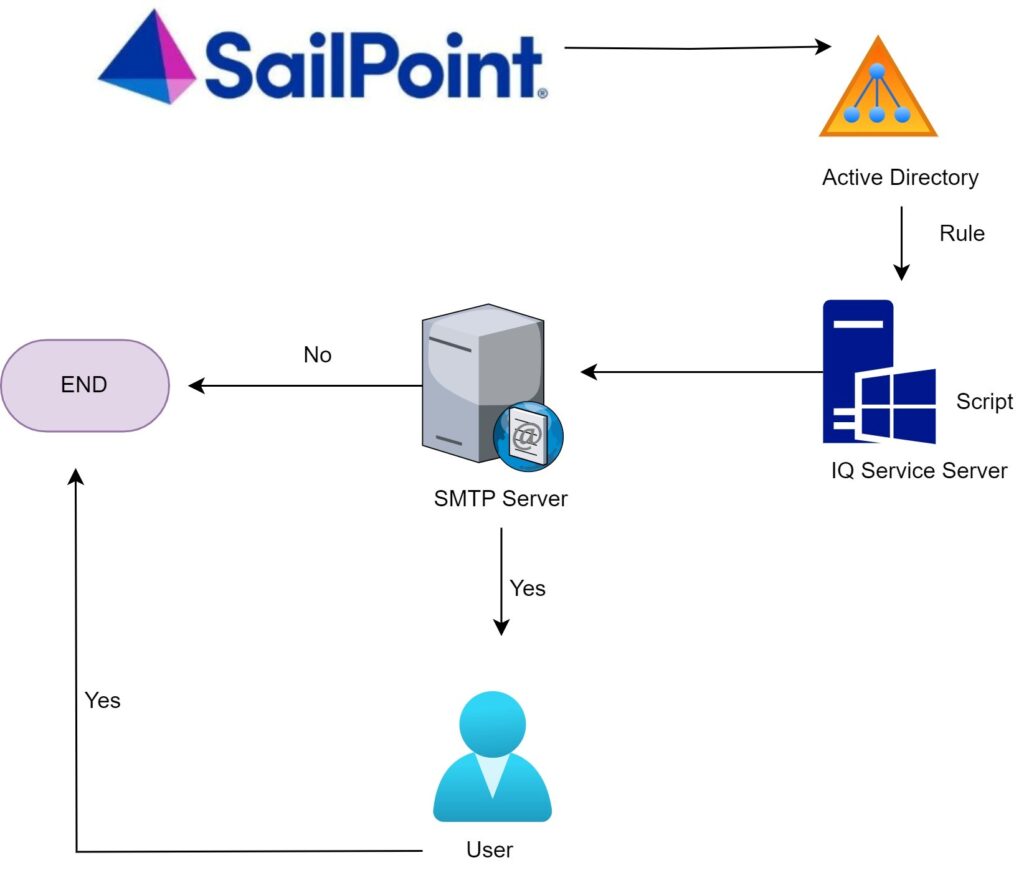
This blog is intended to demonstrate on automating email notifications for newly on-boarded contractors from IdentityNow. This will help in sending auto email notifications to users & their managers (if required) to reset their first password. This is enabled by running a PowerShell script in a shared folder in the IQ Service Server. In the current process, the IT help desk team needs to reach out to the user for his first login. With the help of PowerShell script, this process can be automated by sharing the password reset link automatically.
Use Case Diagram
The above diagram depicts the overall process flow of the use case with the point of initiation being the IQ Service Server following with the SMTP server.
Current IdentityNow templates don’t have email notification which will send Email ID ,password reset link and user manual to end user on his first day to instantly. To achieve this requirement, we have written PowerShell script and rule to achieve desired requirement above diagram gives the overview of how we have achieved this requirement.
From UI Request center, HR or Manager will request for an AD account depending on the license to be assigned for the user to be on-boarded.
Once request is completed Active Directory account will be created and the After create rule will be triggered. By using this rule, we are triggering PowerShell script which is placed in IQ service server for sending Email by using SMTP server containing Email Id, Password reset link & user manual. We can also edit the contents to be shared in the email based on the organization requirements.
Detailed discussion on the overall Use case, communication flow and the advantages:
Introduction to IQ Service Server
The IQ Service, also known as the Integration Service, is a native Windows service that allows Identity Now to participate in a Windows environment and access information that is only accessible via Windows APIs.
It is a lightweight service that must be installed on any supported Windows Server that has connectivity to the target systems you want to manage in Identity Now.
It also secures all incoming & outgoing communications of the server. Overall security of the solution and data integrity will be ensured even in crucial stage.
We can create several instances on the same machine as per the system requirements.
This server is primarily responsible for provisioning in AD from IdentityNow.
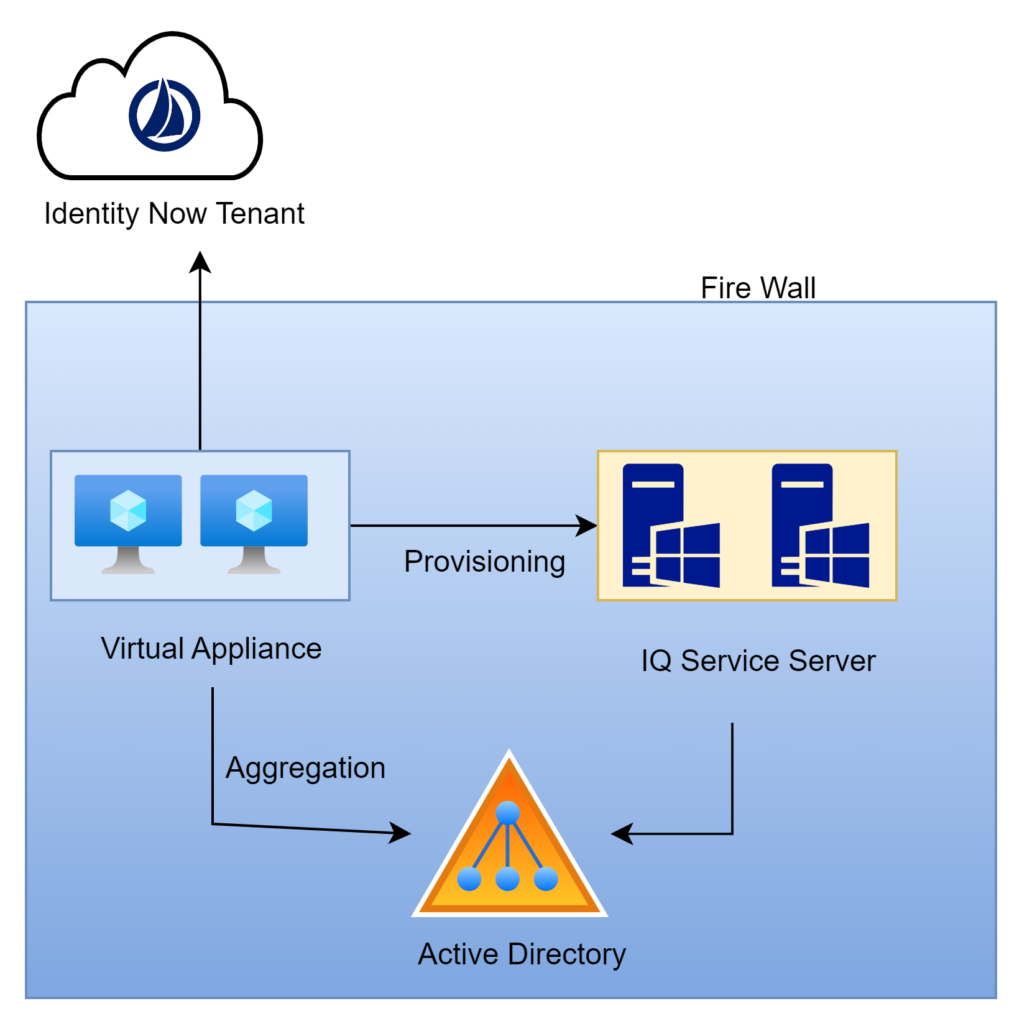
IQ Service Communication Flow
IdentityNow always push task to a VA cluster queue and from cluster queue, VA will pull the request based on the priority of task.
Once request is fetched by VA, VA will communicate to IQService for tasks such as aggregation, create and modify the accounts.
IQService server communicates with domain controller using LDAP/LDAPS.
IQService receives the data from domain controller and gives it back to VA (Outbound traffic).
Finally VA will give the updated results to the tenant and requests for the new task.
Rule Execution process in IdentityNow
Rule execution can be executed in 2 primary places:
Cloud Execution – These rules are executed in the IDN multi-tenant cloud.
Connector Execution– These rules are executed on the on-premise IDN virtual appliance.
Connector Rules are rules that are executed in the IdentityNow virtual appliance, and they are usually extensions of the connector itself. The rules are particular to only certain connectors since they are frequently applied to carry out complex connector-related tasks. Because these rules function within the virtual appliance, they are unable to access IdentityNow’s data model or collect data from it.
The basic logic required to initiate a PowerShell script is derived from the after-creation rule, which then transfers the majority of the subsequent events and/or modifications to the PowerShell script itself. Since this script would be stored on the client’s servers, the customer could easily modify it as needed. Since the code runs outside of the IdentityNow platform, it allows the client to add updates to the PowerShell scripted functionality without requiring SailPoint to review the code.
Demonstration of the use case in IdentityNow
Use of Powershell script in IdentityNow
The popularity of scripting languages with Object Oriented capabilities—like PowerShell is because of their simplicity and use.
These languages’ native scripts can access request and result objects more quickly and effectively.
The Utils.dll class library that is bundled with the IQ Service contains all the necessary classes to access the request and result objects. Process environment variables would be presented as inputs to the script.
The environment variables contain XML-based data. Using Utils.dll, the script creates the appropriate objects.
Once the object is modified, the script should execute the object’s xml() function to convert it to XML and then send the XML to the path mentioned in the script’s single argument.
In the event of an error, the script generates a non-zero value and logs the message in the appropriate file at the specified directory.
Before/ After Scripts for IQ Service
The IQ Service allows function customization by allowing the integration of before/after scripts developed using scripting languages such as PowerShell.
Any required tasks that cannot be automated with the current source functionalities can be automated with scripts.
Native before scripts are scripts that are called before the request is processed; native after scripts are scripts that are called after the request is processed.
The following sources support Before/After Scripts for IQ Service:
It will helps end user to get his organization email ID, password Reset Link & User manual for SailPoint as IdentityNow Default email templates don’t have this type of functionality.
We can set a customized template and add an initial login guide or any policy documents as an attachments while triggering this email.
The dependency on IT help desk team for sharing login details for the newly on-boarded contractors is reduced to a huge extent.
Contractors can login to their system almost immediately post completion of the on-boarding without having any downtime.