Sailpoint IdentityIQ Integration with Oracle E-Business Suite

Oracle E-Business Suite is the most comprehensive suite of integrated, global business applications that enable organizations to make better decisions, reduce costs, and increase performance. All large enterprises use ERP systems for managing and optimizing enterprise-wide business processes. ERP systems like Oracle E-Business Suite are mission-critical which processes a huge amount of business-critical data.

Oracle EBS includes the company’s enterprise resource planning (ERP) product as well as Oracle Human Resources Management System (HRMS), Oracle Financials, Oracle Order Management and customer relationship management (CRM) applications. Each application is licensed separately enabling organizations to select the combination best suited for their business processes.

The Sailpoint Oracle E-Business connector is designed to aggregate user and entitlement data from the Oracle E-Business Suite, and provision user accounts.The Oracle EBS connector only targets APPS schema tables according to Oracle standards.

Sailpoint Connector for EBS User Management Aggregates and provisions EBS user accounts along with their role and responsibility assignments. It helps EBS customers to achieve compliant user administration by enforcing the Segregation of Duties (SoD) policies in real-time during role and responsibility grants.

In this presentation, we are going to see how the Sailpoint IdentityIQ is an innovative identity Governance solution that reduces the cost and complexity of both complying with regulations and delivering access to Oracle E-Business Suite users.


The Following Demo presents the use case of  Birth Right Provisioning and Implementing Security in Oracle E-Business Suite using Role Based Access Control.


Reassignment of Employee mailbox to manager via Sailpoint’s Identity IQ

Email is the most powerful tool for enterprise level communication as it provides accountability and reliability in communication. To an organization, the emails that are received by the employees are a valuable resource. When an employee resigns or is terminated from the company, the organization might still need access to his/her mailbox. This is especially significant in sales, support and administration activities as it can impact the organization either directly or indirectly. This scenario can be addressed by allowing an authority within the organization to access the de-provisioned mailbox and is an important challenge within identity and access management. The risks and compliance guidelines associated with this approach are also factors that need to be considered.

Sailpoint’s IdentityIQ is shipped with a connector for Active Directory. This connector supports management of users, groups and mailboxes on Exchange server. However, for modifying the mailbox permissions, native rules need to be configured in order to execute the corresponding PowerShell scripts.

The following presentation introduces a scenario where handling mailbox permissions would be required. After an overview of native rules, the implementation of this use case is also discussed.

The following demo focuses on granting Exchange mailbox permissions via IdentityIQ and verifying that the changes are reflected on the mail server.

Troubleshooting the EBS Forms Launch Failure

The Forms functionality on Oracle E-Business Suite is an integral part of an organization’s ERP Solution. In situations where Forms need to be accessed from a machine running Oracle Linux 6, the default browser Konqueror does not support it.
Through the course of this blog, I will attempt to resolve this issue by using the Firefox browser.

Detection

A current release of the Firefox browser (version 58) has dropped NPAPI support which disables Forms to detect the JRE version installed on the machine.
Firefox Extended Support Release continues to offer plug-in support. End-users who need to use Forms-based content in EBS must run the Firefox Extended Support Release.
The latest version of Firefox Extended Support Release (version 52) needs the GTK 3 library which is not supported on Oracle Linux 6 (by default) to circumvent this, Firefox Extended Support Release version 49 can be installed (which uses GTK library 2).
For all Linux distributions, a tarball is offered as a download link which can be found on the official Mozilla website.

Solution

Extract the tarball into the ~ directory of the root user.
Once it has been extracted, launch Firefox by entering
./firefox

The next step is to enable the libnpjp2.so plugin that allows EBS Forms to use JRE from the browser.
The Forms functionality also needs JDK version 1.8.0_102 (or above)
Get the required JDK version by downloading the rpm package from the Oracle Archives Page
Once the JDK is in place, navigate to the directory
/usr/java/jdk1.8.0_120/jre/lib/amd64/libnpjp2.so (FOR 64 Bit Version)
And ensure that the libnpjp2.so file exists in that location.

Create a Symbolic Link

Create symbolic links in 3 directories

cd /usr/lib64/mozilla/plugins
cd /usr/lib64/mozilla/plugins-wrapped
cd /etc/skel/.mozilla/plugins

by using the command

ln -s /usr/java/jdk1.8.0_102/jre/lib/amd64/libnpjp2.so
while in each of the directory

Bounce Firefox to view changes when about: plugins is entered in the address bar

Java(TM) Plug-in 1.8.0_102
Filename: libnpjp2.so The next generation Java plug-in for Mozilla browsers.

Configuring Java to allow self-signed certificates

When EBS Forms is being used in a development environment, it is essential to configure Java to accept self-signed certificates.
Due to the default security settings, Java blocks requests from domains that have self-signed certificates.

To allow a local domain to access Java, a Site Exception can be added, to do so, Java Control Panel needs to be started.
To start the control center, navigate to the /bin folder of the installed JRE version; in case of a default install it would be :

/usr/java/jre1.8.0_102/bin

And launch the Control Panel by issuing the

./ControlPanel

command.

Click on the Add an Exception button at the bottom and the local domain on which the EBS application is running.
Save changes and bounce the server to notice the effects.

XML Tags in Sailpoint

XML Objects:

Every object in Sailpoint is stored as an XML file. The existing XML objects can be explored from the “Debug Pages”. XML files are useful while adding new objects. This can be done using “Import from XML” under Global Settings. Any object like rules, certifications, system configurations, email templates, etc. can be created using XML.

XML Object Tags:

Each of the objects is represented by its respective XML tag and has its own structure. For example, rules are referred with the <Rule> tag, tasks with <TaskDefinition> tag, email templates with <EmailTemplate> tag.

An XML file with only one object begins and ends with a tag corresponding to that object type. However, it is a better practice to always wrap the objects with the <sailpoint> tags as this offers more flexibility. This approach also enables to import multiple objects defined in the same XML file.

For example, two XML files can be combined into a single file:


Usage of combined XML objects:

Taking the approach of using a single XML file is extremely useful for deploy-ready and stable objects. Doing this in general will reduce the modularity which raises few concerns:

  1. If an issue arises with importing one of the objects, it will halt the process of import and rest of the features would be left out
  2. As part of the development process, it would be inconvenient to import all the objects repeatedly while only one or few of them are updated.

Due to these reasons, it is better to combine tested and stable XML objects instead of objects that are still in development.

The usage of this approach can be observed in the “init.xml” file that comes with Sailpoint. This file contains all of the objects required for the basic features of the product, packaged into a single XML file.

Troubleshooting a Linux Partition with Corrupted Metadata

A corruption in the Linux file system causes the system to boot into emergency mode by default.

The following error message is displayed on boot up

Welcome to emergency mode! After logging in, type “journalctl -xb” to view system log, “systemctl reboot” to reboot, “systemctl default” or ^D to try again to boot into default mode.

Filesystems can be corrupted by

  • Hardware Errors
    • Media errors are common
    • Disks are getting bigger and bigger
  • To a much lesser degree, bugs in the filesystem

Filesystems are able to “repair” themselves since they consist of lists, links and reference counts that can be validated

  • But not all information is always recovered, inodes that do not have a parent directory is common due to the directory structure being corrupted

Detection

The OS shows the following error:

Corruption detected. Unmount and run xfs_repair.

Corruption of in-memory data detected. Shutting down filesystem(s)

Please unmount the filesystem and rectify the problem(s)

Solution

Enter lvdisplay. This command would bring up the logical volumes present in the Linux machine, the common logical volumes (assuming no changes have been made) are root, home and swap.

To mount a logical volume the command mount /dev/ol/logical_volume_name needs to be entered.

If a logical volume’s metadata is corrupted, the following error is observed after trying to mount it.

XFS(dm-2) Metadata corruption detected at xfs_inode_buf_verify 0x75/0xd0 [xfs]

For the course of this blog it is assumed that the home logical volume is corrupted, so the error is encountered when the following command is executed

mount /dev/ol/home

To fix this enter the command

xfs_repair -L /dev/mapper/ol-home

Where ol-home is the default partition created by Logical Volume Manager (LVM) on the home logical volume. To view the list of partitions the command fdisk –l can be used.

The –L option specifies Force Log Zeroing.

Forces xfs_repair to zero the log even if it is dirty (contains metadata changes).

It is important to understand that this option should be used only if data of that partition has been backed up before, using this in a mission-critical environment without prior testing would spell trouble as in certain cases, the inode tree could end up with even more corrupted metadata.

With fresh metadata, the inode tree of the filesystem is rebuilt and the /home directory can now be mounted by using:

mount dev/ol/home


The changes in the filesystem can be observed by checking the df-l

Reboot the OS for changes to show effect.

Service Now Queue User Administration via SailPoint Identity IQ

The SailPoint ServiceNow Connector manages ServiceNow accounts, groups, and roles. It supports provisioning and aggregation for ServiceNow accounts and groups.

ServiceNow Connector supports configuration of multiple applications of different ServiceNow versions on same IdentityIQ. ServiceNow Rest API supports Basic and OAuth2 methods of authentication.

Under IT Service Management, Its Queue management and administration is based on roles and services assigned to a user.

SailPoint Service Catalog Integration: The integration between SailPoint and ServiceNow allows users of both systems to easily navigate from ServiceNow into IdentityIQ.

In the following presentation, ServiceNow Queue Administration using Sailpoint IdentityIQ is explained and overview of SailPoint Service Catalog Integration using MID Server.

This following demo is based on ServiceNow Queue User Administration using Sailpoint IdentityIQ with all the approval modes (serial, parallel, serialpoll, parallelpoll and any).

SOAP Error : Message request Authorization (SailPoint ServiceNow Service Integration )

Environment:

Java: jdk1.8

ServiceNow : Istanbul

SailPoint IdentityIQ version 7.1, 7.2

Problem Statement: 

javax.xml.soap.SOAPException: Message send failed: org.apache.axis2.saaj.SOAPMessageImpl cannot be cast to oracle.j2ee.ws.saaj.soap.MessageImpl===== reqeust ========Authorization:Basic

at oracle.j2ee.ws.saaj.client.p2p.HttpSOAPConnection.post2(HttpSOAPConnection.java:691)

at oracle.j2ee.ws.saaj.client.p2p.HttpSOAPConnection.post2(HttpSOAPConnection.java:691)

at oracle.j2ee.ws.saaj.client.p2p.HttpSOAPConnection$PrivilegedPost.run(HttpSOAPConnection.java:1502)

at java.security.AccessController.doPrivileged(Native Method)


Solution:

In the above error message it is clearly mention that it is an authorization error related with user privileged account.

Ensure that the following pre-requisites to be performed:

  • Create a ServiceNow Service Integration Module Administrator (ServiceNow user) for integration purpose with SailPoint and assign following roles.

SailPoint Administrator Role List in ServiceNow

Elevate Roles to security admin in ServiceNow for the user.

  • Use the same Integration Administrator in Application configuration of ServiceNow in SailPoint.
  • Use the same Integration Administrator credential in IntegrationConfig : ServiceNowServiceIntegrationModule.


Sailpoint IdentityIQ’s Transient workflows and their advantages

Quicklinks are usually used for faster access of specific functionalities. Often a “no delays” workflow where the start and end of the workflow happen within one single launch of quicklink shall be launched by quicklinks. Usually these kind of workflows involve custom Sailpoint forms which would not be useful once the user stops using this quick link by navigating to some other page.

Conventional workflow launches are serialized by storing the workflow cases as XML objects. This leads to many work items and workflow cases which are incomplete and hang around the Identity IQ over long run. This might lead to performance issues and unwanted data accumulated inside IIQ.

This problem could easily be solved using the transient workflows. The main feature of transient workflows is that they don’t get serialized.

Without the workflow getting serialized, we have specific advantages.

  1. Workflow cases which are inactive specific to this workflow shall not be generated.
  2. Work items that are generated do not get serialized and as a result we don’t have any unwanted work items related to this workflow in user’s inbox.

This would result in cleaner environment where we don’t have unnecessary data.

Extra perk with logging:

Workflow variables in Sailpoint are serialized in non-transient workflows. This means that we can store only the objects that Sailpoint has capability to store as XML object. Log4J loggers are very useful objects which are disqualified as workflow variables because of this restriction.

As the transient workflows do not try to serialize the objects referred by the variables, Logger objects can also be stored in the workflow variables.

This provides us the flexibility to maintain a workflow level logger variable to use your custom logging. Rather than instantiating the custom loggers whenever we require them, we can simply use the workflow variable whenever required.

Resolved : Manage Account Request Problem in SailPoint IIQ

Environment:

SailPoint Version : 7.0, 7.1

Problem Statement:

Unable to request a new account for existing identity from Manage Accounts in SailPoint IIQ.

Problem : Account Request Option is not available


Solution :

Firstly we need to check the Lifecycle Manager Configurations, navigate to Lifecycle Manager and in Configure tab Search for Manage Accounts options :

Applications that support account only requests : Select all applications check box or specified application according to your requirement.

Solution part 1- Select all applications


Allow Manage Accounts Additional Account Requests : Enable
Allow Manage Existing Accounts : Enable
Allow Account Only Requests : Enable

–> If you are using higher version of SailPoint 6.4 then you will face problem in finding these 3 options to enable them.

Solution 1 :

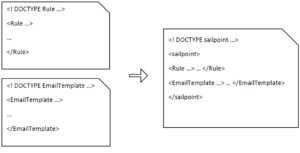
For that you need to edit init-lcm.xml and import it again in iiq console. (This will effect pre-existing workflows and LCM Configuration. So, to avoid that follow Solution 2).

Follow these steps and pictures shown below for editing init-lcm.xml (Solution 1)

 Step 1: init-lcm.xml is present in ~identityIQ/WEB-INF/config/init-lcm.xml location. Make a copy of it and place it in a safe folder.


Now open init.xml and search for Manage Accounts under QuickLink tag.

In init.xml search Manage Account


Carefully observe 3 entries under Manage Accounts tag.

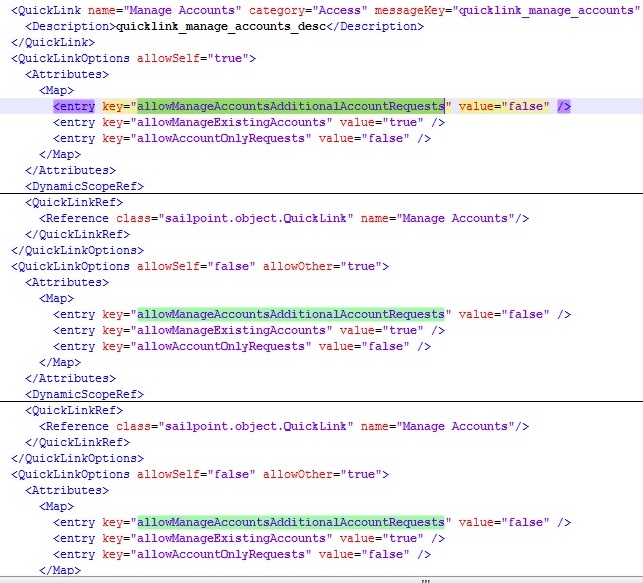
Original_init-lcm.xml of SailPoint 7.1 version


Step 2: Make few changes by enabling this options manually from false to true 3 times in Quicklink Manage Accounts tag as shown in the picture below.

<entry key=”allowManageAccountsAdditionalAccountRequests” value=”false” />
<entry key=”allowManageExistingAccounts” value=”true” />
<entry key=”allowAccountOnlyRequests” value=”false” />

After editing : <entry key=”allowManageAccountsAdditionalAccountRequests” value=”true” />
<entry key=”allowManageExistingAccounts” value=”true” />
<entry key=”allowAccountOnlyRequests” value=”true” />


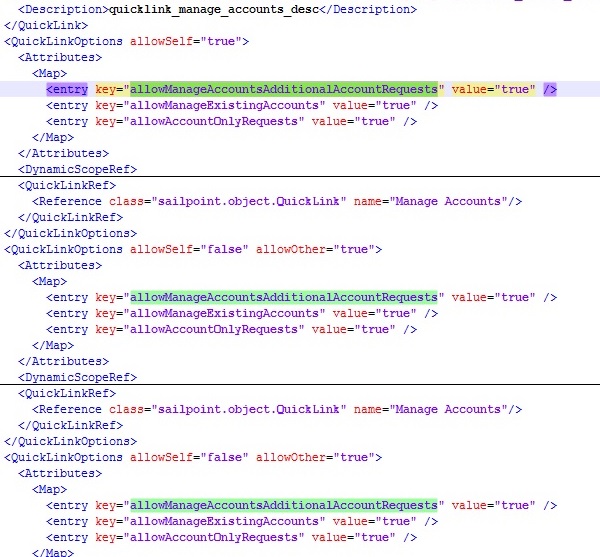
After Editing Manage Accounts Configuration


Step 3: Now save it and import it in iiq console. By using command import init-lcm.xml. After importing observe following changes.

Step 4: Request Account option is available (Issue Resolved). Choose the application for account request. Submit the form.


Request Option Available Now 7.1

> Just for Reference in SailPoint 7.0  it will look like this as shown in the picture below.

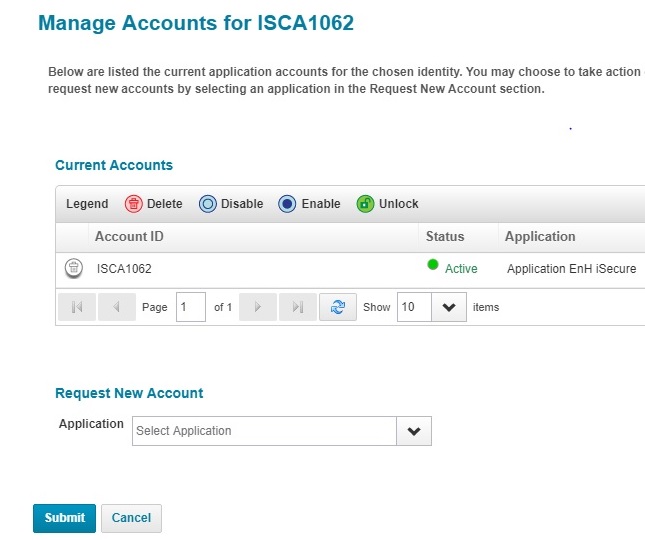
Request Option Available in SailPoint 7.0


Step 5: Confirm Account Action . Click Confirm at the end of the page.

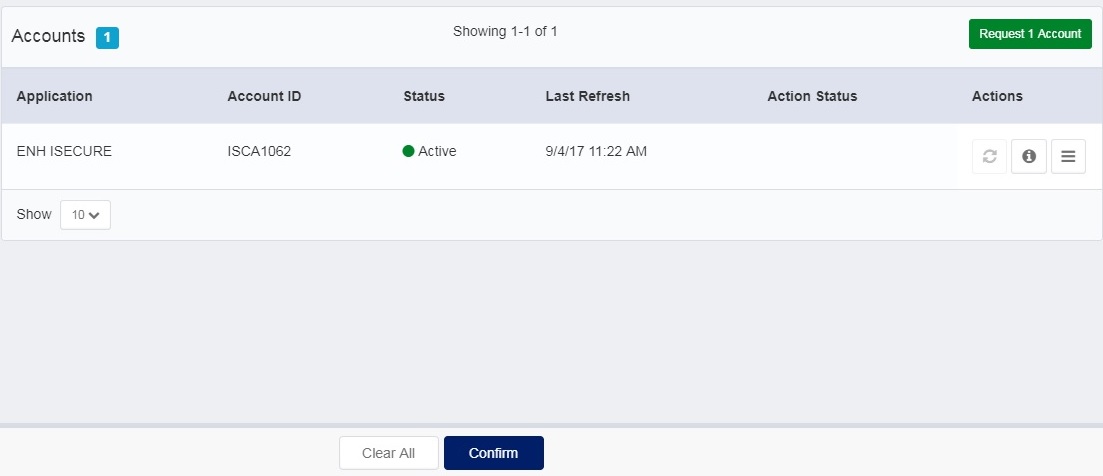
Confirm Account Request


Solution 2 :

You can get same results by configuring through Debug Pages.

Step 1: Go to Debug Page > Select object QuickLink from dropdown listChoose Manage Accounts.

Step 2: Follow same Step 2 in Solution 1.

Step 3: Request Account option is available (Issue Resolved).


Sailpoint IdentityIQ Pass through Authentication via Active Directory

When working with the Cloud, organizations of any scale wish to have common credentials across on-premise applications and the cloud applications. It’s the best user experience as well as the best IT management experience. The overhead of facilitating this can be quite a large endeavor.

Sailpoint’s IIQ provides Pass-through authentication using which a Login into IdentityIQ can be done via an enterprise directory credentials or via SSO credentials.

With pass-through authentication in Sailpoint IdentityIQ, password validation takes place through Application Configured in IdenitytIQ. What this means is a simple, but effective SSO solution for the end user. The below presentation gives a quick overview of concepts of Pass Through Authentication and how it is implemented in Sailpoint IdentityIQ.

The presentation is followed by different use cases demonstrated.