SailPoint’s IdentityIQ Integration with Okta

In the world of Identity Management, securing and monitoring the access for the external users like partners, contractors and customers who have access to organizational resources have always been a challenge for many organizations. To mitigate and help the organizations to secure their resources two big Identity management products partnered together in February 2018. Okta and SailPoint announced a strategic partnership to provide an end-to-end identity for the enterprise – helping organizations balance providing simple, secure user access while meeting complex compliance and security requirements.

Benefits of the Combined Solutions

• Effectively manage user identities’ authentication, application assignments, while ensuring all governance and compliance requirements are met.

• Authenticate user access with single sign-on and multi-factor authentication.

• Ensure that for sensitive applications, only the right user has access, authorization policies are enforced, and the process is documented, timestamped and compliant.

• Automate provisioning throughout the user lifecycle by simplifying processes for creating, modifying and revoking access.

• Automate provisioning of applications adherent to corporate policies.

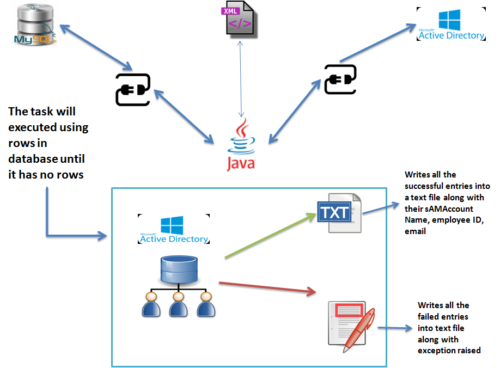
• Trigger provisioning workflows from authoritative sources, such as Active Directory or HR systems, to ensure consistency and increase efficiency.

Below presentation demonstrates Okta, IdentityIQ, SSO Concepts, Importance of SailPoint’s IdentityIQ integration to achieve SSO. The presentation is followed by a demo.

Okta and SailPoint IIQ Integration

Demo of SailPoint’s IIQ and Okta Integration.


IdentityIQ parallel and serial approvals

 Introduction

Out of the box Sailpoint’s IdentityIQ provides numerous workflows for provisioning, we can implement our custom workflows according to the necessity. Similarly, parallel and serial approvals are workflows used in an enterprise to manage the access of the user.

Requirement

In the world of IAM, one thing every developer should remember is that “Right thing must be accessed by the Right user at a Right time“, from the above sentence we can say that an access must be rightfully distributed to the user.

In this requirement a user in an enterprise requested an entitlement or role using IdentityIQ then that access must be approved by the work groups which are maintaining that privilege.

Understanding parallel and serial approvals in IdentityIQ

The following video illustrates about parallel and serial approvals.

Working demo of parallel and serial approvals

The following video demonstrates how parallel and serial approvals accomplishes.


PlainID – Product Overview

PlainID is a young Authorization Management software company. They found an innovative approach to simplify and optimize dynamic, fine grained access to resources and data.

Following video demonstrates about the PlainID product Overview, Architecture and practical implementation of the product in the field of Identity & Access Management.


Data loading into Active Directory using a simple java program

  • Data loading into Active Directory implies creating AD Accounts and corresponding Exchange mailbox accounts using employee data existing in a database.
  • Java program is developed in a fashion which reads the credentials from XML, retrieves employee data from the database, creates an account with a default password in active directory and enables the account as well.
  • The PowerShell script is executed to create exchange accounts for all the users.

Requirement schematic

  • The below process flow diagram explains the requirement lucidly.

requirement


Demo

  • The working demo of this program is embedded.


Documentation and Code

The Documentation and Code for above demo can be downloaded from following links.


Solving problem SailPoint IdentityIQ “Mark Invalid Error”

Problem description 

When we try to correlate the accounts into SailPoint’s identityIQ using multiple authoritative sources the following
exception may arise.

Why this happens

The main reason for this error is ambiguity of accounts. After the account aggregation task completed when we try to run the task refresh identity cubes. Task is not running and error is displays as Task stopped by user. When you see the log file there a exception named Mark Invalid.


.erroe_scrn_sht

Case 1

The main cause for this error is, If you have added more than one authoritative sources marked for one identity. The following exception will arise. that means you have added two Authoritative sources representing the same data if run the aggregation task the accounts will be populated with their name then If we perform refresh identity cubes task the accounts will not linked its respective manager account because there will be an ambiguity between two accounts which has to be correlate as manager account.

Case 2

In other cases if you have any accounts or identities not properly deleted.

Solution

The solution I found is to get backup of the rules and application into a xml file using the console.Shutdown the application server and drop all the tables in database using the sql scripts provided by identityIQ then create the tables using the scripts. Import the init.xml using the iiq console.Then import the xml file which represents the application object. Then if you run the aggregation and correlation tasks you can see that all the identities and their managers are correlated in identity warehouse.

Enabling Active directory SSL authentication

Using JNDI we can access the active directory, but if we want to access the active directory using the secure port we need to get the certificate issued by the active directory certification services.

The certificate helps to authenticate the server over SSL.

SSL authentication is useful when we need to perform the administrative stuff like changing password using JNDI.

Active directory enables us to access the server over SSL using the certificate issued by that server.

To access the active directory using the JNDI we need to get the certificate issued by the active directory and import that into java key tool.


1.     Creating and exporting certificate file

We can export the certificate which can accept the SSL authentication in many ways. But in this article we are exporting the certificate using the internet explorer and command prompt.

Note: to export the certificate, server should be installed with active directory certification services. Refer the following link to install the ADCS

         i.            Exporting the certificate using the internet explorer
  • Open in the internet explorer in the windows server and click on internet options
  • navigate to content and click on certificate

1

  • In the certificates tab navigate to trusted root certificates and click on the certificate with your server name. (in this case server name is ADSERVER)

 2

  • A new popup will populate with certificate name that you have selected, in that click on details tab and select copy file option.


3


  • Then new popup windows will appear, in that click next.


4


  • select the option do not export private key and click next


5


  • Select the base 64 encoded and click next.

6


  • Provide the path and name to certificate.
  • Verify the options and click on finish.

7


      ii.            Exporting the certificate using command prompt
  • open command prompt in your windows server
  • navigate to the folder where you want save certificate
  • enter the following command to export the certificate

> certutil -ca.cert sslcert.cer


2.    Importing certificate into java keytool


After exporting the sslcert.cer file, copy the file into host machine installed with java.

The following steps explains to import sslcert.cer file into java key tool in various environments

        i.            Linux
  • Open the terminal in the folder which containing the exported file
  • execute the following command

# keytool -importcer -keystore JAVA_HOME/jre/lib/security/cacerts -file sslcert.cer

  • Default password for the keystore is: changeit
  • Enter yes to import the certificate to key store


     ii.            Windows
  • Open the command prompt in administrator.
  • navigate to the folder containing exported certificate file
  • Execute the following command

> keytool -importcer -keystore JAVA_HOME/jre/lib/security/cacerts -file sslcert.cer

  • Default password for the keystore is: changeit
  • Enter yes to import the certificate to key store


Solving the problem “Can’t connect to local MySQL server through socket ‘/var/lib/mysql/mysql.sock’ ”

MySQL server is usually connected by using the following command

mysql      –u      root      –p

some times we may encounter the following the error

can’t connect to local MySQL server through socket /var/lib/mysql/mysql.sock

A socket is used to bridge connection between the server and client.

Error message explains that it is not able to find that socket file.

Socket file is automatically created when we start the MySQL server and disappears automatically when the server is stopped.

This problem most probably arises when you accidentally delete it or if you reinstall same server again or because of server might not be running currently.

Current running state of the server could be known using the following command

service     mysqld     status

Use the following command to solve the issue

sudo     /etc/init.d/mysqld     restart

The above command is used to restart the MySQL server so that the socket file can be created.