Enabling Active directory SSL authentication

Using JNDI we can access the active directory, but if we want to access the active directory using the secure port we need to get the certificate issued by the active directory certification services.

The certificate helps to authenticate the server over SSL.

SSL authentication is useful when we need to perform the administrative stuff like changing password using JNDI.

Active directory enables us to access the server over SSL using the certificate issued by that server.

To access the active directory using the JNDI we need to get the certificate issued by the active directory and import that into java key tool.


1.     Creating and exporting certificate file

We can export the certificate which can accept the SSL authentication in many ways. But in this article we are exporting the certificate using the internet explorer and command prompt.

Note: to export the certificate, server should be installed with active directory certification services. Refer the following link to install the ADCS

         i.            Exporting the certificate using the internet explorer
  • Open in the internet explorer in the windows server and click on internet options
  • navigate to content and click on certificate
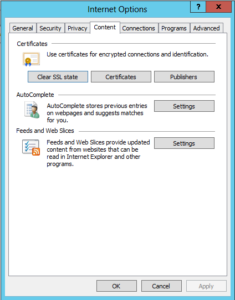
1

  • In the certificates tab navigate to trusted root certificates and click on the certificate with your server name. (in this case server name is ADSERVER)
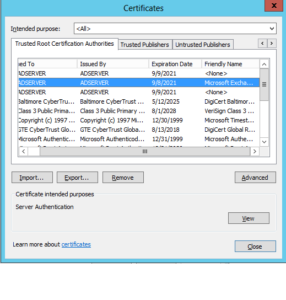
 2

  • A new popup will populate with certificate name that you have selected, in that click on details tab and select copy file option.
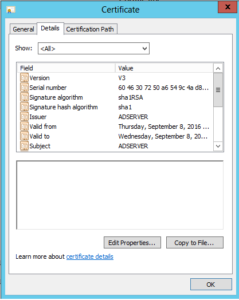


3


  • Then new popup windows will appear, in that click next.
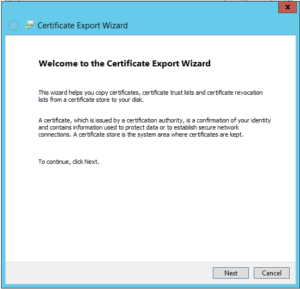
 

4


  • select the option do not export private key and click next
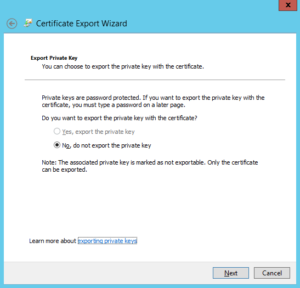
 

5


  • Select the base 64 encoded and click next.
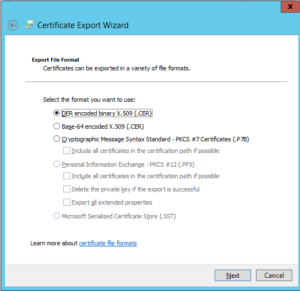
6


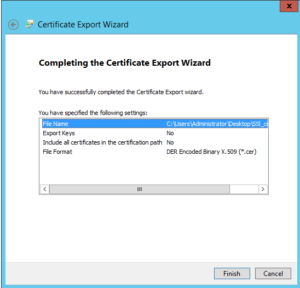
  • Provide the path and name to certificate.
  • Verify the options and click on finish.
7


      ii.            Exporting the certificate using command prompt
  • open command prompt in your windows server
  • navigate to the folder where you want save certificate
  • enter the following command to export the certificate

> certutil -ca.cert sslcert.cer


2.    Importing certificate into java keytool


After exporting the sslcert.cer file, copy the file into host machine installed with java.

The following steps explains to import sslcert.cer file into java key tool in various environments

        i.            Linux
  • Open the terminal in the folder which containing the exported file
  • execute the following command

# keytool -importcer -keystore JAVA_HOME/jre/lib/security/cacerts -file sslcert.cer

  • Default password for the keystore is: changeit
  • Enter yes to import the certificate to key store


     ii.            Windows
  • Open the command prompt in administrator.
  • navigate to the folder containing exported certificate file
  • Execute the following command

> keytool -importcer -keystore JAVA_HOME/jre/lib/security/cacerts -file sslcert.cer
  • Default password for the keystore is: changeit
  • Enter yes to import the certificate to key store


Solving the problem with privileged ports in ODSEE instance creation

It is possible that creation of an instance in Oracle Directory Server might end up with the following error message:

port number 389 is a privileged port.

This happens because all the ports less than 1024 on Linux are treated as privileged. Most of our well know ports like 389 for the LDAP, 80 for HTTP, 443 for HTTPS reside in this range of ports.

Linux enforces that the services cannot be created at the privileged ports until and unless the privileges are escalated.

In this particular case, we can start the instance using the following command:

sudo dsadm start <path-to-instance>

The main reason for need for extra privileges when we use the privileges may be because there is a chance that the firewalls do not block traffic from these ports. Any attacker who might be interested in stealing your data over the network could be opening such ports so that he could escape firewalls. To reduce the attack surface, it is enforced that the privileged port need root access.

Solving the problem “Can’t connect to local MySQL server through socket ‘/var/lib/mysql/mysql.sock’ ”

MySQL server is usually connected by using the following command

mysql      –u      root      –p

some times we may encounter the following the error

can’t connect to local MySQL server through socket /var/lib/mysql/mysql.sock

A socket is used to bridge connection between the server and client.

Error message explains that it is not able to find that socket file.

Socket file is automatically created when we start the MySQL server and disappears automatically when the server is stopped.

This problem most probably arises when you accidentally delete it or if you reinstall same server again or because of server might not be running currently.

Current running state of the server could be known using the following command

service     mysqld     status

Use the following command to solve the issue

sudo     /etc/init.d/mysqld     restart

The above command is used to restart the MySQL server so that the socket file can be created.

Enabling Oracle Linux to listen for requests over the network

Oracle Linux has a default firewall in the name of package “iptables“. This firewall is enabled by default when installed .Without disabling or modifying it we could not access most of the  services provided by the Linux. For example, you may not be able to access your database and tomcat over the network.

We can disable the firewall by following the below procedure :

Firstly we need to install the iptables-services package by using following command –

sudo yum install iptables-services

Next disable the firewall by using following commands:

sudo service iptables start

sudo service iptables stop 

sudo chkconfig iptables off

To punch or block specific ports and for more information , refer to the following link.

Oracle Database Installation – Circumventing the requirement for pdksh package


Oracle Database 11G R2 has many packages as dependencies. Amongst such packages is pdksh packages which is no longer a part of yum repositories. The pdksh is not  needed as long as your ksh package is installed. Oracle Linux has ksh installed by default. Trying to install the pdksh using rpm could cause a conflict between these packages.

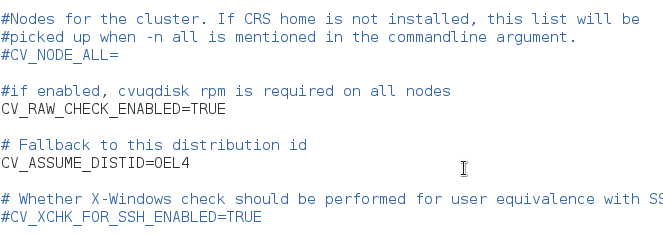
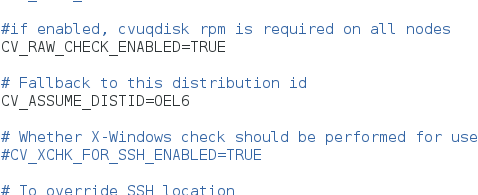
Problems with pdksh could be easily resolved by modifying the configuration of the verification utility of the oracle database. By default, this utility assumes that the Linux distribution being used is OEL4. All the dependencies were verified considering the OEL4. Changing the value of Linux distribution being used could solve the problem with pdksh. If you are using OEL 6, change the value of Linux distribution OEL6. Similarly if you are using OEL 7 , change the value of Linux distribution to OEL7.


Following are the exact instructions regarding the procedure.


Let   <db_extract>      be the location of your database extract.

cd   <db_extract>/database/stage/cvu/admin/

vim cvu_config

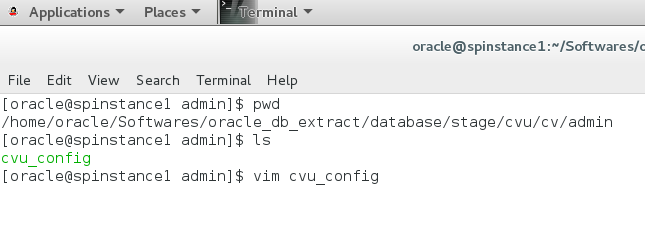
The following screenshots guide you regarding the same:


  1. Navigating to the required directory
    PDKSHNEW1
  2. Default cvu_config

PDKSHNEW2

3.Modified cvu_config

PDKSHNEW3

You should be finding a property named CVU_ASSUME_DISTID whose default value is OEL4

If you are using OEL6 change it to OEL6. If you are using OEL7 change it to OEL7.

Restart the configuration utility and you should not be finding the requirement for pdksh anymore.