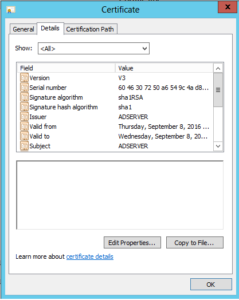
Active Directory Application Configuration – Test Connection Failure in IdentityIQ 7.2

Issue Description:

As part of Active Directory Application Configuration in IdentityIQ 7.2, “Test Connection”  failing with below error message.

In IdentityIQ 7.2, the Active Directory connector supports multiple Active Directory (AD) forests through one application definition.
While defining the Active Directory application through the IdentityIQ user interface in version 7.2, we do not have the option to mention the server details in Domain configuration settings.

Even though we do not specify any server details, the default configuration tries to connect to “localhost“, similar to the default port configuration which is “389“.

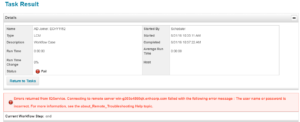
We see the below error message when we click on the “Test Connection”

2018-09-04 05:05:12,551 ERROR http-nio-8080-exec-6 sailpoint.web.ApplicationObjectBean:2701 – Connector failed.sailpoint.connector.ConnectorException: Failed to connect to – dc=enhcorp,dc=com : Failed to connect to server:ldap
dc=enhcorp,dc=com localhost:389

Resolution:


Modify the Application xml file to include the DC servers details.
Below is the example modification.

From

<entry key=”domainSettings”>
<value>
<List>
<Map>
<entry key=”authorizationType” value=”simple”/>
<entry key=”domainDN” value=”DC=enhcorp,DC=com”/>
<entry key=”password” value=”1:iIopEeOL5KrLoSjYKvh/Ww==”/>
<entry key=”port” value=”389″/>
<entry key=”servers”/>
<entry key=”useSSL”>
<value>
<Boolean></Boolean>
</value>
</entry>
<entry key=”user” value=”ENHCORP\Administrator”/>
</Map>
</List>
</value>
</entry>
To
<entry key=”domainSettings”>
<value>
<List>
<Map>
<entry key=”authorizationType” value=”simple”/>
<entry key=”domainDN” value=”DC=enhcorp,DC=com”/>
<entry key=”password” value=”1:iIopEeOL5KrLoSjYKvh/Ww==”/>
<entry key=”port” value=”389″/>
<entry key=”servers”>
<value>
<List>
<String>172.16.153.185</String>
</List>
</value>
<entry key=”useSSL”>
<value>
<Boolean></Boolean>
</value>
</entry>
<entry key=”user” value=”ENHCORP\Administrator”/>
</Map>
</List>
</value>
</entry>

Active Directory – Exchange Provisioning errors in Sailpoint Identity IQ

Issue Description:

Active Directory Provisioning along with Exchange attributes failing with below error message.

Errors returned from IQService. Connecting to remote server win-g303o4860qk.enhcorp.com failed with the following error message: The username or password is incorrect. For more information, see the about_Remote_Troubleshooting Help topic.


Troubleshooting steps:

  • Verified the User/Password details by logging in to the Domain controller as Domain Admin (the user which was used in Active Directory Application Configuration)
  • Verified and restarted Exchange services which were failed to start by default.

  • Enabled logging for AD Connector and observed the below messages.
    • 2018-08-31 02:07:09,515 DEBUG Workflow Event Thread 1 sailpoint.connector.ADLDAPConnector:3503 – 1239254649 Entering handleObjectRequest2018-08-31 02:07:10,796 ERROR Workflow Event Thread 1 sailpoint.connector.ADLDAPConnector:3380 – 1239254649 Exception occurred in handling Object Request.sailpoint.tools.GeneralException: Errors returned from IQService. Connecting to remote server win-g303o4860qk.enhcorp.com failed with the following error message: The username or password is incorrect. For more information, see the about_Remote_Troubleshooting Help topic.
  • Launched Exchange Management Shell and observed below error messages
    • VERBOSE: Connecting to WIN-G303O4860QK.enhcorp.com.New-PSSession : [win-g303o4860qk.enhcorp.com] Connecting to remote server win-g303o4860qk.enhcorp.com failed with the following error message: WinRM cannot complete the operation. Verify that the specified computer name is valid, that the computer is accessible over the network, and that a firewall exception for the WinRM service is enabled and allows access from this computer. By default, the WinRM firewall exception for public profiles limits accesses to remote computers within the same local subnet. For more information, see the about_Remote_Troubleshooting Help topic.At line:1 char:1

      + New-PSSession -ConnectionURI “$connectionUri” -ConfigurationName Microsoft.Excha …


Resolution:

Active Directory-Direct connector reads Exchange Server attributes by connecting to the Active Directory.

But, for provisioning any Exchange attributes, connector needs access to remote Powershell via IQService.

Windows Remote Management (WinRM) is a feature of Windows that allows

administrators to remotely run management scripts. WinRM Service should be running and that

should also be set up for Remote Management using the Enable-PSRemoting -force.


Enable PowerShell remoting in the domain using below cmdlet in Exchange Management Shell.

>Enable-PSRemoting -Force

Sailpoint IdentityIQ Pass through Authentication via Active Directory

When working with the Cloud, organizations of any scale wish to have common credentials across on-premise applications and the cloud applications. It’s the best user experience as well as the best IT management experience. The overhead of facilitating this can be quite a large endeavor.

Sailpoint’s IIQ provides Pass-through authentication using which a Login into IdentityIQ can be done via an enterprise directory credentials or via SSO credentials.

With pass-through authentication in Sailpoint IdentityIQ, password validation takes place through Application Configured in IdenitytIQ. What this means is a simple, but effective SSO solution for the end user. The below presentation gives a quick overview of concepts of Pass Through Authentication and how it is implemented in Sailpoint IdentityIQ.

The presentation is followed by different use cases demonstrated.


Data loading into Active Directory using a simple java program

  • Data loading into Active Directory implies creating AD Accounts and corresponding Exchange mailbox accounts using employee data existing in a database.
  • Java program is developed in a fashion which reads the credentials from XML, retrieves employee data from the database, creates an account with a default password in active directory and enables the account as well.
  • The PowerShell script is executed to create exchange accounts for all the users.

Requirement schematic

  • The below process flow diagram explains the requirement lucidly.

requirement


Demo

  • The working demo of this program is embedded.


Documentation and Code

The Documentation and Code for above demo can be downloaded from following links.


Enabling Active directory SSL authentication

Using JNDI we can access the active directory, but if we want to access the active directory using the secure port we need to get the certificate issued by the active directory certification services.

The certificate helps to authenticate the server over SSL.

SSL authentication is useful when we need to perform the administrative stuff like changing password using JNDI.

Active directory enables us to access the server over SSL using the certificate issued by that server.

To access the active directory using the JNDI we need to get the certificate issued by the active directory and import that into java key tool.


1.     Creating and exporting certificate file

We can export the certificate which can accept the SSL authentication in many ways. But in this article we are exporting the certificate using the internet explorer and command prompt.

Note: to export the certificate, server should be installed with active directory certification services. Refer the following link to install the ADCS

         i.            Exporting the certificate using the internet explorer
  • Open in the internet explorer in the windows server and click on internet options
  • navigate to content and click on certificate

1

  • In the certificates tab navigate to trusted root certificates and click on the certificate with your server name. (in this case server name is ADSERVER)

 2

  • A new popup will populate with certificate name that you have selected, in that click on details tab and select copy file option.


3


  • Then new popup windows will appear, in that click next.


4


  • select the option do not export private key and click next


5


  • Select the base 64 encoded and click next.

6


  • Provide the path and name to certificate.
  • Verify the options and click on finish.

7


      ii.            Exporting the certificate using command prompt
  • open command prompt in your windows server
  • navigate to the folder where you want save certificate
  • enter the following command to export the certificate

> certutil -ca.cert sslcert.cer


2.    Importing certificate into java keytool


After exporting the sslcert.cer file, copy the file into host machine installed with java.

The following steps explains to import sslcert.cer file into java key tool in various environments

        i.            Linux
  • Open the terminal in the folder which containing the exported file
  • execute the following command

# keytool -importcer -keystore JAVA_HOME/jre/lib/security/cacerts -file sslcert.cer

  • Default password for the keystore is: changeit
  • Enter yes to import the certificate to key store


     ii.            Windows
  • Open the command prompt in administrator.
  • navigate to the folder containing exported certificate file
  • Execute the following command

> keytool -importcer -keystore JAVA_HOME/jre/lib/security/cacerts -file sslcert.cer

  • Default password for the keystore is: changeit
  • Enter yes to import the certificate to key store