SailPoint IdentityNow Rules

INTRODUCTION:

  • Generally we write Rules when the required goal cannot be achieved by using transforms.
  • It is a Code based Configuration option.
  • A flexible framework that allows for very advanced or complex configurations.
  • You can just think of it as basically just writing Java code.
  • Technically it is Bean Shell however, it is much similar to Java, such that if you are familiar with Java, you will be familiar with Bean Shell.
  • Just like with transforms, the use cases drive the need for a rule and thus we have many different rule types.
  • Rules are very powerful but due to the IdentityNow architecture there are some special considerations regarding rules.
  • Essentially, rules must be very high-quality code because they are being deployed into a multi-tenant service.

Rule Execution :

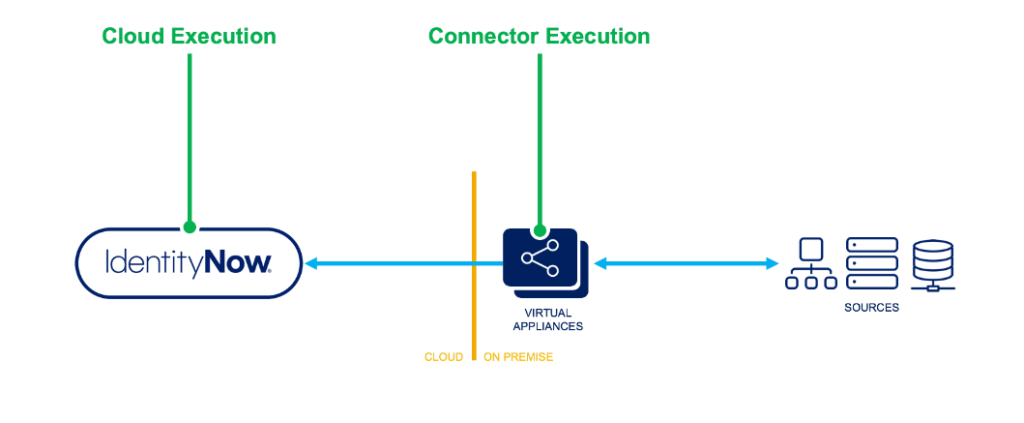
There are two primary places where you can execute rules one is CLOUD EXECUTION RULE & other one is CONNECTER EXECUTION RULE .

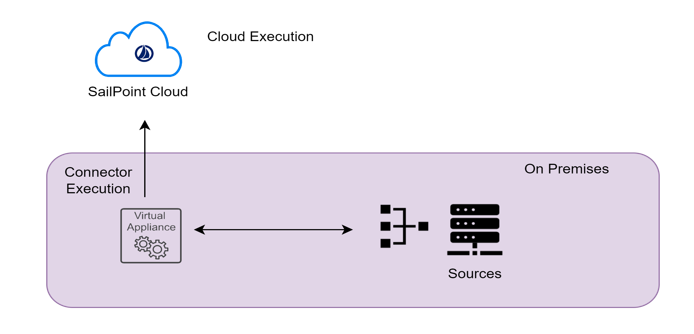
Let us have an overview on the difference between the cloud rules & connector rules

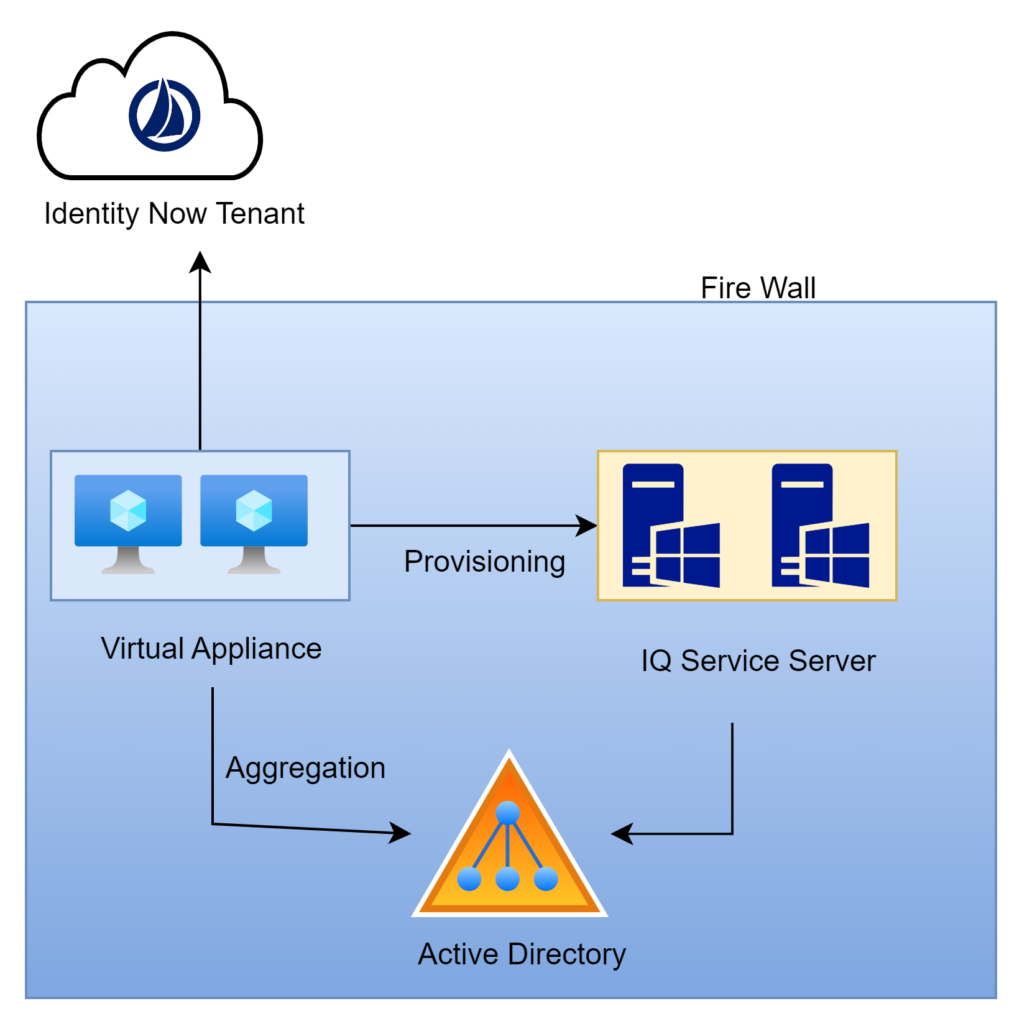
Cloud Executed rules are running in the cloud within the Identity Now tenant. Connector rules run on the virtual appliance which is on-premise inside the customer’s data center

Cloud Execution Rule :

  • Cloud executed rules, as the name implies, are executed within the Identity Now multi-tenant environment.
  • They typically have independent functions for a specific purpose.  For example, calculating an Identity attribute value.
  • Cloud executed rules typically need to query the Identity Now data model in order to complete their work.
  • The rule might need to guarantee uniqueness of a value and it would generate a value and query Identity Now to determine if that value already exists.
  • Access to any Identity Now data is read-only and you can’t make any calls outside of Identity Now such as a REST API from another vendor service.
  • Because they run in a multi-tenant environment,  the are put in a very restricted context and there is a great deal of scrutiny taken during the required review process for rules.
  • We will cover the review process that is required when a cloud-executed rules is submitted later in the presentation.
  • Of course, this all makes sense as you cannot allow rules to effect other tenants if they are poorly written.
  • You also have to restrict the rules context so they can’t access any data from another tenant and things along those lines.

Connecter Execution Rule :

  • Connector executed rules do not run in the cloud which is fairly obvious based on the name.
  • These rules instead run on the VA itself. So they are running in the customers data center and therefore they are not running side by side  with services from another tenant.
  • They are usually extending the connector capabilities. The functions that they perform are quite complex.
  • They do NOT have access to the Identity Now Data Model because they are executing on a virtual appliance.
  • The huge difference here is that they are not subject to a review process by SailPoint. These rules can be uploaded via the REST API and are significantly easier to work with. With that said you still want these rules to be well written.
  • The simple fact is that the possible negative effect of a poorly written connector rule is limited because it is not running within the Identity Now tenant.

SailPoint Provides us with six APIs to perform connector rule operations mentioned below :

  • GET, LIST, CREATE, UPDATE, DELETE, VALIDATE are the APIs that are currently used for connector rule operations.
  • A token with ORG_ADMIN authority is required to perform any operation.

Rule Examples

Example usage:

  • Calculate complex identity attributes. 
  • Calculate complex account attributes. 
  • Provide connector logic

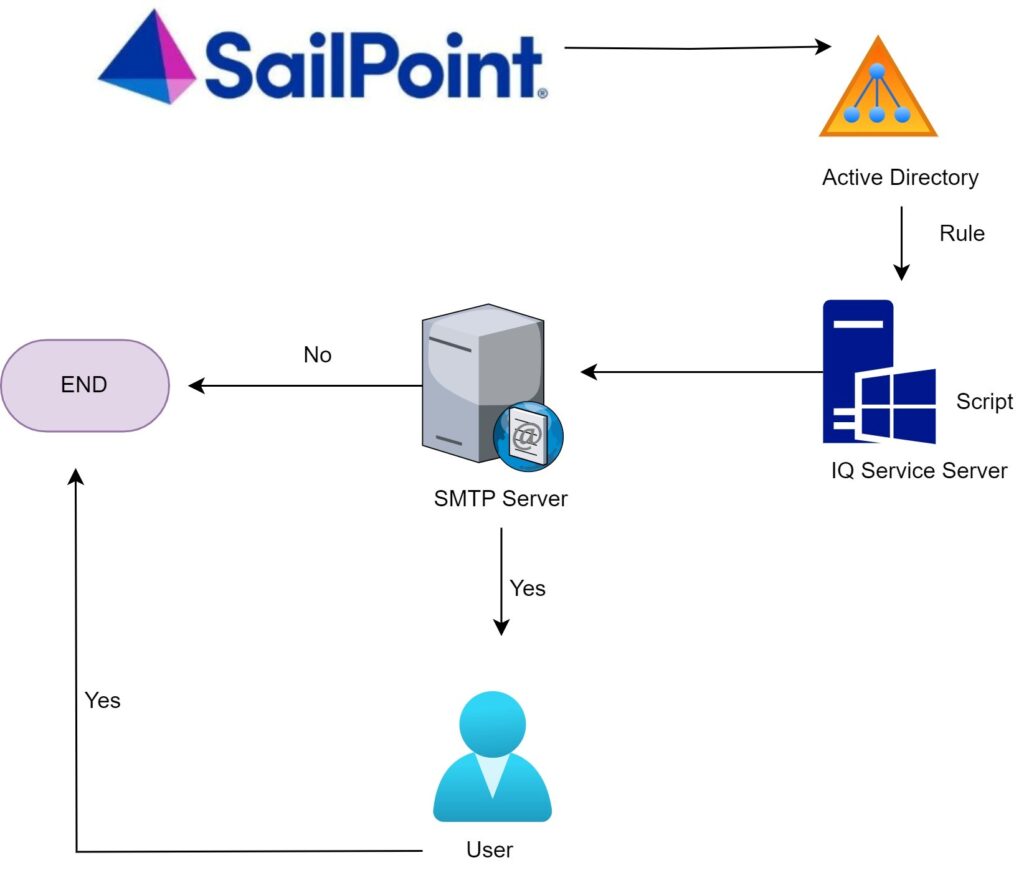
Connector rule Example – If there is a requirement to disable the account based on the number of entitlements or the account should be disabled automatically based on role revocation, this can be achieved by writing a connector rule

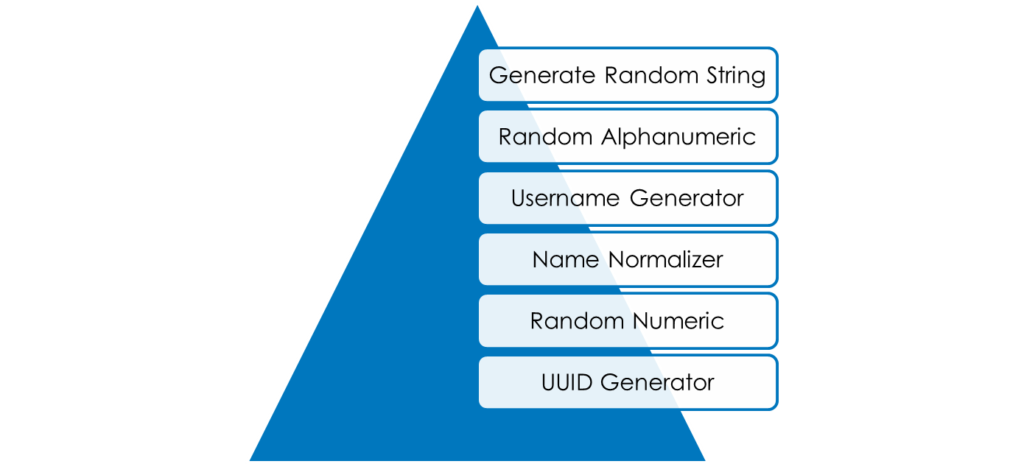
Cloud rule Example– This can be used for generating a unique email id which can scan the existing email id’s and generate a unique id for every joiner.

Please subscribe to our social media and stay updated with latest technology content. Thanks you.

SailPoint IdentityIQ Custom Connector

Introduction

Connectivity is critical to successful IAM deployments. SailPoint is committed to providing design, configuration, troubleshooting and best practice information to deploy and maintain connectivity to target systems. SailPoint IdentityIQ enables you to manage and govern access for digital identities across various applications in your environment. Connectors are the bridges that IdentityIQ uses to communicate with and aggregate data from applications. SailPoint IdentityIQ provides a wide range of OOTB connectors that facilitate integration with variety of systems, applications and data sources. These connectors are designed to simplify the process of managing Identity information and access across different platforms.  

In SailPoint IdentityIQ, a Custom Connector is a specialized integration component that allows the IdentityIQ platform to connect and interact with external systems, applications, or data sources that are not supported by the standard OOTB connectors. Custom connectors extend the capabilities of IdentityIQ by enabling it to manage identity-related information in a wider range of systems. 

High level architecture of Custom connector 

Custom Connector Development

Developing Custom connector in SailPoint IdentityIQ involves creating a Java-based implementation that adheres to the connector framework and API provided by SailPoint.  

This allows you to define the interaction between IdentityIQ and the specific external system you want to integrate with. A typical development of custom connector includes 4 steps – 

  1. Creating a new implementation of functionality and packaging it into JAR file. 
  • The custom connector uses the openconnector framework provided by SailPoint in the openconnector package where there are lot of methods provided for different type of operations.  
  • The custom logic which you want to implement using this custom connector shall be developed in the specified methods.  
  • Once code development is completed, Custom connector code with all the classes must be compiled and packaged to a JAR file.  
  • And the JAR file must be placed in WEB-INF/lib folder of IIQ Installation directory 
  1. Defining Connector type in Connector Registry 
  • Connector Registry is an XML file present in IdentityIQ as Configuration object. This file contains the information about all the different connectors and their related details.  
  • Now that we have created a new connector in our IdentityIQ, we have to declare its information and details in Connector Registry.  
  • Here we will create an xml file consisting of the details pertaining to our custom connector. Once we Import this xml file into IdentityIQ, it will be merged with the existing Connector Registry file in IdentityIQ database allowing IdentityIQ to create a new entry in the list of connectors.  
  • Alternatively, the Connector Registry could be manually edited through the Debug page
  1. Defining .xhtml page which specifies required and optional connection parameters. 
  • Usually, some parameters are required to define the connection to the target resource (e.g. host, port, username, password, etc.).  
  • To allow these parameters to be specified through the UI for each application that uses this connector, an .xhtml page must be written to define how the Application Configuration user interface will request and record those parameters.  
  • This file must be placed in the [IdentityIQ Installation Directory]/define/applications/ directory and must be referenced in the application definition’s XML as the “formPath” entry.  
  1. Testing the connector by Creating an application which uses this connector. 
  • Finally, after completing all the development related activities, one must start the application server which is hosting IdentityIQ.   
  • An Application object must be created for using the IdentityIQ’s UI. Select the configured custom connector as application type to tie it to the connector registry configuration and specifying any connection parameters through the configuration. 
  •  Once the application is onboarded, we can perform all the configured functionalities in it and verify back the results within the targeted external application.  
  • Alternatively, Application connector can be tested from the integration console (run iiq integration from the [IdentityIQ Installation Directory]/WEB-INF/bin directory).  
  • This console can be used to test the various features of your connector including Aggregation and Provisioning

The following presentation gives you clear understanding of custom connector development in detail.

Now let’s have a demo on building custom connector, deploying it into SailPoint IdentityIQ and using it. 

Please subscribe to our social media and stay updated with latest technology content. Thanks!

SailPoint IdentityNow Workflows

About SailPoint IdentityNow Workflows:

IdentityNow workflows are a way to automate processes related to Identity Security Cloud. These processes when carried individually are manual, error prone and laborious in nature.

Here are a few examples of the power of workflows.

  1. Design workflows that can handle a growing number of users onboarding requests, ensuring scalability as the organization hires new employees.
  2. Design workflow to raise tickets in ticketing system to automate the resolution of access-related issues reported by users, ensuring a streamlined process.
  3. Modify an existing workflow to include new steps for managing temporary access during a special project, adapting to changing business needs.
  4. Implement a workflow for access reviews that automatically identifies and revokes unnecessary access rights, ensuring that users only retain permissions relevant to their current roles.
  5. Streamline access request procedures including approval steps for access approval or modification.
  6. Send email alert when an identity changes group in end application.
  7. No human involvement while configuring and activating certification campaign when identity changes department and also send email alert to reviewer.

In this video blog, we will be discussing about the IdentityNow workflows in detail. The following are the key topics that are discussed as part of the blog.

  1. Why SailPoint introduced Workflow in IdentityNow
  2. Available platforms in IdentityNow to build a workflow.
  3. General terminology and use of Inline variables
  4. Simulating and testing a workflow
  5. Migrate workflows between sandbox and production.

The detailed discussion of Workflows, it’s terminology and configuration process are present in the following video.

Detailed demo on developing & testing workflows in all 3 possible ways is present in the following video.

Please subscribe to our socials and stay updated with latest technology content.

SailPoint IdentityNow Automation Testing

Introduction
Automation testing refers to the testing of the software in which tester write the test script once with the help of testing tools and framework and run it on the software.
The test script automatically tests the software without human intervention and shows the result.

Prerequisites for Automation:
To begin automation testing using Selenium, there are few prerequisites should have in place:

  1. Programming Language: Choose a programming language in which you will write your test scripts. Java, Python, C#, and Ruby are common choices for Selenium automation. You should have a good grasp of the chosen language.so we have chosen java.
  2. Integrated Development Environment (IDE): Install an integrated development environment (IDE) such as Eclipse, IntelliJ IDEA, or Visual Studio Code to write and manage your Selenium scripts. We have chosen Eclipse as IDE platform.
  3. Java Development Kit (JDK): If u opt for Java, you’ll need to install the Java Development Kit (JDK) on your system.
  4. Selenium WebDriver: Download the Selenium WebDriver for your preferred programming language. You can add the WebDriver libraries to your project using build tools like Maven.
  5. Web Browsers: Make sure you have the web browsers you intend to automate (e.g., Chrome, Firefox) installed on your system.
  6. Web Drivers: Selenium interacts with browsers through web drivers. You should have the appropriate web drivers for the browsers you plan to test with (e.g., Chrome Driver, Gecko Driver). These should be downloaded and configured. Ensure that your chosen IDE is integrated with the Selenium WebDriver, making it easier to write, run, and debug test scripts.
  7. Test Framework: Select a test framework such as TestNG or Hybrid. Test frameworks help structure your tests and provide reporting capabilities.

By meeting these prerequisites, you’ll be well. prepared to start automation testing using Selenium and create efficient, maintainable, and effective test scripts.

The following below video showcases a small presentation on automation testing:

Tools used for Automation testing.

  1. Eclipse:
    Eclipse is a digital workspace for automation testing. It’s a special software that makes creating and running automated tests easier. It is used by testers because it’s super flexible and works with different programming languages. It helps in writing, organizing, and running tests for finding problems or bugs in software, making sure everything works smoothly.
  2. Selenium:
    Selenium is an Open source, It Supports multiple languages like java, python, Ruby. Scripts can be run on Multiple browsers like Chrome, Firefox, IE, Microsoft Edge. It supports Multiple operating systems like Linux, Windows, MacOS. It can be integrated with third party applications like TestNG, Cucumber.
  3. TestNG:
    TestNG is a testing framework used with Selenium for automating tests. It allows for organizing test cases, running tests in a specific sequence. It offers annotations to manage test execution flow, such as @Test for defining test cases, @BeforeMethod and @AfterMethod as you can see the highlighted point in the picture for pre and post-test setups, and @DataProvider for parameterization. This combination of Selenium and TestNG helps in efficient and structured automation testing, enabling testers to create, manage, and execute test cases reliably. Generates HTML reports showing test execution details.
  4. Maven:
    Maven is an open-source tool. Maven allows to download all the JARs and Dependencies and manage lifecycle for a Selenium Java project. This makes it easier for the QA to configure dependencies for Selenium Java by automatically downloading the JARs from the Maven repository.

Advantages of Automation testing

Efficiency: Automation testing can execute repetitive and complex tasks faster than manual testing.
Accuracy: Automated tests perform the same steps precisely every time, reducing the chance of human errors.
Reusability: Test scripts can be reused across different phases of development and in various testing scenarios.
Faster Feedback: Automated tests provide rapid feedback on the software’s stability and functionality.

Let us see how we can execute the test cases in the below video:

Integrating SailPoint App on Microsoft Teams Application

Introduction:

SailPoint for Microsoft Teams provide users access to corporate resources anytime, anywhere right from Microsoft.

Users are distributed worldwide, the number of applications used are constantly increasing and the lines between who can access these applications and who should access these apps are increasingly getting blurred. SailPoint for Microsoft Teams enables users to get the access they need to stay productive right from within the tool they use the most, all while maintaining strict governance and compliance controls.

Figure:1 SailPoint Integration Flow on Teams

Supported Features:

  • Make role or application requests right within Microsoft Teams using SailPoint bot.
  • Cancel an access request if you don’t need it.
  • Approve or deny new access requests and add comments if needed.
  • Get notified when an access request is approved or denied along with comments.

Prerequisites & Required Permissions:

  • Prior tenant mapping is required to use the reset password feature.
  • We required Admin privileges to do the following,
  • Reset the Identity Now tenant.
  • Receive certification campaign notifications.

Let us understand SailPoint App integration using Microsoft teams’ applications in the following below presentation:

Commands used in Teams integration:

  1. Sign In: Sign in command used to login to the tenant after tenant mapping you will need to sign in to the tenant.
  2. Create: create command used to create an access request using Applications, Roles or Entitlements with in the team’s integration.
  3. Sign out: Sign out command used to sign out from the current existing tenant, you will not receive any notifications until sign in.
  4. Help: It will showcase all the available commands list.
  5. Reset Tenant: Resent tenant command used map a new tenant from current tenant, for resetting tenant need admin level privileges.
  6. Reset Password: This command used to reset your tenant password. It required tenant mapping before changing the password.

In the following demo, I will be providing a brief introduction of SailPoint App Integration on Microsoft teams:

Advantages of using SailPoint Teams Integration:

  • Make Application, Role, or Entitlements requests from within Microsoft teams using the shortcuts buttons.
  • Approve or deny access requests with a single click to improve employee productivity and reduce learning curve.

SailPoint IdentityNow Transforms

Introduction

Transform allows you to manipulate attributes values while provisioning to a source. It will help in manipulating any incoming data from the source as per the requirement.

Transforms are configurable objects that define easy ways to manipulate attribute data without requiring you to write code. Transforms are configurable building blocks with sets of inputs and outputs.

As we can see in diagram there is Input-Transform-Output. In input the value or data is coming from identity attributes or Account attribute and according to requirement we will write the transforms and in output we can see our result.

Transform syntax

The Transform syntax has the following properties:

  • The basic requirement for a transform is name, type, attributes.
  • For name, we can take any objects and that will reflect to your identity profile.
  • For Type, we can put the transforms according to your requirement.
  • For inputs, the developer can decide whether we want to take the value from identity attribute or Account attribute.

Basic String Operations

These are basic string operation there are 18 transform. These transform are commonly used in any operation.

I will discuss each and every transform.

1)Base64 Decode– This transform is used for converting String to Base64. Basically it used for decoding purpose.

2)Base64 Encode-This transform is used for converting Base64 to String. Basically it used for encoding purpose.

3)Concatenation-Concatenation transform is used for Combining two string. This transform basically used to combined first name and last name.

4)Index Of– The index of transform is used to get the location of a specific substring. Suppose that if we give the string to find the index of a string if its found it will return the index number, if doesn’t find it will return -1.

5)Substring– Substring transform is used to take the specific part of the string with provided begin index and end index.

6)Split– Split Transform basically used to split the string based on the provided delimiter. This transform is often useful when you want to split combined names into their constituent parts or when you want to simplify an ordered list of values into a single attribute.

7)Leftpad – Left pad transform to pad the string left side with a user-supplied character out to a specific number of characters. This transform is often useful for data normalization situations.  such as user IDs are not uniform in length.

8)Right pad– Right pad transform to pad the string right side with a user-supplied character out to a specific number of characters. This transform is often useful for data normalization situations.  such as user IDs are not uniform in length.

9)Replace– Replace transform is used for replace the specific string based on the provided regex.

10)Replace All– Replace All transform used to replace the string based on the provided table attribute of key-value pairs as an argument.

11)Upper– Upper transform use to convert an string into uppercase letters.

12)Lower– Lower transform use to convert an string into lowercase letters.

13)Static– Static transform is use to return a fixed string value, or more commonly, to evaluate Velocity. Static transform can also take other dynamically provided variables as inputs into the value attribute.

14)Last Index of – The  last index of transform is used to get the last location of a specific substring.

15)Trim– Trim transform used to trim whitespaces from both the beginning and ending of input strings.

16)Get End of String– Get end of string transform as an out-of-the-box rule transform provided through SailPoint’s Cloud Services Deployment Utility rule. The transform allows you to get the rightmost N characters of a string.

17) Decompose Diacritial Marks– Decompose Diacritial marks transform is used to remove the diacritical marks.

18)E.164 phone transform:- The E.164 phone transform is used to convert an incoming phone number string into an E.164-compatible number.

Date Operation

Under the date operation there are three transform.

 1)Date compare , 2)Date format , 3)Date Math.

1)Date compare:-The date compare transform is used to compare two dates and, depending on the comparison it will return the one value accordingly.

For comparing the date we can use some of the operation like:- Less than , Less than or equal to , greater than and Greater than or equal to.

 We can use the date compare for calculating the Life cycle state.

2)Date Format:- The date format transform is used to convert datetime strings from one format to another. It is useful when you are syncing data from one system to another, because each application uses a different format for date and time data.

3)Date Math:- Date Math transform can be used for performing mathematical operation like addition, subtractions and rounding of a timestamp.

 It also allows you to work with a referential value of “now” to run operations against the current date and time instead of a fixed value.

Generators

Under generators Transform there are six different transforms are present.

Under generators Transform there are six different transforms are present.

1)Generate Random String- Generate Random String Transform provided through SailPoint’s Cloud Services Utility rule. This transform allow us to generate a random string of any length.

2) Random Alphanumeric:- The random alphanumeric transform is used to generate a random string of any provided length, if we do not provide the length it will give the default output that is 32 char. comprising both numbers and letters (both lowercase and uppercase). The maximum allowable value is 450 characters.

3)Username Generator:- To set the logic to use when it determines a unique value for an attribute in an account create profile, utilize the username generator transform. The logic of the generator can be as basic as combining elements of an HR record or the user’s name.

4)Name normalizer:- The name normalizer transform is used to clean or standardize the spelling of strings coming in from source systems. The most common use for this transform is for names.

5)Random Numeric:- The random numeric transform is used to generate a random number of any length. The transform defaults value is 10 char. and maximum allowable value is 450 characters.

6)UUID Generator:-The UUID generator transform is use to create a universal unique ID (UUID) in the form of a 36-character string.

Extending Transforms

Under extending transforms there are two transforms.

1)Reference transform:- The reference transform is used to reuse a transform that has already been written within another transform. We can use this transform when you want to repeat the same logic multiple times within other transforms.

2)Rule Transform:- Rule transform allows you to reuse logic that has already been written for a previous use case. you can use the rule transform to reuse code contained within a Generic rule.

Rules Vs Transforms

Transforms

  • Transforms are JSON-based configurations, editable with IdentityNow’s transform REST APIs.
  • It supports complex logic to modify aggregation and provisioning process.
  • We can view, create, edit, and delete transforms directly via REST API without any involvement of SailPoint.

Rules

  • Rules are implemented with code (typically BeanShell, a Java-like syntax).
  • It support more complex logic.
  • By creating Rules there is involvement of Sailpoint for cloud rules.

SailPoint IdentityNow REST API’s

Introduction

API stands for Application Programming Interface. APIs are mechanisms that enable two software components to communicate with each other using a set of definitions and protocols.

API architecture is usually explained in terms of client and server. The application sending the request is called the client and the application sending the response is called the server.

API Workflow

Fig. – API dataflow

What is REST API:

  REST stands for Representational State Transfer. This is the most popular and flexible APIs found on the web today. The client sends requests to the server as data. The server uses this client input to start internal functions and returns output data back to the client.  REST defines a set of functions like GET, POST, PUT, DELETE, etc. that clients can use to access server data. Clients and servers exchange data using HTTP.

The main feature of REST API is statelessness. Statelessness means that servers do not save client data between requests. Client requests to the server are similar to URLs you type in your browser to visit a website. The response from the server is plain data, without the typical graphical rendering of a web page.

Rest API operation in SailPoint IdentityNow

Post Operation: POST APIs request allows appending data to the endpoint. This is a method used to add information within the request body in the server. It is commonly used for passing delicate information.

GET operations: GET APIs request is used to obtain details from the endpoint and does not have any impact on the endpoint. The GET request does not update any endpoint data while it is triggered.

UPDATE operations: PUT APIs request is used to pass data to the server for creation or modification of an endpoint. The difference between POST and PUT is that POST request is not idempotent.

DELETE operations: DELETE APIs request deletes a resource already present in the server. The DELETE method sends a request to the server for deleting the request mentioned in the endpoint.

Let us understand usage of REST API’s in SailPoint IdentityNow in the following below presentation:

Pre-requisite

  • Base URL of SailPoint tenant.
  • secret key and client ID for the token generation.
  • Generating access token with Authorization code.

Rest API Authentication in IdentityNow

              Authentication is the process of determining whether someone or something is, in fact, who or what it says it is. Authentication provides access control for systems by checking to see if a user’s credentials match the credentials in a database of authorized users or in a data authentication server. In doing this, authentication assures secure systems, secure processes and enterprise information security.

OAuth 2.0

  • OAuth 2.0 is the industry-standard protocol for AUTHORIZATION.
  • OAuth 2.0 is designed primarily as a means of granting access to a set of resources, in simple way OAuth 2.0 Access Token is a string that the OAuth client uses to make requests to the resource server.

JSON Web Token

          JSON Web Token (JWT) authentication is a stateless method of securely transmitting information between two parties as (JSON) object. It is often used to authenticate and authorize users in web applications and APIs.

Rest API Authorization in IdentityNow

          Authorization in system security is the process of giving the user permission to access a specific resource or Authorization is the act of validating the user’s permission to access a given resource. This term is often used interchangeably with access control or client privilege.

Personal Access Token in IdentityNow

In IdentityNow a personal access token (PAT) is a method of authenticating to an API as a user without providing a username and password.

Now, let us go through a demo on how we can use these REST API’s in SailPoint IdentityNow.

Features of Rest API in IdentityNow

  • APIs extend IdentityNow functionality and Usability
  • Advanced configuration such as
    • Transform creation
    • Customization of account profiles
    • Ranking authoritative source priority
    • System level changes
    • Object management
  • Interface with other systems – pull data/initiate processes

Identity Deletion in SailPoint IdentityNow

Identity management (IDM), also known as identity and access management (IAM), ensures that authorized people and only authorized people have access to the technology resources they need to perform their job functions.

And access is managed by the user lifecycle state in IdentityNow. Identity Lifecycle State aims to automate and manage the entire digital identity lifecycle process and access throughout the organization.

Identity lifecycle is a set of stages of the identity from the creation to its deactivation or deletion. It contains a creation of an account, assignment of correct groups and permissions, setting and resetting passwords and in the end deactivation or deletion of the account.

Figure 1: Identity Lifecycle Management

Handling the unwanted identities in SailPoint increases the processing time and reduces the usability of the SailPoint tenant. To reduce the process and speed up the work, in tenant only limited and require identities we can handle, handling is easy and processing the limited identities is a less time-consuming process, so we can delete unwanted and terminated users’ identities from SailPoint.

Now, let us have a look at the SailPoint REST API’s used in the Identity deletion process. Below is the list of APIs used for Identity deletion in SailPoint IdentityNow:

Figure 2:  REST APIs in PowerShell Script connecting with SailPoint IdentityNow

And here, we will be using A personal access token (PAT) is a method of authenticating to an API as a user without providing a username and password.

Prerequisites for Identity deletion:

  1. SailPoint REST API’s.
  2. Client ID and Client Secret.
  3. IQservice Server.

Now, let us discuss the use case of Identity deletion.

Use Case:

All the identities in the “30daysPostTermination” lifecycle state will be deleted from IdentityNow. 

The deleted identities would be re-aggregated in the next aggregation cycle as “Uncorrelated accounts” in target application, and hence would not affect the new hire creation logic and the SAMAccount name would remain unique as per the requirement and the logic defined.

A PowerShell script will be developed to call the APIs to identify all the Identities in the required lifecycle state i.e. “30daysPostTermination” and will delete the accounts from the HRMS Source for all the Identities.

Figure 3: Use Case diagram.

Steps Overview as per the script:

Step1: As part of the PowerShell script first it will read the require details from property file. In property file we can maintain the ClientID, client Secret, base URL, search query, deletion limit, log file path and debug values.

Step2: Authentication API will execute to generate the access token.

Step3: Next Search API will execute and the fetch “30daysPostTermination” lifecycle state identities from SailPoint Tenant.

Step4: One by one Identities will pass to Delete API to delete from SailPoint Tenant.

Let us understand Identity Deletion by using SailPoint REST APIs, use cases and automation of the script via windows task scheduler in the following below presentation:

Advantages of Identities Deletion in SailPoint IdentityNow.

  1. It will increase the usability of the tenant.
  2. It decreases the aggregation and identity refresh process time.
  3. It will fasten the backend processes and reduce the unwanted identity handling.
  4. Reduce the burden on the tenant.

When a user got terminated or left the organization, all access will be removed, and accounts will be disabled.
Now, let us go through a demo on how we can achieve identity deletion in SailPoint IdentityNow.

Triggering Email from PowerShell for NELM users

Introduction

This blog is intended to demonstrate on automating email notifications for newly on-boarded contractors from IdentityNow. This will help in sending auto email notifications to users & their managers (if required) to reset their first password. This is enabled by running a PowerShell script in a shared folder in the IQ Service Server. In the current process, the IT help desk team needs to reach out to the user for his first login. With the help of PowerShell script, this process can be automated by sharing the password reset link automatically.

Use Case Diagram

The above diagram depicts the overall process flow of the use case with the point of initiation being the IQ Service Server following with the SMTP server.

  • Current IdentityNow templates don’t have email notification which will send Email ID ,password reset link and user manual to end user on his first day to instantly. To achieve this requirement, we have written PowerShell script and rule to achieve desired requirement above diagram gives the overview of how we have achieved this requirement.
  • From UI Request center, HR or Manager will request for an AD account depending on the license to be assigned for the user to be on-boarded.
  • Once request is completed Active Directory account will be created and the After create rule will be triggered.  By using this rule, we are triggering PowerShell script which is placed in IQ service server for sending Email by using SMTP server containing Email Id, Password reset link & user manual. We can also edit the contents to be shared in the email based on the organization requirements.

Detailed discussion on the overall Use case, communication flow and the advantages:

Introduction to IQ Service Server

  • The IQ Service, also known as the Integration Service, is a native Windows service that allows Identity Now to participate in a Windows environment and access information that is only accessible via Windows APIs.
  • It is a lightweight service that must be installed on any supported Windows Server that has connectivity to the target systems you want to manage in Identity Now.
  • It also secures all incoming & outgoing communications of the server. Overall security of the solution and data integrity will be ensured even in crucial stage.
  • We can create several instances on the same machine as per the system requirements.
  • This server is primarily responsible for provisioning in AD from IdentityNow.

IQ Service Communication Flow

  • IdentityNow always push task to a VA cluster queue and from cluster queue, VA will pull the request based on the priority of task.
  • Once request is fetched by VA, VA will communicate to IQService for tasks such as aggregation, create and modify the accounts.
  • IQService server communicates with domain controller using LDAP/LDAPS.
  • IQService receives the data from domain controller and gives it back to VA (Outbound traffic).
  •  Finally VA will give the updated results to the tenant and requests for the new task.

Rule Execution process in IdentityNow

Rule execution can be executed in 2 primary places:

  • Cloud Execution – These rules are executed in the IDN multi-tenant cloud.
  • Connector Execution – These rules are executed on the on-premise IDN virtual appliance.
  • Connector Rules are rules that are executed in the IdentityNow virtual appliance, and they are usually extensions of the connector itself. The rules are particular to only certain connectors since they are frequently applied to carry out complex connector-related tasks. Because these rules function within the virtual appliance, they are unable to access IdentityNow’s data model or collect data from it.
  • The basic logic required to initiate a PowerShell script is derived from the after-creation rule, which then transfers the majority of the subsequent events and/or modifications to the PowerShell script itself. Since this script would be stored on the client’s servers, the customer could easily modify it as needed. Since the code runs outside of the IdentityNow platform, it allows the client to add updates to the PowerShell scripted functionality without requiring SailPoint to review the code.

Demonstration of the use case in IdentityNow

Use of Powershell script in IdentityNow

  • The popularity of scripting languages with Object Oriented capabilities—like PowerShell is because of their simplicity and use.
  • These languages’ native scripts can access request and result objects more quickly and effectively.
  • The Utils.dll class library that is bundled with the IQ Service contains all the necessary classes to access the request and result objects. Process environment variables would be presented as inputs to the script.
  • The environment variables contain XML-based data. Using Utils.dll, the script creates the appropriate objects.
  • Once the object is modified, the script should execute the object’s xml() function to convert it to XML and then send the XML to the path mentioned in the script’s single argument.
  • In the event of an error, the script generates a non-zero value and logs the message in the appropriate file at the specified directory.

Before/ After Scripts for IQ Service

  • The IQ Service allows function customization by allowing the integration of before/after scripts developed using scripting languages such as PowerShell.
  • Any required tasks that cannot be automated with the current source functionalities can be automated with scripts.
  • Native before scripts are scripts that are called before the request is processed; native after scripts are scripts that are called after the request is processed.

The following sources support Before/After Scripts for IQ Service:

Advantages

  • It will helps end user to get his organization email ID, password Reset Link & User manual for SailPoint as IdentityNow Default email templates don’t have this type of functionality.
  • We can set a customized template and add an initial login guide or any policy documents as an attachments while triggering this email.
  • The dependency on IT help desk team for sharing login details for the newly on-boarded contractors is reduced to a huge extent.
  • Contractors can login to their system almost immediately post completion of the on-boarding without having any downtime.

Oracle Fusion Integration with SailPoint IdentityIQ

About Oracle Fusion: Oracle Fusion Cloud HCM is a complete cloud solution that connects every human resource process and every person across the enterprise.

Benefits of Oracle Fusion:

  • Oracle HCM cloud enables HR leaders by delivering an end-to-end solution to manage every stage of the employee lifecycle.
  • Human capital management transforms the traditional administrative functions of human resource departments – recruiting, training, payroll, compensation, and performance management into opportunities to drive engagement, productivity, and business value.
  • It also offers Data Efficiency by preserving history of changes made to the attributes of some objects. As a Professional user, you can retrieve and edit past and future versions of an object.
  • Many HCM objects, including person names, assignments, benefits-plans, grades, jobs, locations, payrolls, and positions are date-effective. Date-effective objects include one or more physical records. Each record has effective start and end dates. One record is current and available to transactions. Others are past or take effect in the future. Together, these records constitute the logical record or object instance.

Integration with SailPoint IdentityIQ

Here, Oracle Fusion application is integrated with SailPoint using Webservices connector. Let us have a quick overview of basic configuration parameters of SailPoint IdentityIQ Webservices Connector

Webservices connector application configuration
  • Base URL: The base URL is used to connect to the web service managed system.
  • Authentication Method: Authentication methods that is supported are: OAuth2, API Token, Basic Authentication and No/Custom Authentication
  • Schema Attribute for Account Enable status: Attribute name and value required to be provided to check the Enable status. For example: status=Active
  • Username: Username of the resource owner
  • Password: Password of the resource owner
  • Grant Type: We can select the type of Grant from below: Refresh Token, JWT, Client Credentials, Password and SAML Bearer Assertion
  • Client Id: (Optional for JWT and SAML Bearer Assertion) Client Id for OAuth2 authentication.
  • Client Secret: (Optional for JWT and SAML Bearer Assertion) Client Secret for OAuth2 authentication.
  • Token URL: URL for generating access token.

Basically, connecting SailPoint to your Web Services allows you to configure any web service supported managed system which can read and write on the managed system using the respective managed system’s Web Services. Web Services supports JSON and XML for read and write.

Oracle Fusion Integration with SailPoint IdentityIQ

Now, let us have a look at the Oracle Fusion REST APIs used in the Integration process. Below is the list of APIs used for integrating Oracle Fusion to SailPoint:

  • Get all Workers API: This fetches all the worker records as of the specified date. Worker types include employee, contingent worker, and pending worker. By default, the current date is retained.
  • Get all User Accounts API: This fetches all the userAccounts. We may need to manage user accounts for the workers to assign or revoke Fusion Roles
  • Get all Roles API: This is used the get the roles assigned to the user accounts.
  • Create Employee API: This is used to create an Employee record in Oracle Fusion.
  • Update Employee API: This is used to update an Employee record in Oracle Fusion.
  • Terminate Worker API: This is used to Disable a Worker record in Oracle Fusion.
  • Role Revoke API: This is used to revoke an assigned role.
  • Rehire Employee API: This is used to Enable an Employee record in Oracle Fusion.

And here, we will be using Basic Authentication in the Integration Process where we have used Username and Password of the resource owner to from connection between Oracle Fusion and SailPoint IdentityIQ

Prerequisites for integrating Oracle Fusion with SailPoint

  1. Oracle Fusion REST APIs
  2. Oracle Fusion instance
  3. Base URL of the Oracle Fusion instance
  4. As we are using Basic Authentication, we need username and password for the APIs

Now, let us discuss the use cases involved in the integration process.

Use Cases

1. Joiner/Create account Process

Joiner Process starts with the creation of account in Truth Source application. Then that account will be brought to SailPoint through a scheduled aggregation task.

Joiner/Create Account Process

Then through a Scheduled Refresh Identity Cube task and using a configured Business Role and Assignment Rule, two conditions are checked.

  1. Identity or Account in Truth Source is Active
  2. Business Unit is XXXX

If these two conditions are satisfied. Then the account creation process for Oracle Fusion application gets triggered. As part of the Joiner or Account creation process, Basic access will be provisioned to the newly created account from the Fusion end automatically.

2. Leaver/Disable Account Process:

Leaver process starts when the Last working day attribute of account is populated in Truth Source application.

Leaver/Disable Account Process

Then that Last working day for that account will be updated in SailPoint through a scheduled aggregation task. Then through a Scheduled Refresh Identity Cube task, it is checked that if that Last working day is equal to Today’s date. In other words, it is checked that if the Last working day has reached.

If the Last working day has reached, then the account disable process for Oracle Fusion application gets triggered.

As part of the Termination process, all the Roles which that account has, will be de-provisioned.

3. Rehire/Enable Account Process:

Rehire Process starts by enabling the account in Truth Source application. Then that is updated in SailPoint through a scheduled aggregation task.

Rehire/Enable Account Process

Then through a Scheduled Refresh Identity Cube task, the account enable process for Oracle Fusion application gets triggered.

As part of the Rehire/Enable account process, another new Assignment is created for that account with AssignmentName and AssignmentNumber appended with “R”. And Basic access will be assigned to that enabled account as we saw in the create account use case.

Advantages of Integrating Oracle Fusion with Sailpoint IdentityIQ:

  1. In this integration, we have automated the creation of account in Oracle Fusion. Whereas before the integration, Oracle Fusion team had to create an account in Oracle Fusion manually for the new Joiners
  2. In this integration, we have also automated the Disabling and Role Revoke operations. Actually, when the Last Working Date of the user has reached, then the Oracle Fusion account of this leaver will be disabled and Oracle Fusion Roles assigned to this leaver will Revoked, by Sailpoint. Whereas, before the integration, Oracle Fusion team had to disable the account and Revoked Roles in Oracle Fusion manually for the leavers.
  3. In this Integration, we have also automated the update operation as well. From Sailpoint, we are updating the attributes such as LegalEmployerName, Department, Job, Grade, FirstName, LastName, DisplayName, etc. Whereas, before the integration, Oracle Fusion team had to handle these updates manually which will be a tedious task to do.
  4. We have also automated the Rehire Process. When a user got rehired, then for that user, Oracle Fusion account will be enabled and a new work relationship will be created from Sailpoint.

When a user got Rehired, only the Basic access will be given, not the access that user had before Leaver process for that user initiated.
The detailed discussion of Oracle Fusion introduction, Oracle Fusion TEST APIs, use cases and integration approach is discussed in the following video:

Now, let us a have a demo on integration of Oracle Fusion with SailPoint IdentityIQ in the following video: