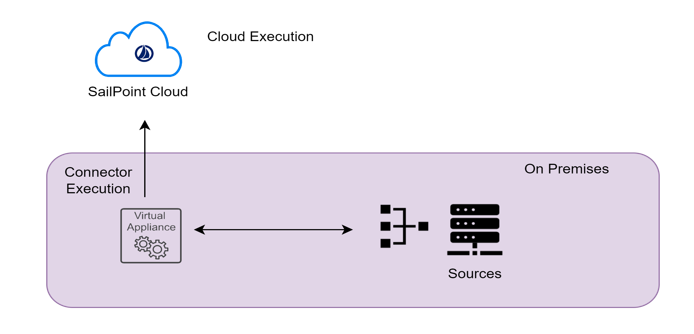
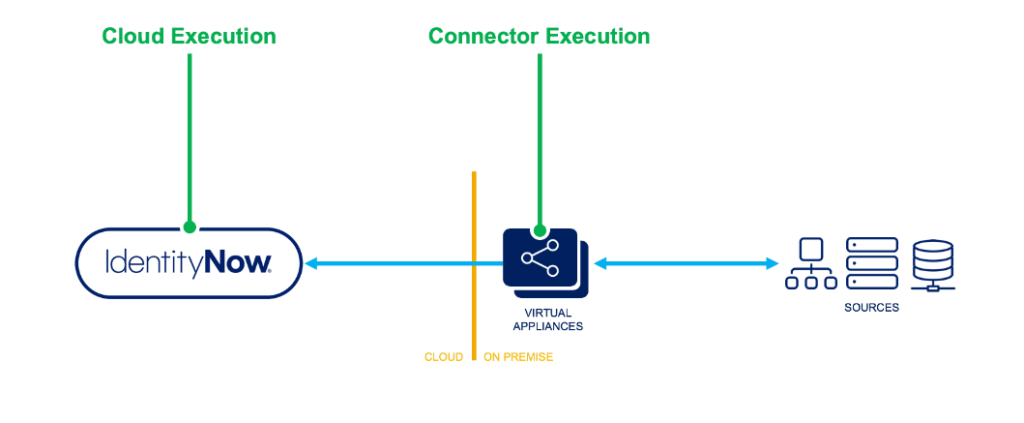
Let us have an overview on the difference between the cloud rules & connector rules
Cloud Executed rules are running in the cloud within the Identity Now tenant. Connector rules run on the virtual appliance which is on-premise inside the customer’s data center
Cloud Execution Rule :
Cloud executed rules, as the name implies, are executed within the Identity Now multi-tenant environment.
They typically have independent functions for a specific purpose. For example, calculating an Identity attribute value.
Cloud executed rules typically need to query the Identity Now data model in order to complete their work.
The rule might need to guarantee uniqueness of a value and it would generate a value and query Identity Now to determine if that value already exists.
Access to any Identity Now data is read-only and you can’t make any calls outside of Identity Now such as a REST API from another vendor service.
Because they run in a multi-tenant environment, the are put in a very restricted context and there is a great deal of scrutiny taken during the required review process for rules.
We will cover the review process that is required when a cloud-executed rules is submitted later in the presentation.
Of course, this all makes sense as you cannot allow rules to effect other tenants if they are poorly written.
You also have to restrict the rules context so they can’t access any data from another tenant and things along those lines.
Connecter Execution Rule :
Connector executed rules do not run in the cloud which is fairly obvious based on the name.
These rules instead run on the VA itself. So they are running in the customers data center and therefore they are not running side by side with services from another tenant.
They are usually extending the connector capabilities. The functions that they perform are quite complex.
They do NOT have access to the Identity Now Data Model because they are executing on a virtual appliance.
The huge difference here is that they are not subject to a review process by SailPoint. These rules can be uploaded via the REST API and are significantly easier to work with. With that said you still want these rules to be well written.
The simple fact is that the possible negative effect of a poorly written connector rule is limited because it is not running within the Identity Now tenant.
SailPoint Provides us with six APIs to perform connector rule operations mentioned below :
GET, LIST, CREATE, UPDATE, DELETE, VALIDATE are the APIs that are currently used for connector rule operations.
A token with ORG_ADMIN authority is required to perform any operation.
Rule Examples
Example usage:
Calculate complex identity attributes.
Calculate complex account attributes.
Provide connector logic
Connector rule Example – If there is a requirement to disable the account based on the number of entitlements or the account should be disabled automatically based on role revocation, this can be achieved by writing a connector rule
Cloud rule Example– This can be used for generating a unique email id which can scan the existing email id’s and generate a unique id for every joiner.
Please subscribe to our social media and stay updated with latest technology content. Thanks you.
Connectivity is critical to successful IAM deployments. SailPoint is committed to providing design, configuration, troubleshooting and best practice information to deploy and maintain connectivity to target systems. SailPoint IdentityIQ enables you to manage and govern access for digital identities across various applications in your environment. Connectors are the bridges that IdentityIQ uses to communicate with and aggregate data from applications. SailPoint IdentityIQ provides a wide range of OOTB connectors that facilitate integration with variety of systems, applications and data sources. These connectors are designed to simplify the process of managing Identity information and access across different platforms.
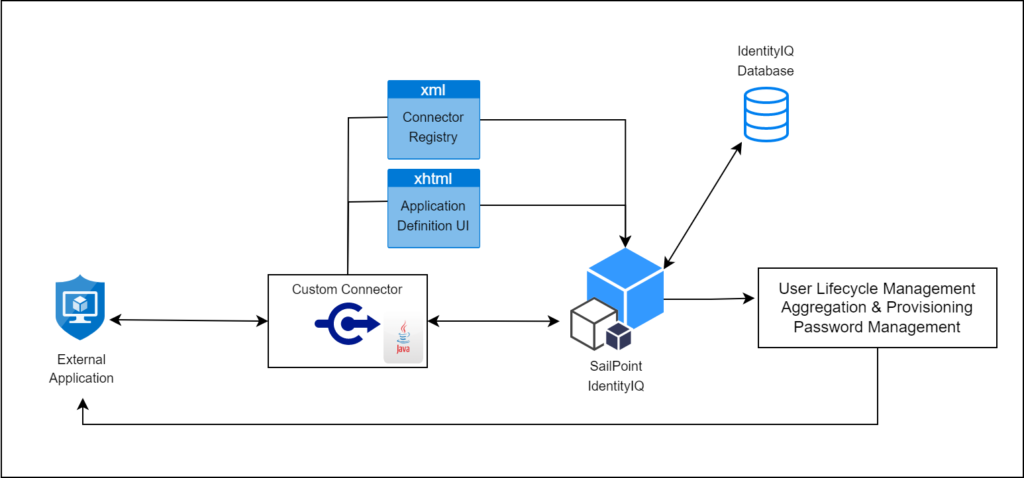
In SailPoint IdentityIQ, a Custom Connector is a specialized integration component that allows the IdentityIQ platform to connect and interact with external systems, applications, or data sources that are not supported by the standard OOTB connectors. Custom connectors extend the capabilities of IdentityIQ by enabling it to manage identity-related information in a wider range of systems.
High level architecture of Custom connector
Custom Connector Development
Developing Custom connector in SailPoint IdentityIQ involves creating a Java-based implementation that adheres to the connector framework and API provided by SailPoint.
This allows you to define the interaction between IdentityIQ and the specific external system you want to integrate with. A typical development of custom connector includes 4 steps –
Creating a new implementation of functionality and packaging it into JAR file.
The custom connector uses the openconnector framework provided by SailPoint in the openconnector package where there are lot of methods provided for different type of operations.
The custom logic which you want to implement using this custom connector shall be developed in the specified methods.
Once code development is completed, Custom connector code with all the classes must be compiled and packaged to a JAR file.
And the JAR file must be placed in WEB-INF/lib folder of IIQ Installation directory
Defining Connector type in Connector Registry
Connector Registry is an XML file present in IdentityIQ as Configuration object. This file contains the information about all the different connectors and their related details.
Now that we have created a new connector in our IdentityIQ, we have to declare its information and details in Connector Registry.
Here we will create an xml file consisting of the details pertaining to our custom connector. Once we Import this xml file into IdentityIQ, it will be merged with the existing Connector Registry file in IdentityIQ database allowing IdentityIQ to create a new entry in the list of connectors.
Alternatively, the Connector Registry could be manually edited through the Debug page.
Defining .xhtml page which specifies required and optional connection parameters.
Usually, some parameters are required to define the connection to the target resource (e.g. host, port, username, password, etc.).
To allow these parameters to be specified through the UI for each application that uses this connector, an .xhtml page must be written to define how the Application Configuration user interface will request and record those parameters.
This file must be placed in the [IdentityIQ Installation Directory]/define/applications/ directory and must be referenced in the application definition’s XML as the “formPath” entry.
Testing the connector by Creating an application which uses this connector.
Finally, after completing all the development related activities, one must start the application server which is hosting IdentityIQ.
An Application object must be created for using the IdentityIQ’s UI. Select the configured custom connector as application type to tie it to the connector registry configuration and specifying any connection parameters through the configuration.
Once the application is onboarded, we can perform all the configured functionalities in it and verify back the results within the targeted external application.
Alternatively, Applicationconnector can be tested from the integration console (run iiq integration from the [IdentityIQ Installation Directory]/WEB-INF/bin directory).
This console can be used to test the various features of your connector including Aggregation and Provisioning.
The following presentation gives you clear understanding of custom connector development in detail.
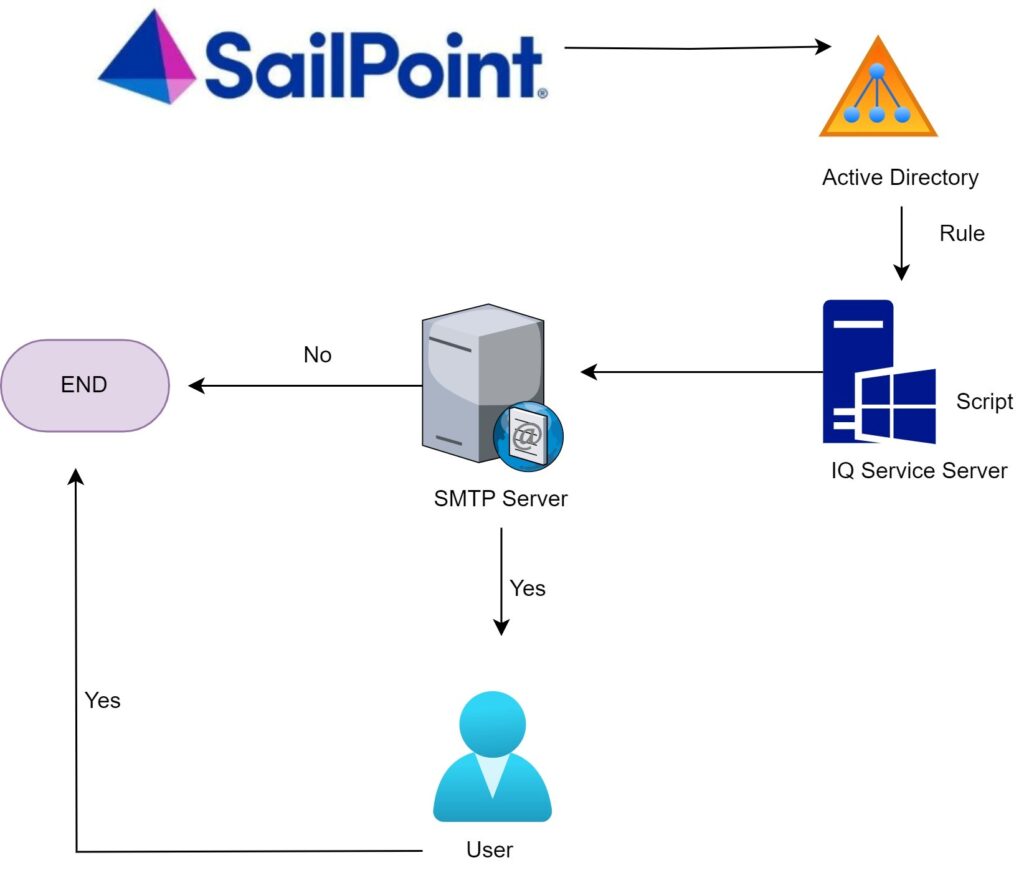
This blog is intended to demonstrate on automating email notifications for newly on-boarded contractors from IdentityNow. This will help in sending auto email notifications to users & their managers (if required) to reset their first password. This is enabled by running a PowerShell script in a shared folder in the IQ Service Server. In the current process, the IT help desk team needs to reach out to the user for his first login. With the help of PowerShell script, this process can be automated by sharing the password reset link automatically.
Use Case Diagram
The above diagram depicts the overall process flow of the use case with the point of initiation being the IQ Service Server following with the SMTP server.
Current IdentityNow templates don’t have email notification which will send Email ID ,password reset link and user manual to end user on his first day to instantly. To achieve this requirement, we have written PowerShell script and rule to achieve desired requirement above diagram gives the overview of how we have achieved this requirement.
From UI Request center, HR or Manager will request for an AD account depending on the license to be assigned for the user to be on-boarded.
Once request is completed Active Directory account will be created and the After create rule will be triggered. By using this rule, we are triggering PowerShell script which is placed in IQ service server for sending Email by using SMTP server containing Email Id, Password reset link & user manual. We can also edit the contents to be shared in the email based on the organization requirements.
Detailed discussion on the overall Use case, communication flow and the advantages:
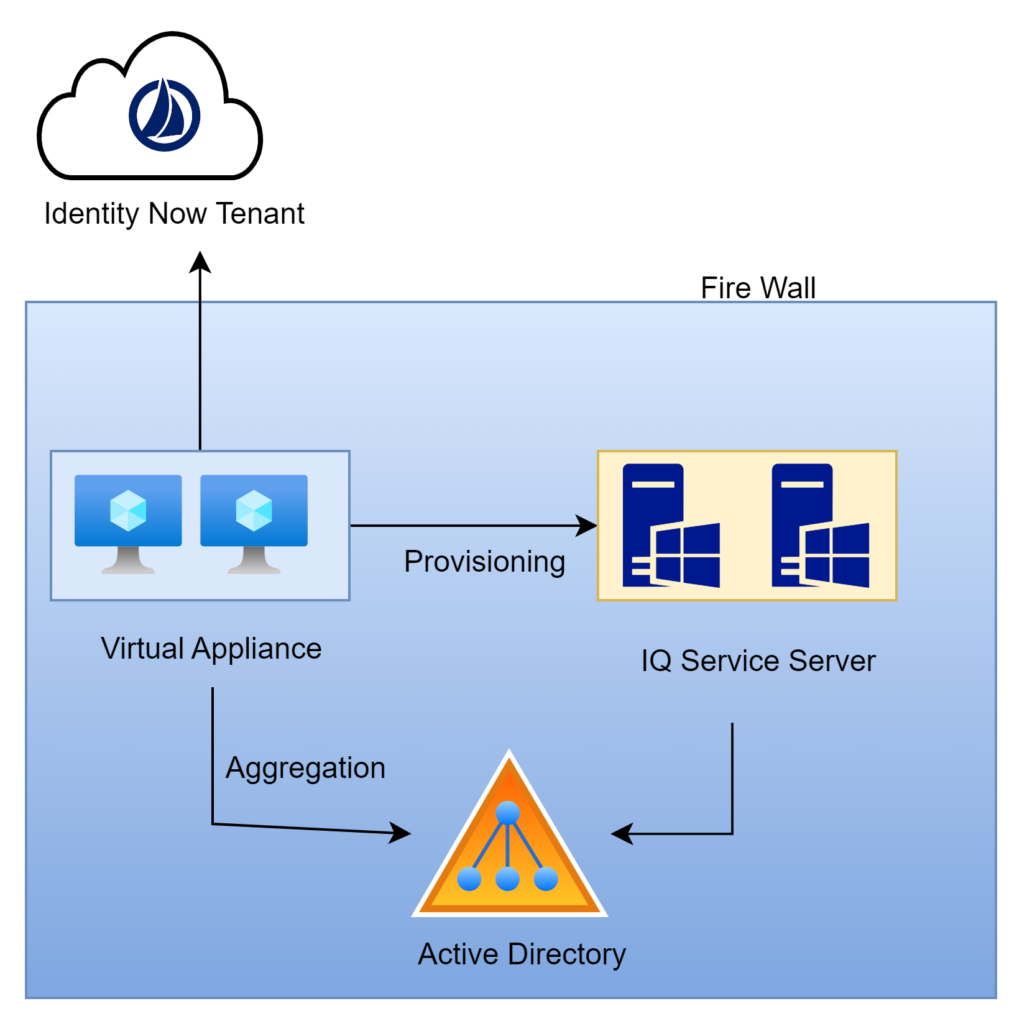
Introduction to IQ Service Server
The IQ Service, also known as the Integration Service, is a native Windows service that allows Identity Now to participate in a Windows environment and access information that is only accessible via Windows APIs.
It is a lightweight service that must be installed on any supported Windows Server that has connectivity to the target systems you want to manage in Identity Now.
It also secures all incoming & outgoing communications of the server. Overall security of the solution and data integrity will be ensured even in crucial stage.
We can create several instances on the same machine as per the system requirements.
This server is primarily responsible for provisioning in AD from IdentityNow.
IQ Service Communication Flow
IdentityNow always push task to a VA cluster queue and from cluster queue, VA will pull the request based on the priority of task.
Once request is fetched by VA, VA will communicate to IQService for tasks such as aggregation, create and modify the accounts.
IQService server communicates with domain controller using LDAP/LDAPS.
IQService receives the data from domain controller and gives it back to VA (Outbound traffic).
Finally VA will give the updated results to the tenant and requests for the new task.
Rule Execution process in IdentityNow
Rule execution can be executed in 2 primary places:
Cloud Execution – These rules are executed in the IDN multi-tenant cloud.
Connector Execution– These rules are executed on the on-premise IDN virtual appliance.
Connector Rules are rules that are executed in the IdentityNow virtual appliance, and they are usually extensions of the connector itself. The rules are particular to only certain connectors since they are frequently applied to carry out complex connector-related tasks. Because these rules function within the virtual appliance, they are unable to access IdentityNow’s data model or collect data from it.
The basic logic required to initiate a PowerShell script is derived from the after-creation rule, which then transfers the majority of the subsequent events and/or modifications to the PowerShell script itself. Since this script would be stored on the client’s servers, the customer could easily modify it as needed. Since the code runs outside of the IdentityNow platform, it allows the client to add updates to the PowerShell scripted functionality without requiring SailPoint to review the code.
Demonstration of the use case in IdentityNow
Use of Powershell script in IdentityNow
The popularity of scripting languages with Object Oriented capabilities—like PowerShell is because of their simplicity and use.
These languages’ native scripts can access request and result objects more quickly and effectively.
The Utils.dll class library that is bundled with the IQ Service contains all the necessary classes to access the request and result objects. Process environment variables would be presented as inputs to the script.
The environment variables contain XML-based data. Using Utils.dll, the script creates the appropriate objects.
Once the object is modified, the script should execute the object’s xml() function to convert it to XML and then send the XML to the path mentioned in the script’s single argument.
In the event of an error, the script generates a non-zero value and logs the message in the appropriate file at the specified directory.
Before/ After Scripts for IQ Service
The IQ Service allows function customization by allowing the integration of before/after scripts developed using scripting languages such as PowerShell.
Any required tasks that cannot be automated with the current source functionalities can be automated with scripts.
Native before scripts are scripts that are called before the request is processed; native after scripts are scripts that are called after the request is processed.
The following sources support Before/After Scripts for IQ Service:
It will helps end user to get his organization email ID, password Reset Link & User manual for SailPoint as IdentityNow Default email templates don’t have this type of functionality.
We can set a customized template and add an initial login guide or any policy documents as an attachments while triggering this email.
The dependency on IT help desk team for sharing login details for the newly on-boarded contractors is reduced to a huge extent.
Contractors can login to their system almost immediately post completion of the on-boarding without having any downtime.
About Oracle Fusion: Oracle Fusion Cloud HCM is a complete cloud solution that connects every human resource process and every person across the enterprise.
Benefits of Oracle Fusion:
Oracle HCM cloud enables HR leaders by delivering an end-to-end solution to manage every stage of the employee lifecycle.
Human capital management transforms the traditional administrative functions of human resource departments – recruiting, training, payroll, compensation, and performance management into opportunities to drive engagement, productivity, and business value.
It also offers Data Efficiency by preserving history of changes made to the attributes of some objects. As a Professional user, you can retrieve and edit past and future versions of an object.
Many HCM objects, including person names, assignments, benefits-plans, grades, jobs, locations, payrolls, and positions are date-effective. Date-effective objects include one or more physical records. Each record has effective start and end dates. One record is current and available to transactions. Others are past or take effect in the future. Together, these records constitute the logical record or object instance.
Integration with SailPoint IdentityIQ
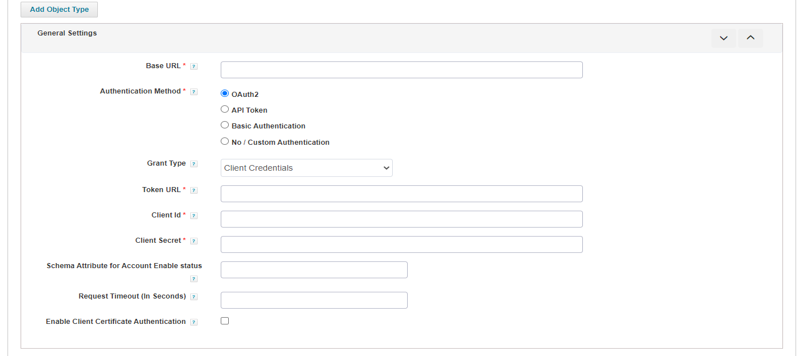
Here, Oracle Fusion application is integrated with SailPoint using Webservices connector. Let us have a quick overview of basic configuration parameters of SailPoint IdentityIQ Webservices Connector
Webservices connector application configuration
Base URL: The base URL is used to connect to the web service managed system.
Authentication Method: Authentication methods that is supported are: OAuth2, API Token, Basic Authentication and No/Custom Authentication
Schema Attribute for Account Enable status: Attribute name and value required to be provided to check the Enable status. For example: status=Active
Username: Username of the resource owner
Password: Password of the resource owner
Grant Type: We can select the type of Grant from below: Refresh Token, JWT, Client Credentials, Password and SAML Bearer Assertion
Client Id: (Optional for JWT and SAML Bearer Assertion) Client Id for OAuth2 authentication.
Client Secret: (Optional for JWT and SAML Bearer Assertion) Client Secret for OAuth2 authentication.
Token URL: URL for generating access token.
Basically, connecting SailPoint to your Web Services allows you to configure any web service supported managed system which can read and write on the managed system using the respective managed system’s Web Services. Web Services supports JSON and XML for read and write.
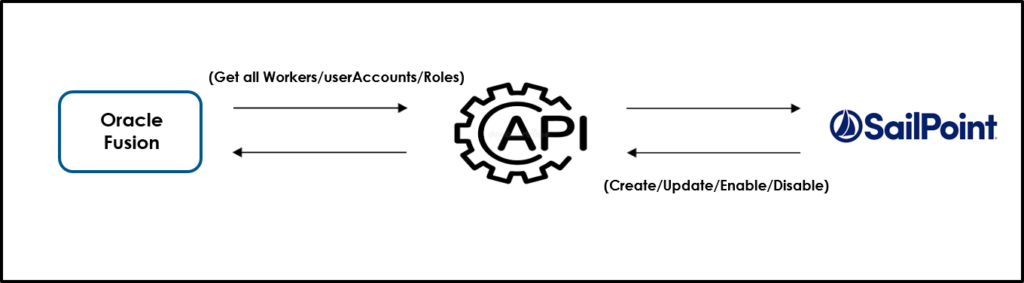
Oracle Fusion Integration with SailPoint IdentityIQ
Now, let us have a look at the Oracle Fusion REST APIs used in the Integration process. Below is the list of APIs used for integrating Oracle Fusion to SailPoint:
Get all Workers API: This fetches all the worker records as of the specified date. Worker types include employee, contingent worker, and pending worker. By default, the current date is retained.
Get all User Accounts API: This fetches all the userAccounts. We may need to manage user accounts for the workers to assign or revoke Fusion Roles
Get all Roles API: This is used the get the roles assigned to the user accounts.
Create Employee API: This is used to create an Employee record in Oracle Fusion.
Update Employee API: This is used to update an Employee record in Oracle Fusion.
Terminate Worker API: This is used to Disable a Worker record in Oracle Fusion.
Role Revoke API: This is used to revoke an assigned role.
Rehire Employee API: This is used to Enable an Employee record in Oracle Fusion.
And here, we will be using Basic Authentication in the Integration Process where we have used Username and Password of the resource owner to from connection between Oracle Fusion and SailPoint IdentityIQ
Prerequisites for integrating Oracle Fusion with SailPoint
Oracle Fusion REST APIs
Oracle Fusion instance
Base URL of the Oracle Fusion instance
As we are using Basic Authentication, we need username and password for the APIs
Now, let us discuss the use cases involved in the integration process.
Use Cases
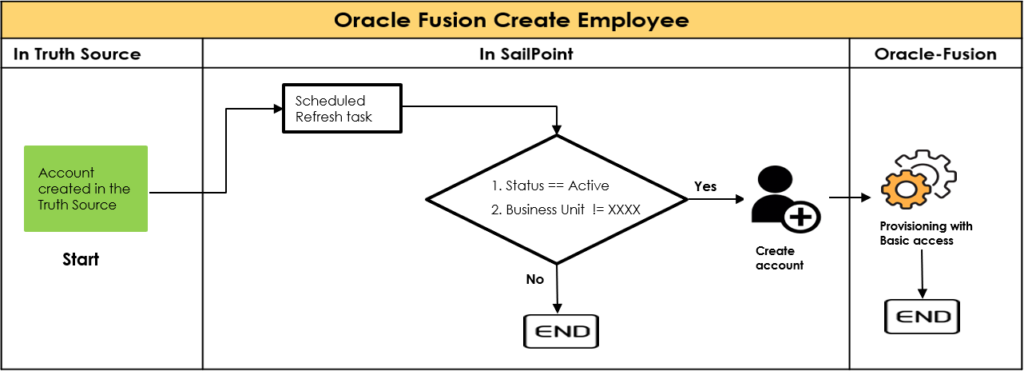
1. Joiner/Create account Process
Joiner Process starts with the creation of account in Truth Source application. Then that account will be brought to SailPoint through a scheduled aggregation task.
Joiner/Create Account Process
Then through a Scheduled Refresh Identity Cube task and using a configured Business Role and Assignment Rule, two conditions are checked.
Identity or Account in Truth Source is Active
Business Unit is XXXX
If these two conditions are satisfied. Then the account creation process for Oracle Fusion application gets triggered. As part of the Joiner or Account creation process, Basic access will be provisioned to the newly created account from the Fusion end automatically.
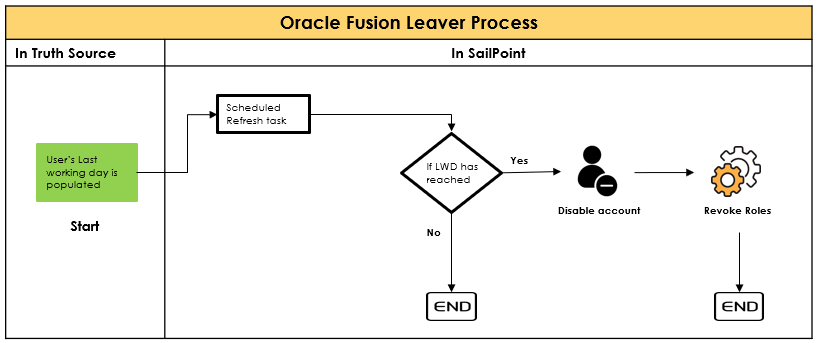
2. Leaver/Disable Account Process:
Leaver process starts when the Last working day attribute of account is populated in Truth Source application.
Leaver/Disable Account Process
Then that Last working day for that account will be updated in SailPoint through a scheduled aggregation task. Then through a Scheduled Refresh Identity Cube task, it is checked that if that Last working day is equal to Today’s date. In other words, it is checked that if the Last working day has reached.
If the Last working day has reached, then the account disable process for Oracle Fusion application gets triggered.
As part of the Termination process, all the Roles which that account has, will be de-provisioned.
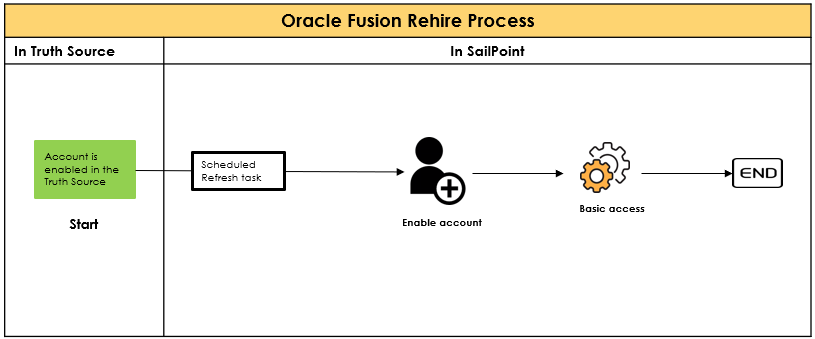
3. Rehire/Enable Account Process:
Rehire Process starts by enabling the account in Truth Source application. Then that is updated in SailPoint through a scheduled aggregation task.
Rehire/Enable Account Process
Then through a Scheduled Refresh Identity Cube task, the account enable process for Oracle Fusion application gets triggered.
As part of the Rehire/Enable account process, another new Assignment is created for that account with AssignmentName and AssignmentNumber appended with “R”. And Basic access will be assigned to that enabled account as we saw in the create account use case.
Advantages of Integrating Oracle Fusion with Sailpoint IdentityIQ:
In this integration, we have automated the creation of account in Oracle Fusion. Whereas before the integration, Oracle Fusion team had to create an account in Oracle Fusion manually for the new Joiners
In this integration, we have also automated the Disabling and Role Revoke operations. Actually, when the Last Working Date of the user has reached, then the Oracle Fusion account of this leaver will be disabled and Oracle Fusion Roles assigned to this leaver will Revoked, by Sailpoint. Whereas, before the integration, Oracle Fusion team had to disable the account and Revoked Roles in Oracle Fusion manually for the leavers.
In this Integration, we have also automated the update operation as well. From Sailpoint, we are updating the attributes such as LegalEmployerName, Department, Job, Grade, FirstName, LastName, DisplayName, etc. Whereas, before the integration, Oracle Fusion team had to handle these updates manually which will be a tedious task to do.
We have also automated the Rehire Process. When a user got rehired, then for that user, Oracle Fusion account will be enabled and a new work relationship will be created from Sailpoint.
When a user got Rehired, only the Basic access will be given, not the access that user had before Leaver process for that user initiated. The detailed discussion of Oracle Fusion introduction, Oracle Fusion TEST APIs, use cases and integration approach is discussed in the following video:
Now, let us a have a demo on integration of Oracle Fusion with SailPoint IdentityIQ in the following video:
Before going through the Integration of Genie with SailPoint IdentityIQ, let us understand what a ticket and a ticketing system is.
What is a ticket?
A Ticket is a special record that represents an incident, request or event that requires action from the IT department. It contains the necessary details of the incident, request or event.
A ticketing system is a software platform designed to manage and track customer support requests. It streamlines the process of resolving customer issues, making it easier for businesses to provide fast and effective support.
Benefits of embracing a ticketing system in your organization:
Control High Volume of Requests from a Centralized Place – Organizations can track and manage inbound support requests with the help of a good ticketing system. The solution can be used by executives to manage support cases more efficiently while still attending to all client issues.
Combine interactions into one thread – Your team can use ticketing system to combine customer-related conversations into a single thread when offering customer care to clients via a variety of channels.
Process automation and workload management – Ticketing systems provide several potentials for automation. As an illustration, the software gathers assistance requests from several sources before automating the creation of tickets. Regardless of the help channel clients select, tickets are automatically created whenever they submit requests.
Adequate team collaboration – Ticketing systems provide a platform to the customer service representatives to collaborate among themselves in assigning tickets to senior associates in terms of P0 escalations.
About Genie:
Genie is a ticketing tool, in which there are different types of tickets such as Work Order tickets, Incident tickets, etc. SailPoint handles creation of below tickets in Genie from SailPoint.
Onboarding ticket
Exit or Off-boarding ticket
Provision failure ticket
Among the above tickets, Onboarding and Off-boarding tickets are Work Order tickets and Provision failure ticket is an Incident ticket.
Integration with SailPoint IdentityIQ:
Genie is integrated with SailPoint using REST APIs.
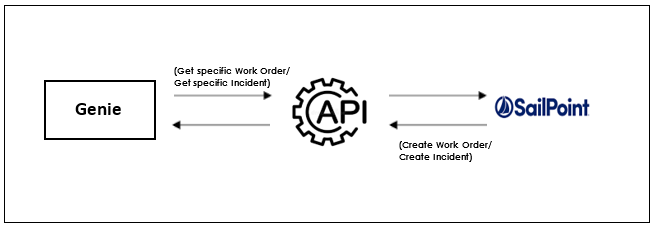
Below is the high-level architecture of Genie – SailPoint Integration
High level architecture
Now, let us have a look at the APIs used in the Integration process. Below is the list of APIs used for creating tickets and getting specific ticket details:
Generate Authentication key: We are using this API to generate an Authentication key. Here, the generated Authentication key expires for every few minutes.
Creating Work Order ticket: We are using this API to create a Work Order ticket in Genie.
Get specific Work Order ticket: We are using this API to Get a specific Work Order ticket details. In other words, it is used to Retrieve the Work Order ID of the submitted request.
Creating Incident ticket: We are using this API to create a Work Order ticket in Genie.
Get specific Incident ticket: We are using this API to Get a specific Incident ticket details. In other words, it is used to Retrieve the Incident number of the submitted request.
Prerequisites for integrating Genie with SailPoint:
Following are the prerequisites that are essential for integration of Genie with SailPoint IdentityIQ
Genie API details for creating tickets
Base URL and Authentication details of the APIs
Access to Genie Test Instance
Database table to store the ticket details
Connection details of the Database
Now, let us discuss the use cases involved in the integration process.
Use Cases
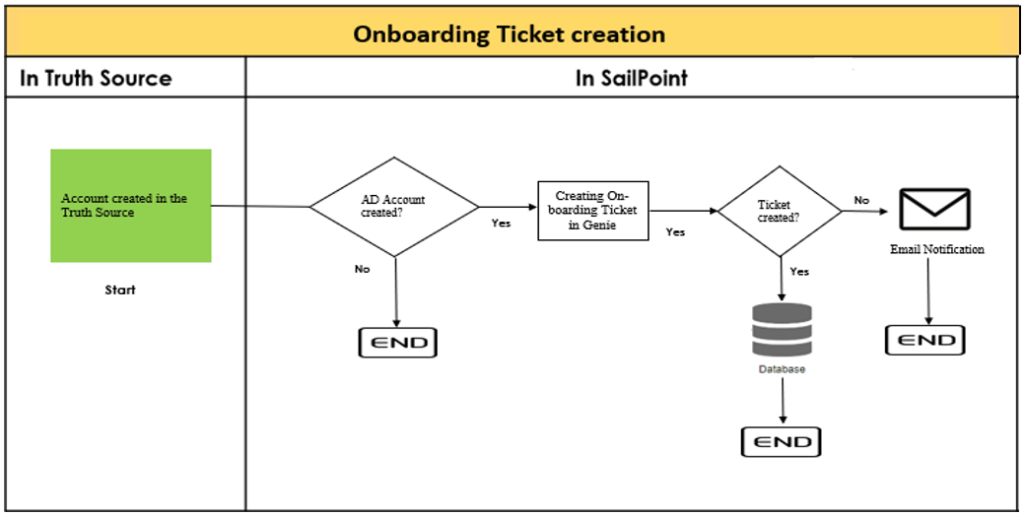
Onboarding Ticket Creation:
An Onboarding Work order ticket will be created in Genie from SailPoint when a new joiner joins the organization and his/her account is created in Truth Source and Active Directory applications.
The ticket contains details of the New Joiner such as Start Date, First Name, Last Name, Employee ID, Employment Type, AD ID, Domain ID, Contact Information, etc.
Onboarding ticket creation process
Success case:
Once the ticket gets created in Genie successfully, the details of the created ticket such as Work Order ID, Creation Date, Request ID and ticket summary will be added to the database table.
Failure case:
If the ticket creation fails for some reason, then an Email notification containing the New Joiner’s details, will be triggered to the respective stakeholders.
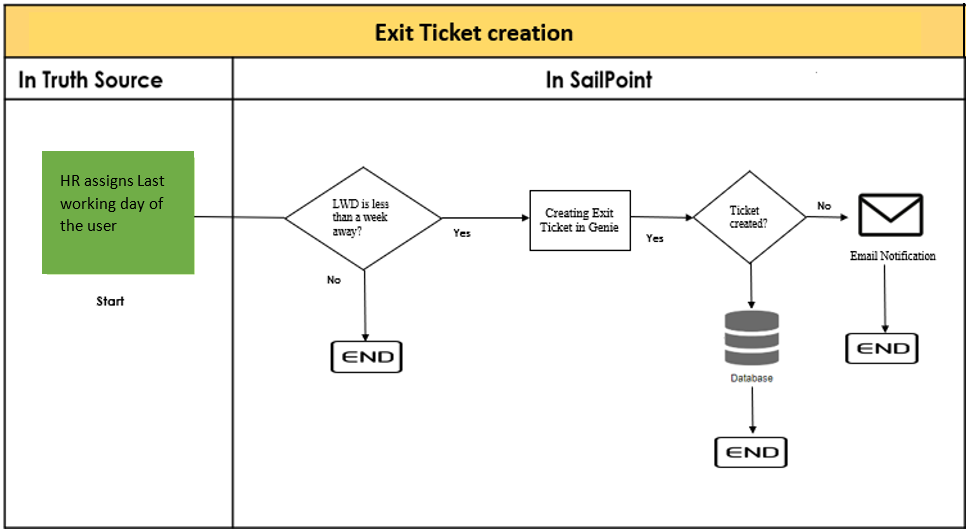
Exit or Off-boarding Ticket Creation
An Exit or Off-boarding Work order ticket will be created in Genie when HR assigns the Last working date of the user in Truth source and that Last working date is 7 days away from today’s date.
The ticket contains details of the End dated user such as Last Working Date, First Name, Last Name, Employee ID, Employment Type, AD ID, Domain ID, Contact Information, etc.
Exit ticket creation process
Success case: Once the ticket gets created in Genie successfully, the details of the created ticket such as Work Order ID, Creation Date, Request ID and ticket summary will be added to the database table. Failure case: If the ticket creation fails for some reason, then an Email notification with the End Dated user’s details, will be triggered to the respective stakeholders specifying.
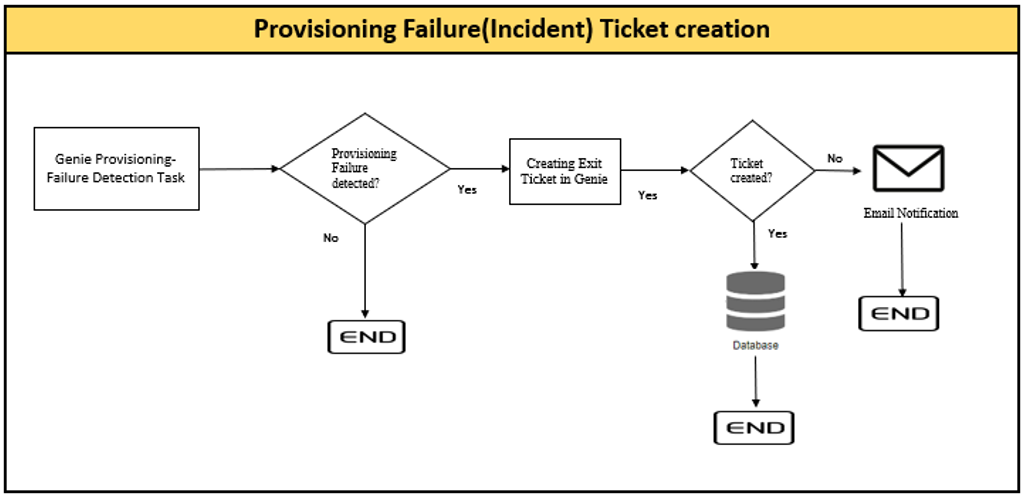
Provisioning Failure (Incident Ticket)
A Provisioning Failure (Incident) ticket per application will be created if the provisioning operations failed in SailPoint in last 24 hours. In this use case, applications under consideration are Active Directory, G-Suite and OpenLDAP and operations under consideration are Create, Enable, Disable and Delete.
For example, if the Disable operation failed in Active Directory for an account, then a ticket (which will be of Incident type) will be created in Genie containing the details such as Type of operation failed and Display Name, Employee ID, email, sAMAccountName, userPrincipalName, distinguishedName, etc details of the account.
Provisioning Failure ticket creation process
Success case:
Once the ticket gets created in Genie successfully, the details of the created ticket such as Incident Number, Creation Date, Request ID and ticket summary will be added to the database table.
Failure case:
If the ticket creation fails for some reason, then an Email notification will be triggered to the respective stakeholders specifying Type of operation failed, Application name in which Provisioning failed and Display Name, Employee ID, email, etc. details of the account.
Now, let us understand the advantages of integrating a ticketing system with SailPoint IdentityIQ when compared with a traditional ITSM.
Advantages of Integrating Genie with SailPoint IdentityIQ:
In this integration, we have automated the creation of onboarding tickets for New Joiners. Whereas in traditional ITSM’s, the ticket should be created manually by the end user.
While creating tickets in Genie, SailPoint uses the data coming from Truth Source which will be updated by the HR team. Whereas in traditional ITSM’s, there is every chance that end user does not give the mandatory details required by IT team to perform necessary action on that ticket or the end user mistakenly may also enter incorrect details. So, IT team might need to contact the HR team or the end user, which is a time-consuming process.
In this integration, we will be using the details of the user as per the Truth Source application while creating the ticket. So, the IT team may not wait for the communication from the concerned team.
Whereas in traditional ITSM’s, when the ticket is created, the IT team should get certain required details from the concerned team manually. The Exit ticket will be created automatically when the end-dated user is one week away from the Last Working date, which gives the IT team ample amount of time to take necessary actions such as collection of assets and disabling of access.
In this integration, we are storing the ticket details such as Work Order ID, Incident Number, Creation Date, Request ID and Summary in the database table for all the tickets created from SailPoint. So, we can use this table’s data for auditing purposes which ensures centralized governance.
The Incident tickets are created every day (one ticket per application) from SailPoint in Genie for applications such as Active Directory, G-Suite and OpenLDAP and for operations such as Create, Enable, Disable and Delete, if the provisioning fails in these applications. The point to be noted here is, if in an application, no provisioning operations failed for that day, then no ticket will be created for that application for the particular day. But, there is every chance that, one ticket per application will be created where each ticket contains the information of all the accounts for which Provisioning failed. Using SailPoint, this is one of the critical advantages of integrating genie with SailPoint IIQ. Whereas in traditional ITSM’s, this needs to be done manually, which will be a tedious task to do.
The detailed discussion of APIs, use cases and integration approach is discussed in the following video:
Now, let us a have a demo on integration of Genie with SailPoint IdentityIQ in the following video:
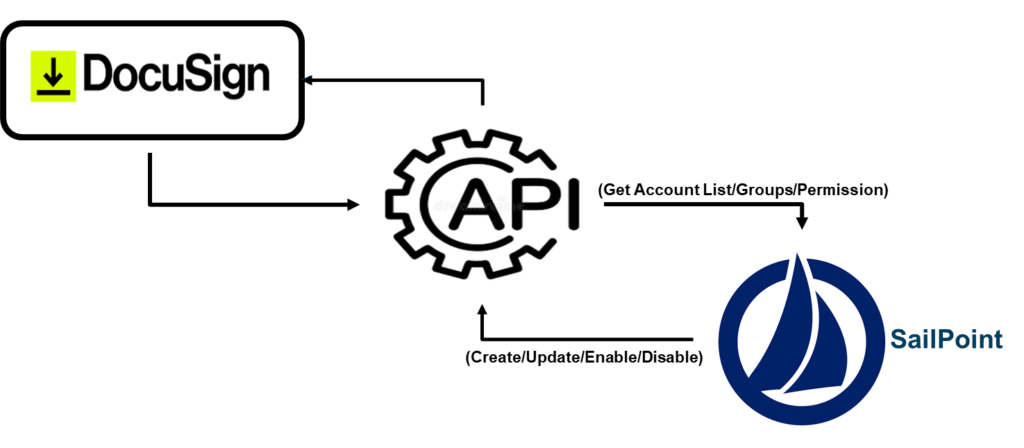
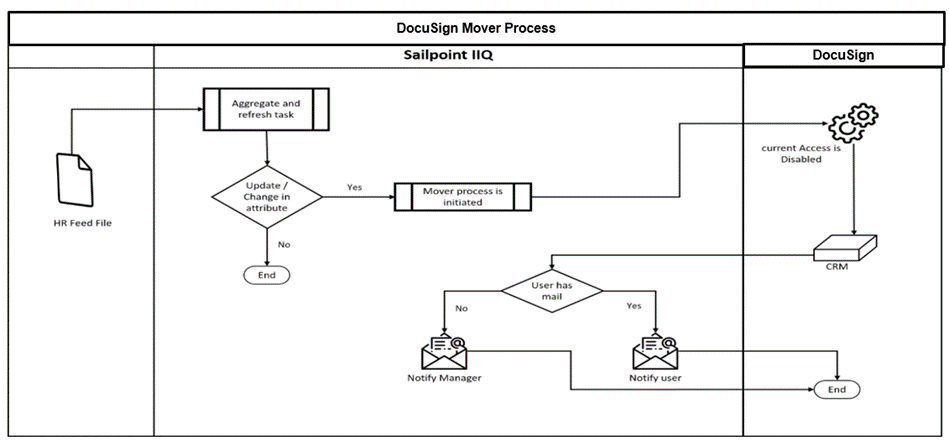
The DocuSign electronic signature app provides users a simplified way to digitally sign and return documents from anywhere in the world.
describes the Integration for the DocuSign Application of SailPoint IdentityIQ (IIQ) solution implementation.
SailPoint webservice connector is application type used to connect from SailPoint to DocuSign application. for creating account, update account, Activate and deactivate account.
Details Required for DocuSign integrate with SailPoint
Need to get the DocuSign API details for the different operation.
Base URL will be different for different environment.
secret key and client ID for the token generation.
The following operation will be performed by IIQ –
Create, Update, Enable, Disable, Account Aggregation, Group Aggregation
Created Account operation: This use case will be used to create the account for the different user with adding the groups, permission, and different details required for the account creation.
Update Account operation : If the existing user need to update the details , where the details can be updated in the form which is provided in the SailPoint.
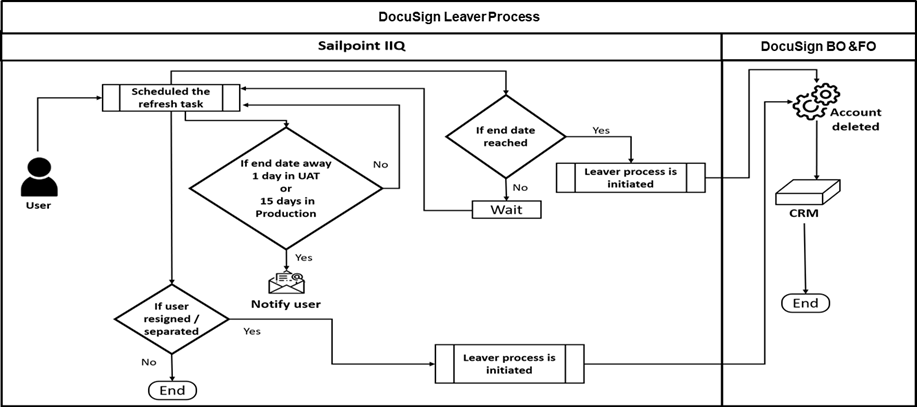
Leaver Process : As the user will be left the company or the department, then the user will be disabled or deleted automatically by the leaver process.
Mover Process : Once the user is transferred from the one department to other department or to the position is changed of the user then the mover process will be triggered.
Rehire Process: Once the user is re-hired in the organization then the re-hire process will be triggered.
A plugin is a tiny piece of software that extends the functionality of an Application or Computer program.
The IdentityIq Plugin Framework is an protract framework model for IdentityIQ.It allows third parties to develop affluent application and service-level amplification to the core SailPoint IdentityIQ. It enables plugins to extend the excellence in user interface, deliver custom REST endpoints, and to deliver conventional background services.
In the following presentation, I will be providing a brief introduction of IdentityIQ Plugins:
Plugin Versioning Requirements
Plugin version numbers must be numeric, denote the parts of the version number with decimal points, and not contain any alphabetic or other characters in order to better facilitate upgrading plugins. Leading zeroes will be removed from each segment of the version number, and the values between the decimal points are converted to integers.
For example: 06 and 00006 are both interpreted as 6 A segment containing any non-numeric values is interpreted as 0 7.009.alpha is parsed as 7.9.0 5.7.8a is parsed as 5.7.0
Plugin Object Model
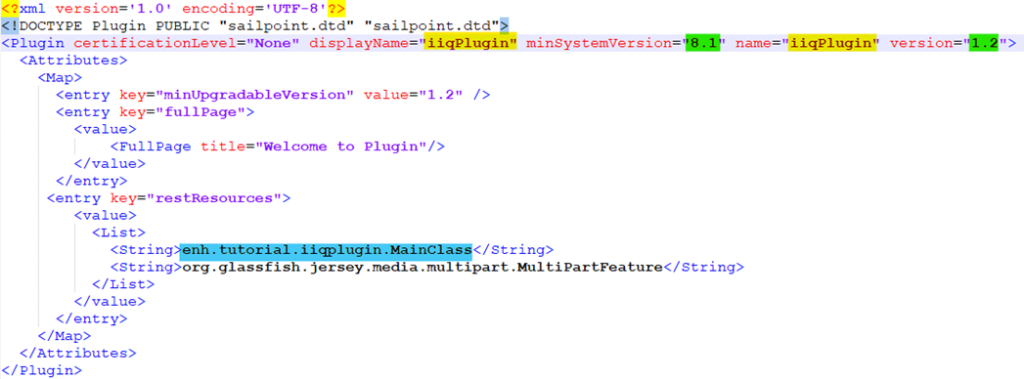
The Plugin XML object, which specifies the plugin’s constant, describes a plugin in IdentityIQ. REST resources, Snippets, and settings are a few examples of features. The manifest.xml file contains the definition of the Plugin object. This file is necessary for plugin.
The XML object known as the Plugin Object defines the plugin’s feature. By binding them as attributes of a Plugin Object, this object informs IdentityIQ about the facets that are present in your plugin. You can also specify information about the plugin in the Plugin Object, such its name, the privileges needed to use it, its version, snippets, and REST resources. Use the advanced plugin settings to define a form or to refer to a specific plugin configuration file for more complicated plugins that need support for several field types and more dynamic behavior, such as drop-down lists or password fields. Depending on past selections, dynamic behavior can involve showing or hiding other fields.
For Example: In contrast to when the user picks basic authentication, it could be more acceptable to display an access token field when the user selects o-auth authentication.
Plugin Settings
Attributes that can be changed during installation are known as plugin settings. To view the configuration options page, click Configure. Forms are used to display the settings. The form is generated automatically if the plugin does not use its advanced options. On the plugin settings page, the settings from the manifest file are shown in alphabetical order. A single setting on a plugin’s configuration settings page can be represented by the Plugin setting object. On the settings page, each object serves to represent a single customizable setting.
IdentityIQ stores the .zip archive file of the Plugin in the IdentityIQ database in the spt_file_bucket table. The data in the spt_file_bucket table is a referenced ID to an entry in the spt_persisted_file table.
After establishment or amid an application server restart, plugins are stacked from this.zip file. All consequence files are taken from the.zip file and cached for ensuing utilization. The cached files can be gotten to using a assortment of accessor ways, but they can moreover be retrieved by utilizing
the URL prefix /identityiq/plugin/pluginName taken after by the way indicated within the construct structure. The PluginClassLoader lesson is utilized to stack and cache compiled Java classes from the.zip file.
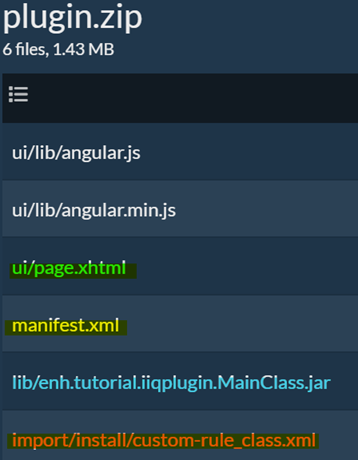
Example Plugin Directory Structure:
Bulk User Creation Plugin
This is a custom plugin built by ENH iSecure for creating Identities through SailPoint IdentityIQ and Provision the following identities to the requested Applications in IdentityIQ
A User like a manger level will have a Privilege to request for Bulk User Creation, once a .csv file is Uploaded in UI page by the following user and if the users request gets Approved a bulk number of identities will be created in Sailpoint IdentityIQ and the following identities provisioning takes place on the identities joining dates for the Requested Applications and following Email notification follows with respective action steps.
In the following video, I will be providing a detailed demo on IdentityIQ custom Plugin (Bulk User Creation)
Nowadays, almost every website requires some form of authentication to access its features and content. With the number of websites and services rising, a centralized login system has become a necessity. Single sign-on (SSO) is an authentication process that allows a user to access multiple applications with one set of login credentials. PingIdentity’s PingFederate allows the SSO for the enterprises which have the multiple applications and API’s to protect.
PingFederate is the leading enterprise federation server for user authentication and standards-based single sign-on (SSO) for employee, partner and customer identity types.
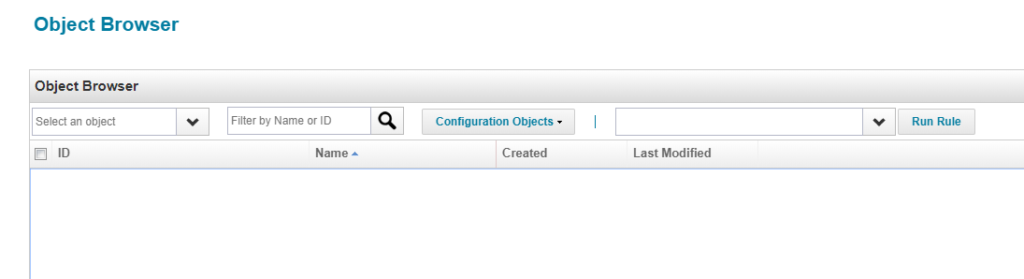
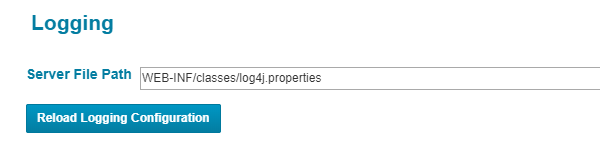
Usually this kind of refresh is performed through UI from the debug pages in IdentityIQ. Following are the steps to follow for refreshing log4j configurations through UI.
log4j configurations whenever there are any changes have to refreshed across all the servers present in the environment. However, when a load balancer is configured, we might not have control to access individual servers through UI, thus making the refresh of log4j configurations through UI on each server.
Possible solutions:
There are 3 possible solutions for this problem.
Temporarily re-directing load-balancer traffic to only one server and refresh the configurations on the same through debug pages. This process has to be repeated across all the servers.