Service Now Queue User Administration via SailPoint Identity IQ

The SailPoint ServiceNow Connector manages ServiceNow accounts, groups, and roles. It supports provisioning and aggregation for ServiceNow accounts and groups.

ServiceNow Connector supports configuration of multiple applications of different ServiceNow versions on same IdentityIQ. ServiceNow Rest API supports Basic and OAuth2 methods of authentication.

Under IT Service Management, Its Queue management and administration is based on roles and services assigned to a user.

SailPoint Service Catalog Integration: The integration between SailPoint and ServiceNow allows users of both systems to easily navigate from ServiceNow into IdentityIQ.

In the following presentation, ServiceNow Queue Administration using Sailpoint IdentityIQ is explained and overview of SailPoint Service Catalog Integration using MID Server.

This following demo is based on ServiceNow Queue User Administration using Sailpoint IdentityIQ with all the approval modes (serial, parallel, serialpoll, parallelpoll and any).

SOAP Error : Message request Authorization (SailPoint ServiceNow Service Integration )

Environment:

Java: jdk1.8

ServiceNow : Istanbul

SailPoint IdentityIQ version 7.1, 7.2

Problem Statement: 

javax.xml.soap.SOAPException: Message send failed: org.apache.axis2.saaj.SOAPMessageImpl cannot be cast to oracle.j2ee.ws.saaj.soap.MessageImpl===== reqeust ========Authorization:Basic

at oracle.j2ee.ws.saaj.client.p2p.HttpSOAPConnection.post2(HttpSOAPConnection.java:691)

at oracle.j2ee.ws.saaj.client.p2p.HttpSOAPConnection.post2(HttpSOAPConnection.java:691)

at oracle.j2ee.ws.saaj.client.p2p.HttpSOAPConnection$PrivilegedPost.run(HttpSOAPConnection.java:1502)

at java.security.AccessController.doPrivileged(Native Method)


Solution:

In the above error message it is clearly mention that it is an authorization error related with user privileged account.

Ensure that the following pre-requisites to be performed:

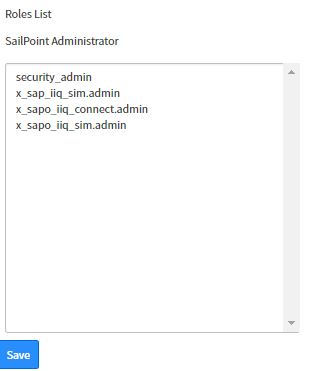
  • Create a ServiceNow Service Integration Module Administrator (ServiceNow user) for integration purpose with SailPoint and assign following roles.

SailPoint Administrator Role List in ServiceNow

Elevate Roles to security admin in ServiceNow for the user.

  • Use the same Integration Administrator in Application configuration of ServiceNow in SailPoint.
  • Use the same Integration Administrator credential in IntegrationConfig : ServiceNowServiceIntegrationModule.


Resolved : Manage Account Request Problem in SailPoint IIQ

Environment:

SailPoint Version : 7.0, 7.1

Problem Statement:

Unable to request a new account for existing identity from Manage Accounts in SailPoint IIQ.

Problem : Account Request Option is not available


Solution :

Firstly we need to check the Lifecycle Manager Configurations, navigate to Lifecycle Manager and in Configure tab Search for Manage Accounts options :

Applications that support account only requests : Select all applications check box or specified application according to your requirement.

Solution part 1- Select all applications


Allow Manage Accounts Additional Account Requests : Enable
Allow Manage Existing Accounts : Enable
Allow Account Only Requests : Enable

–> If you are using higher version of SailPoint 6.4 then you will face problem in finding these 3 options to enable them.

Solution 1 :

For that you need to edit init-lcm.xml and import it again in iiq console. (This will effect pre-existing workflows and LCM Configuration. So, to avoid that follow Solution 2).

Follow these steps and pictures shown below for editing init-lcm.xml (Solution 1)

 Step 1: init-lcm.xml is present in ~identityIQ/WEB-INF/config/init-lcm.xml location. Make a copy of it and place it in a safe folder.


Now open init.xml and search for Manage Accounts under QuickLink tag.

In init.xml search Manage Account


Carefully observe 3 entries under Manage Accounts tag.
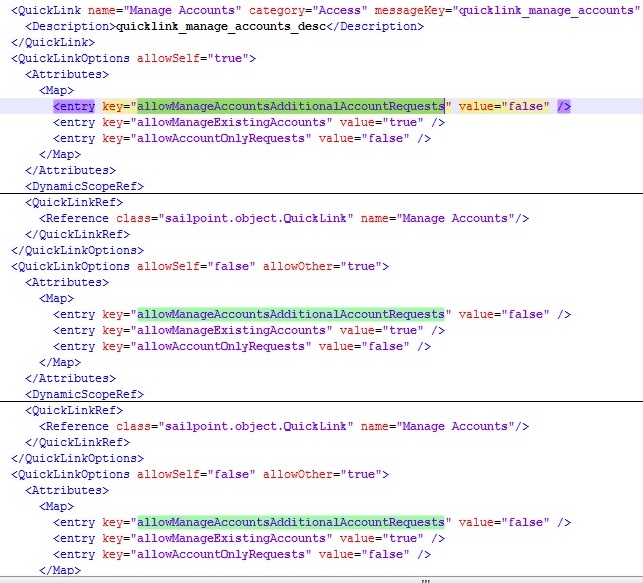
Original_init-lcm.xml of SailPoint 7.1 version


Step 2: Make few changes by enabling this options manually from false to true 3 times in Quicklink Manage Accounts tag as shown in the picture below.

<entry key=”allowManageAccountsAdditionalAccountRequests” value=”false” />
<entry key=”allowManageExistingAccounts” value=”true” />
<entry key=”allowAccountOnlyRequests” value=”false” />

After editing : <entry key=”allowManageAccountsAdditionalAccountRequests” value=”true” />
<entry key=”allowManageExistingAccounts” value=”true” />
<entry key=”allowAccountOnlyRequests” value=”true” />
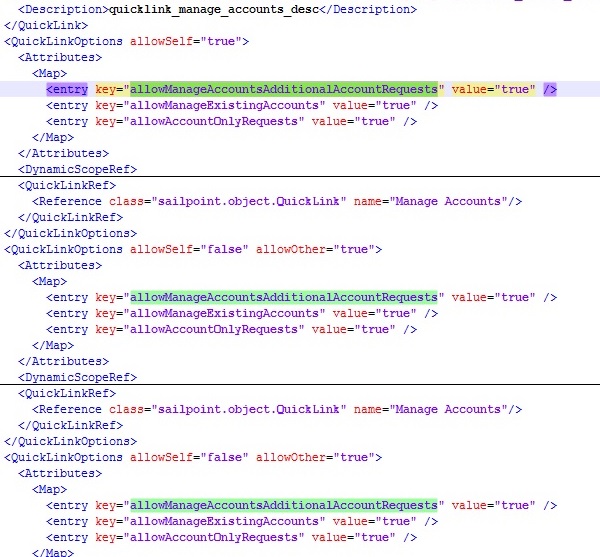
 

After Editing Manage Accounts Configuration


Step 3: Now save it and import it in iiq console. By using command import init-lcm.xml. After importing observe following changes.

Step 4: Request Account option is available (Issue Resolved). Choose the application for account request. Submit the form.
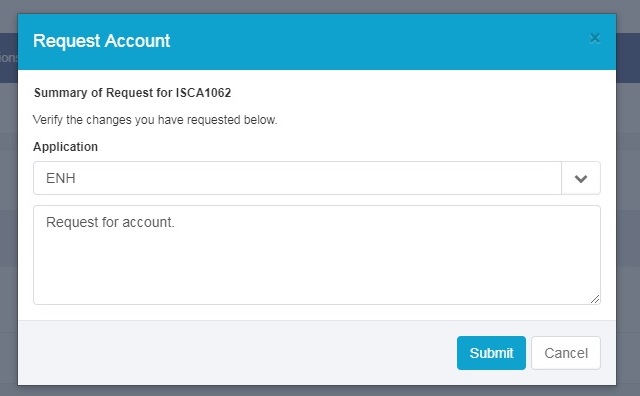
 

Request Option Available Now 7.1

> Just for Reference in SailPoint 7.0  it will look like this as shown in the picture below.
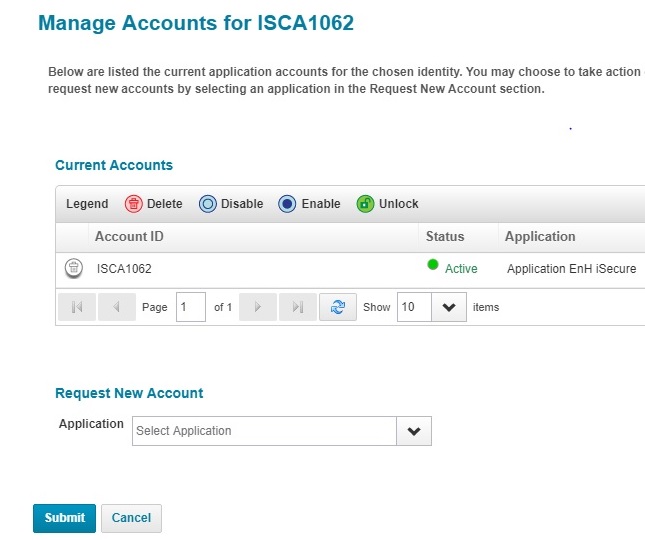
Request Option Available in SailPoint 7.0


Step 5: Confirm Account Action . Click Confirm at the end of the page.
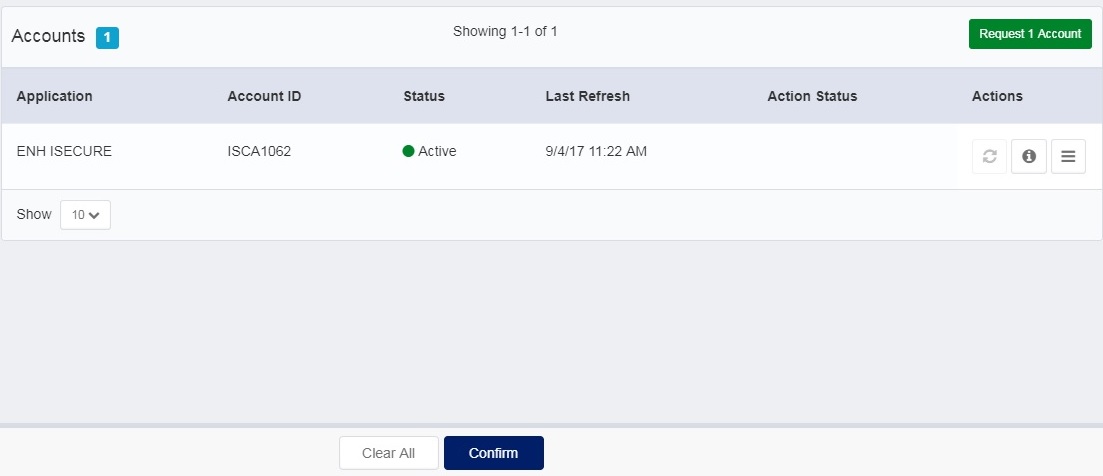
Confirm Account Request


Solution 2 :

You can get same results by configuring through Debug Pages.

Step 1: Go to Debug Page > Select object QuickLink from dropdown listChoose Manage Accounts.

Step 2: Follow same Step 2 in Solution 1.

Step 3: Request Account option is available (Issue Resolved).
 

SailPoint IdentityIQ’s ER Relationship Model

Traditionally, all developers deciphered a product, by understanding the Entity Relationship model of the product’s database schema. This approach was the quick and easiest way to understand any product.


A similar approach is tried in deciphering SailPoint IdentityIQ, an Identity Governance solution from Sailpoint. The presentation envisages to give the audience a thorough understanding of the product, not from the API perspective, but from a database model perspective.


Sailpoint’s Identity IQ has some key objects like Identity, Application, Bundle etc. There are many dependent objects. Most of the key objects are covered comprehensively in the presentation.