Enabling Oracle Linux to listen for requests over the network

Oracle Linux has a default firewall in the name of package “iptables“. This firewall is enabled by default when installed .Without disabling or modifying it we could not access most of the  services provided by the Linux. For example, you may not be able to access your database and tomcat over the network.

We can disable the firewall by following the below procedure :

Firstly we need to install the iptables-services package by using following command –

sudo yum install iptables-services

Next disable the firewall by using following commands:

sudo service iptables start

sudo service iptables stop 

sudo chkconfig iptables off

To punch or block specific ports and for more information , refer to the following link.

Oracle Database Installation – Circumventing the requirement for pdksh package


Oracle Database 11G R2 has many packages as dependencies. Amongst such packages is pdksh packages which is no longer a part of yum repositories. The pdksh is not  needed as long as your ksh package is installed. Oracle Linux has ksh installed by default. Trying to install the pdksh using rpm could cause a conflict between these packages.

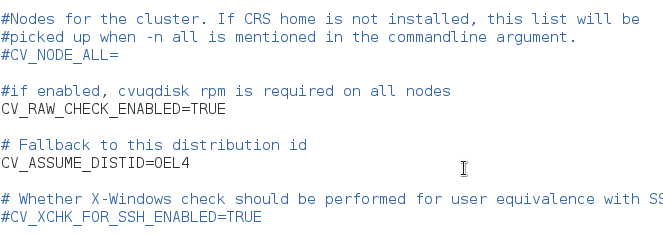
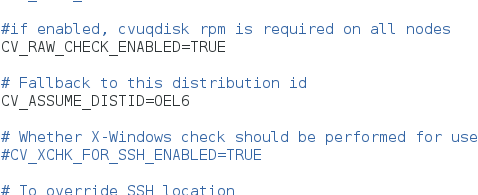
Problems with pdksh could be easily resolved by modifying the configuration of the verification utility of the oracle database. By default, this utility assumes that the Linux distribution being used is OEL4. All the dependencies were verified considering the OEL4. Changing the value of Linux distribution being used could solve the problem with pdksh. If you are using OEL 6, change the value of Linux distribution OEL6. Similarly if you are using OEL 7 , change the value of Linux distribution to OEL7.


Following are the exact instructions regarding the procedure.


Let   <db_extract>      be the location of your database extract.

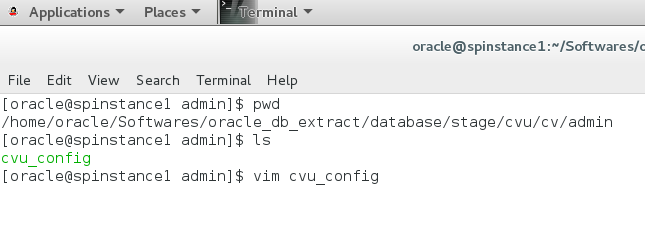
cd   <db_extract>/database/stage/cvu/admin/

vim cvu_config

The following screenshots guide you regarding the same:


  1. Navigating to the required directory
    PDKSHNEW1
  2. Default cvu_config

PDKSHNEW2

3.Modified cvu_config

PDKSHNEW3

You should be finding a property named CVU_ASSUME_DISTID whose default value is OEL4

If you are using OEL6 change it to OEL6. If you are using OEL7 change it to OEL7.

Restart the configuration utility and you should not be finding the requirement for pdksh anymore.

Solving the problem with ‘&’ character while importing files into IdentityIQ

Sailpoint’s IdentityIQ uses xml files for importing various objects like applications, rules. If you have a script that uses a ‘logical and’ (&)  in your code , normally the import fails. This is because of the way in which normal xml files are read. This is one of the special characters.

To solve the problem replace all the ‘logical and’s which are represented by the character ‘&’ to ‘&amp;’. This would make your import successful.

Kindly observe the following screenshot for reference:

ampersand in xml

Find related information at this link.

IdentityIQ Migration from MySQL to Oracle database

Sailpoint’s IdentityIQ migration from Oracle Database to MySQL could probably cause a problem with  work items, event logs, identity requests. Creation of work items, event logs, identity requests fail with the following error :

“unable to find the sequence”

The problem was caused because of migration to the Oracle database. Sailpoint’s IdentityIQ sql script for MySQL in IdentityIQ creates these sequences as tables and the same is translated into the Oracle database.

Here is how you solve the problem:-

IdentityIQ has 3 sequences in all.

  1. identityiq.spt_syslog_event_sequence.
  2. identityiq.spt_identity_request_sequence.
  3. identityiq.spt_work_item_sequence.

We can find the current values of these sequences by the following  queries on your new Oracle Database:

select * from spt_syslog_event_sequence

select * from spt_identity_request_sequence

select * from spt_work_item_sequence

Drop all these tables by the following queries:

drop table spt_syslog_event_sequence;

drop table spt_identity_request_sequence;

drop table spt_work_item_sequence;

Create the required sequences by the following queries:

create sequence identityiq.spt_syslog_event_sequence start with <current_sequence_value> increment by 1 nocache;

create sequence identityiq.spt_identity_request_sequence start with <current_sequence_value> increment by 1 nocache;

create sequence identityiq.spt_work_item_sequence start with <current_sequence_value> increment by 1 nocache;

Now that we have the sequences in place , creation of event logs,  work items, identity requests will be working fine.
Enabling group attributes with Delimited Files in IdentityIQ

It is very usual that delimited file applications can contain groups. Along with specifying group schema in configuration , we need to specify the group attribute i.e., the attribute which speaks about the membership of an account in a group.

In Sailpoint’s IdentityIQ 6.2 and previous versions, we have a GUI facility to mark such group attribute. From Sailpoint’s IdentityIQ 6.4, there is no such GUI facility to mark group attribute. This can be modified by modifying the definition in debug pages of IdentityIQ.

Here is how you mark group attribute:

  1.  Open the debugpages which are available at <iiqhostname>/debug
  2. Select Application as object Type and open the xml representing your application
  3. Go to the tag that defines schemas and then to the specific schema that represents your application accounts.
  4. Find the AttributeDefinition tag that represents your group attribute.
  5. Add the following attribute to that tag.

schemaObjectType=”group”

Please find the following screenshot for reference :-

schemaobjecttype

Run required aggregations to see that your group structure is intact.